Generate user journey
After setting up the traffic agent, TrueTest collects and models user journeys that will in turn enable the generation of relevant flows.
TrueTest uses the MutationObserver API and Javascript Listener to track user interactions on the AUT, such as clicks, inputs, and selections by monitoring changes to the DOM and attaching a listener to DOM elements. The technology combination allows TrueTest to collect detailed data on user behavior. TrueTest then uses the data to generate user journey maps in your AUT.
- TestOps Legacy
- TestOps
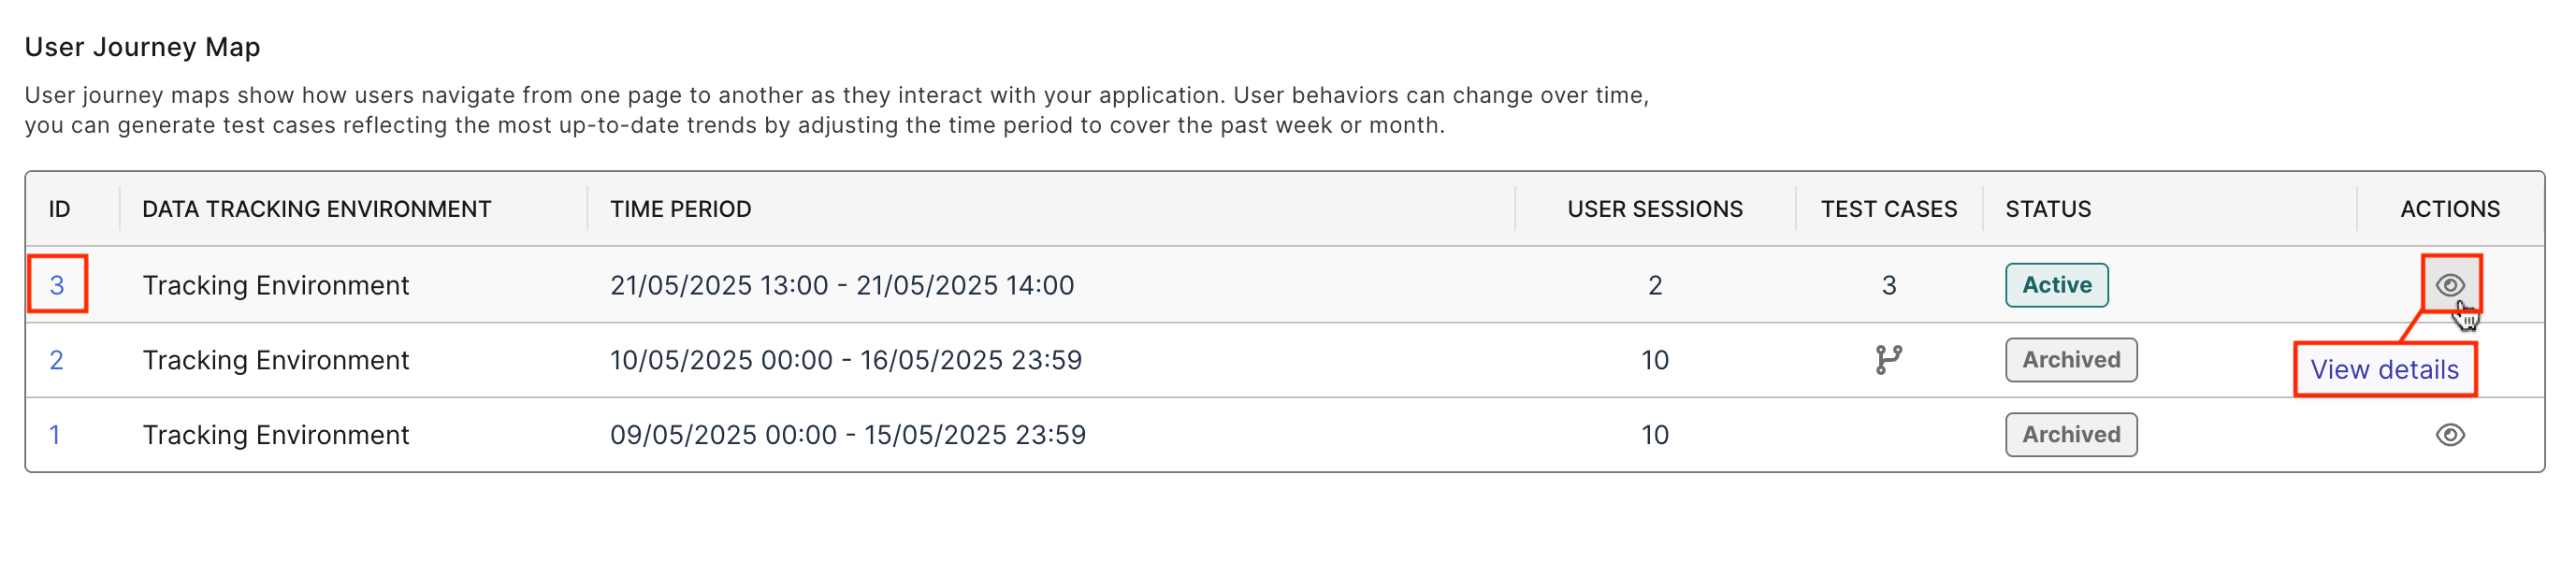
To view the list of application domains with generated user journey map, on the TestOps navigation bar, click TrueTest.
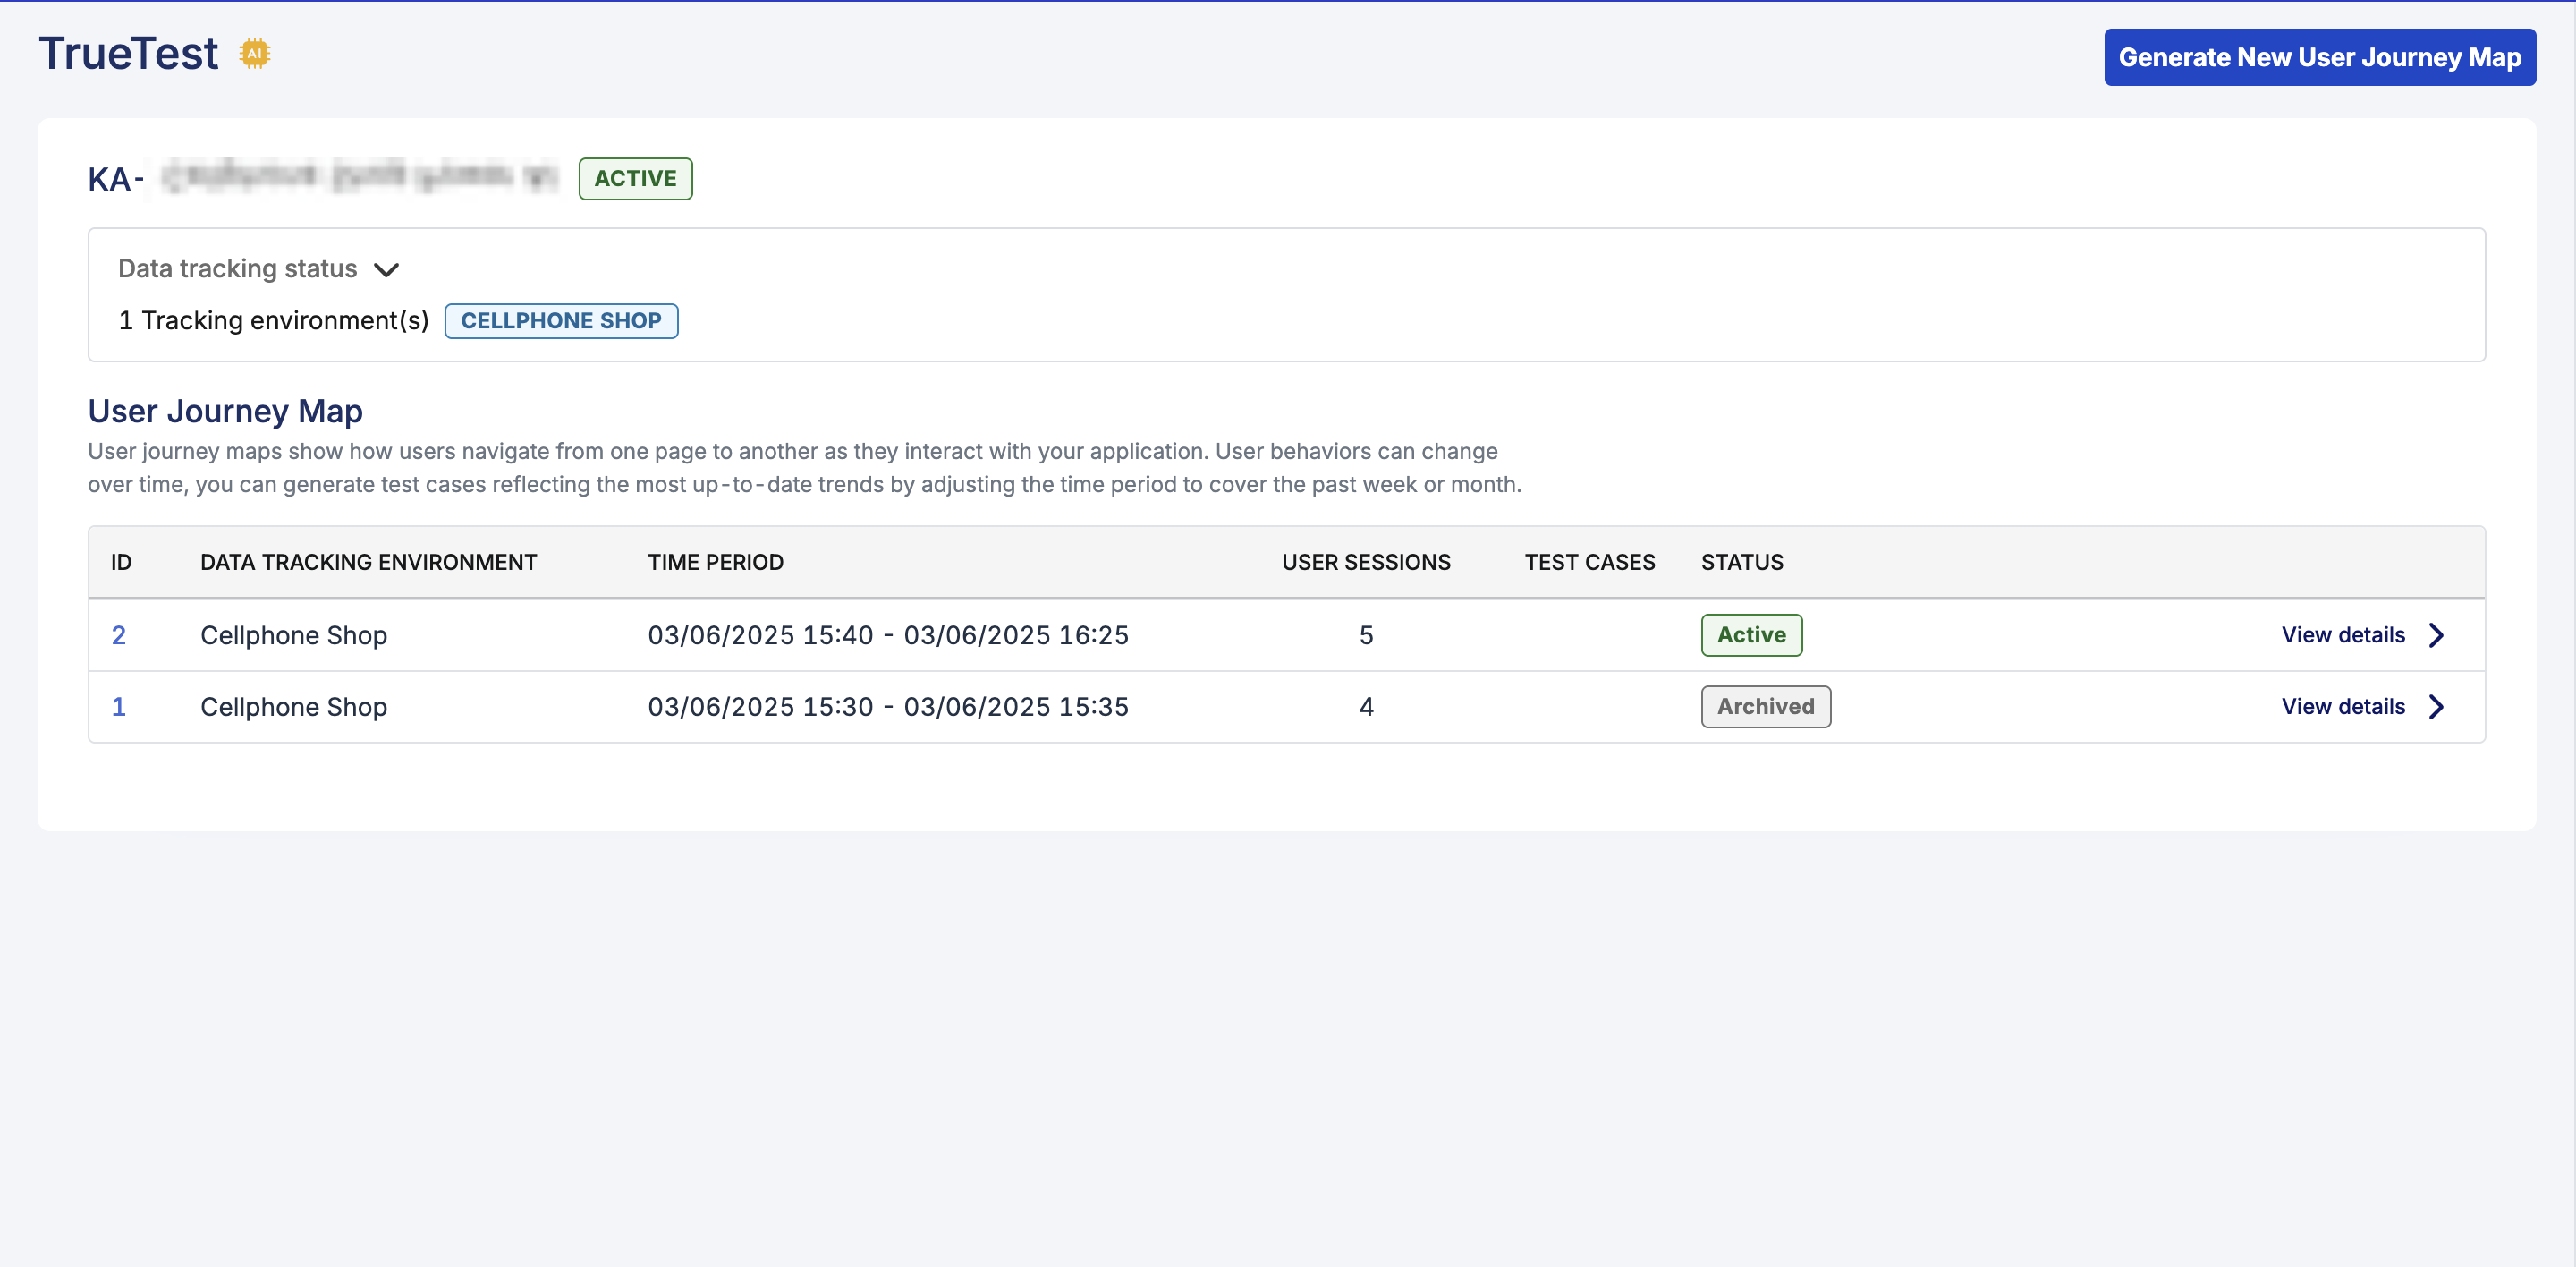
You can click the ID of a map or View details to access its detail page. The detail page includes user flows. See: View user journey map.
- AI features are enabled for your Organization. See Configure AI services.
- Make sure the Account Admin/System Admin has configured TrueTest Agent to track data on your AUT. If not, follow this guide: Configure TrueTest Agent.
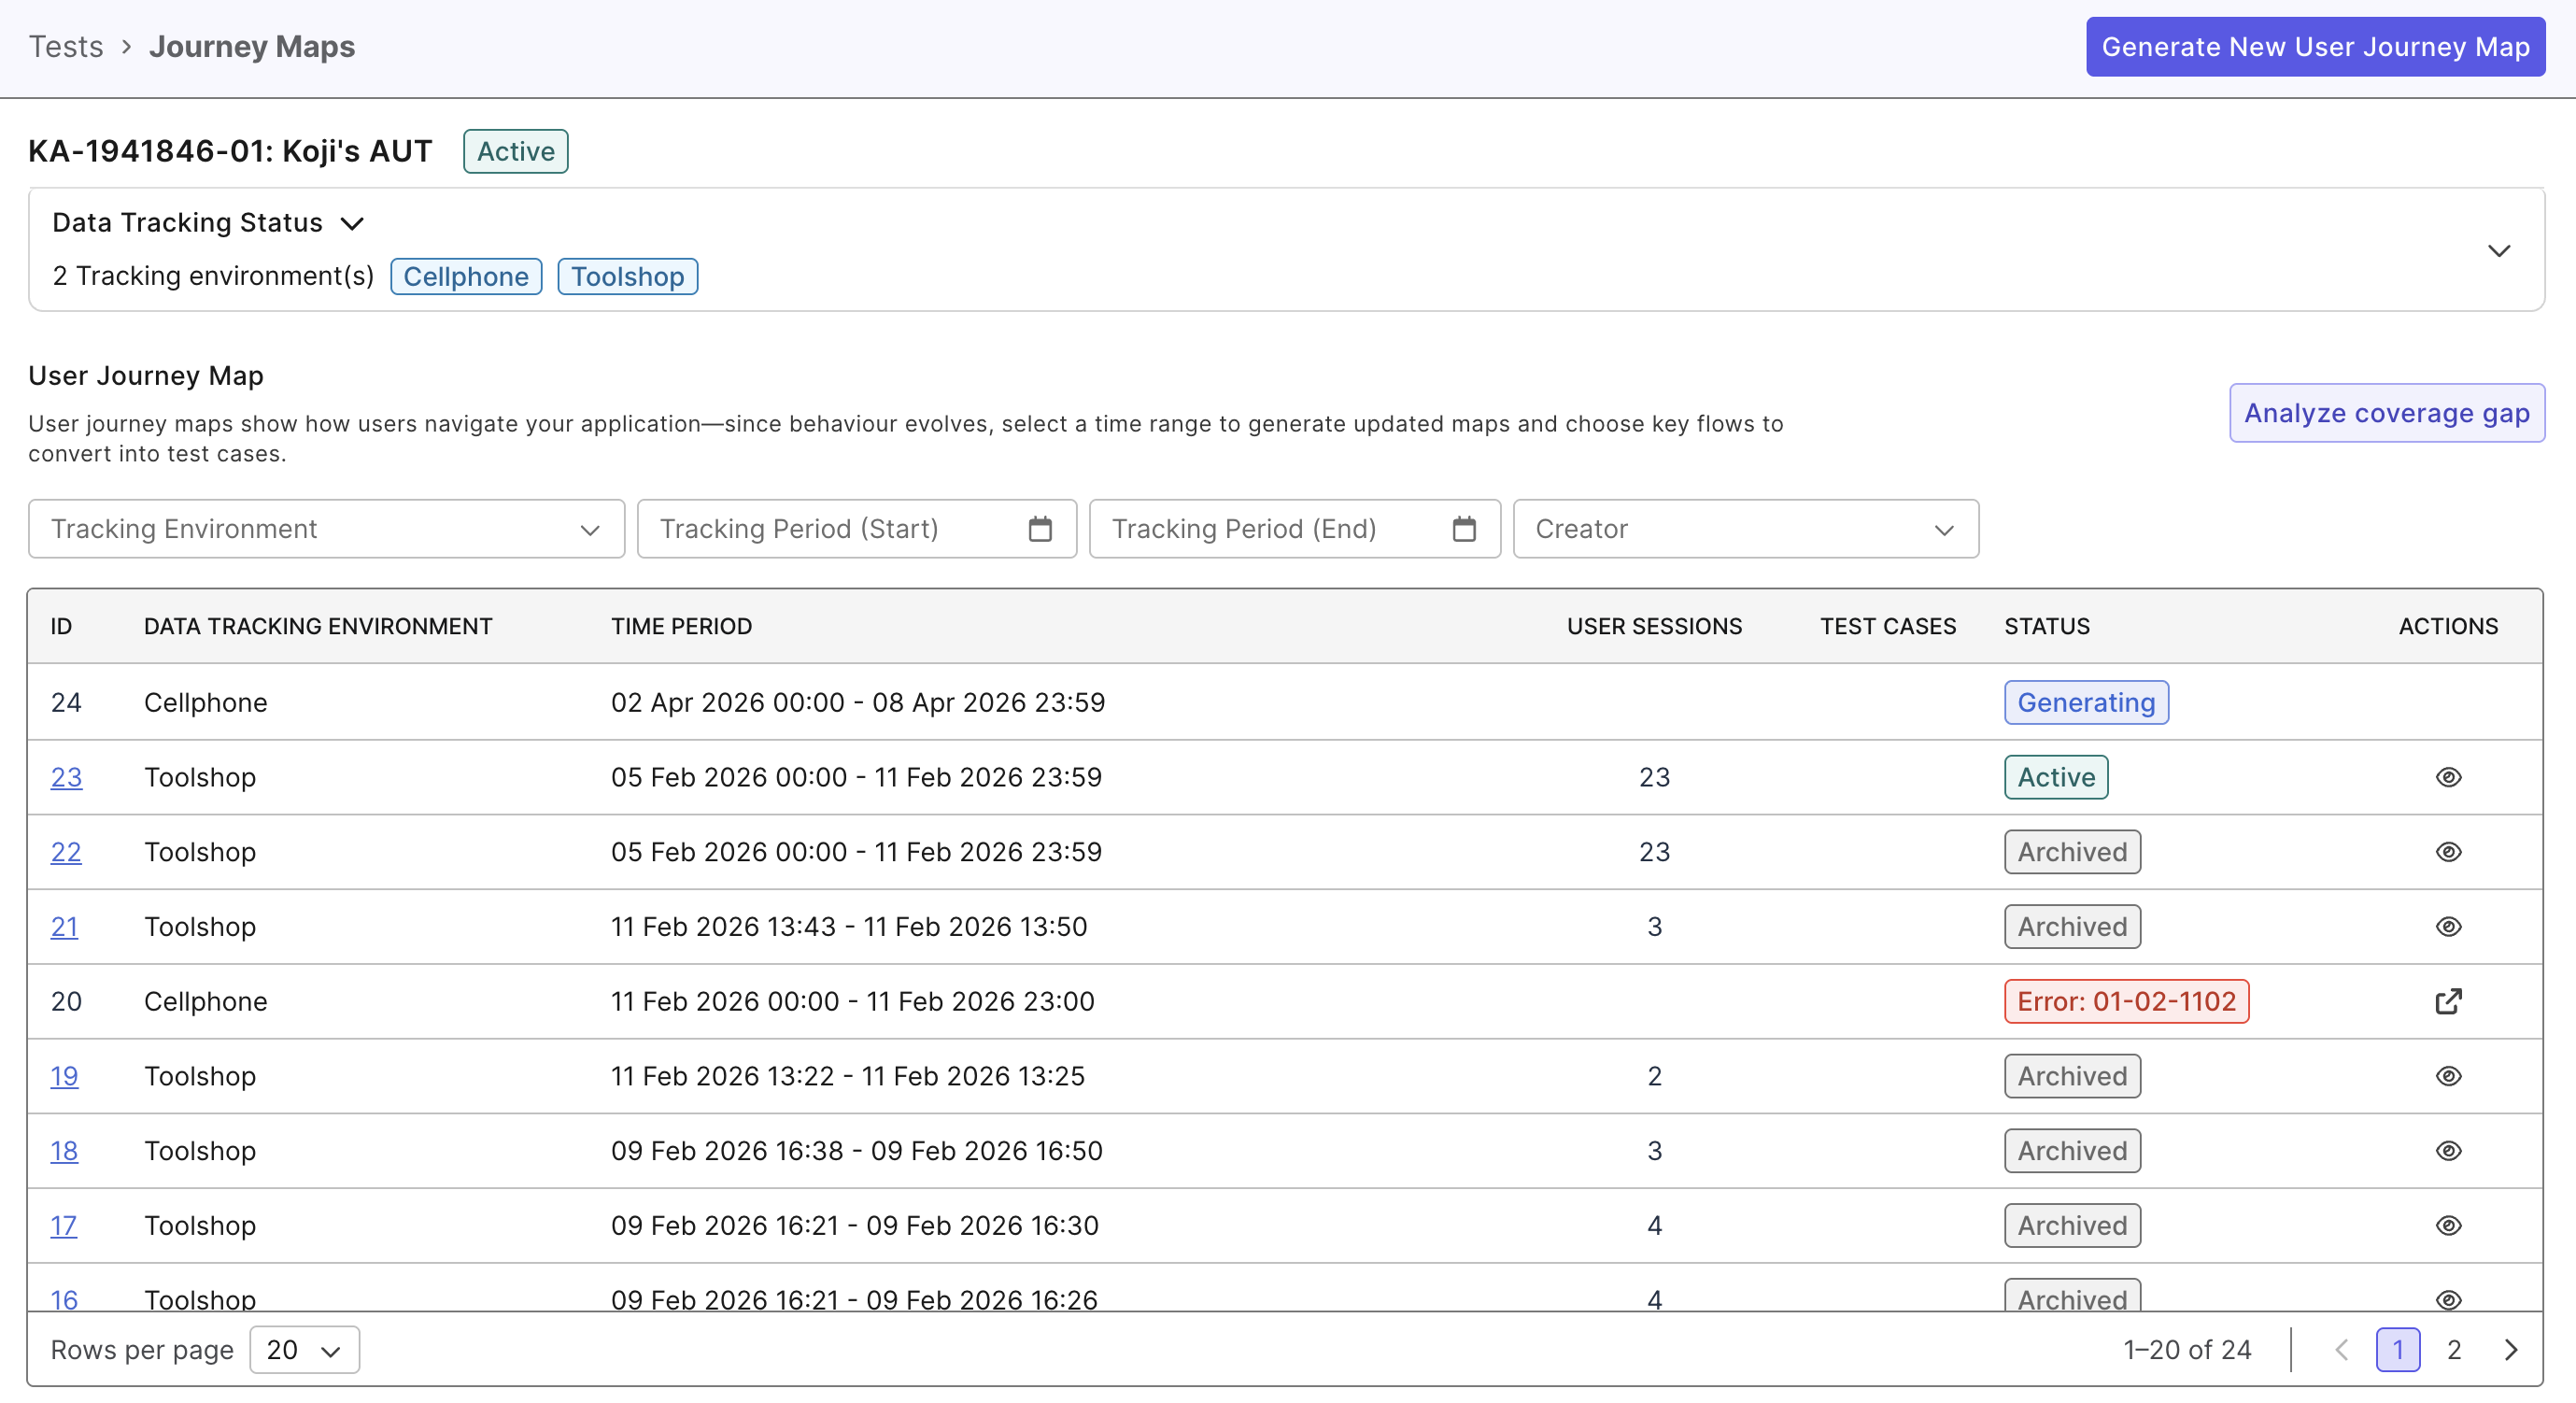
To view the list of application domains with generated user journey map: From the sidebar, go to Test > Journey Maps.
Generate new user journey map
You can generate a new user journey map with different time frame.
- TestOps Legacy
- TestOps
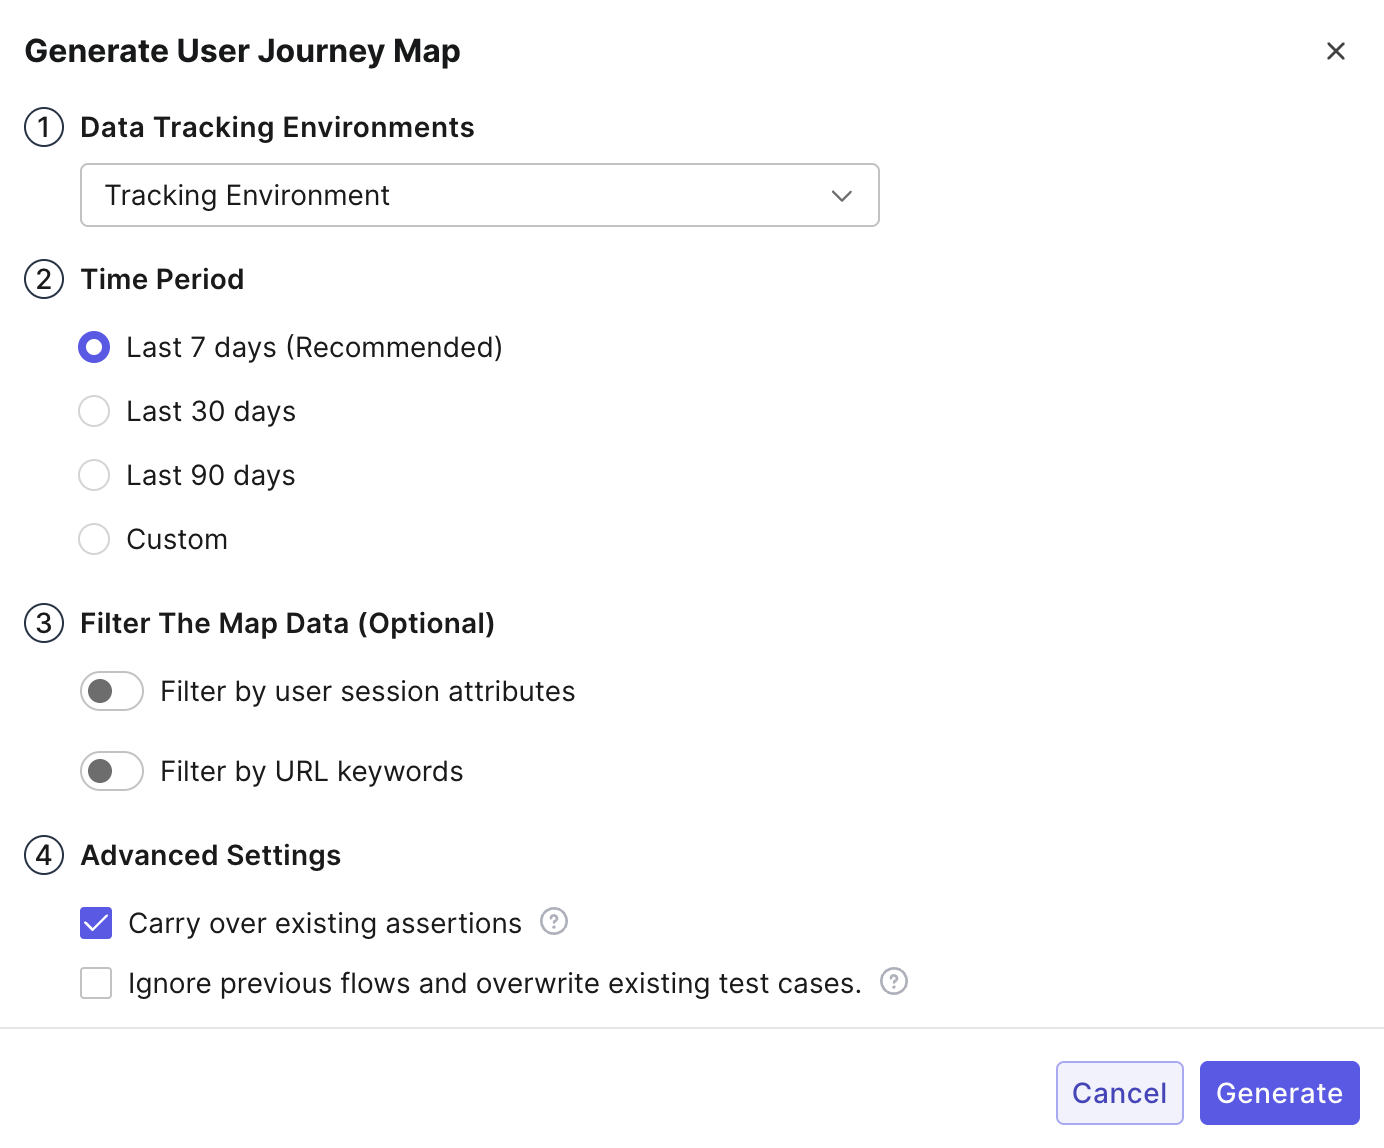
On the User Journeys page, click Generate New User Journey Map > select data tracking environment and set time period.
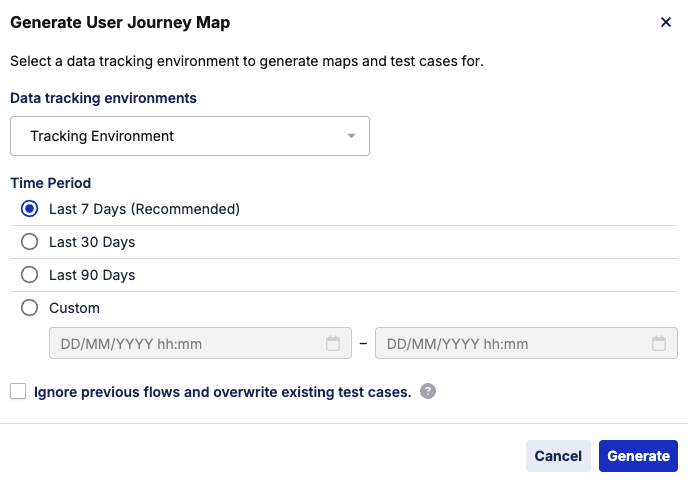
On the User Journeys page, click Generate New User Journey Map and select a time period, or customize your preferred time period.
Filter map data
The filter options allow you to generate specific flows that focus on functional areas.
- Filter by user session attributes: Filter sessions using a text-based query, e.g.
userRole,flow. - Filter by URL keywords: Filter sessions based on the URL patterns, e.g. "checkout", "product-details".
Advanced settings
-
Carry over existing assertions: Enabled by default. When this option is enabled, TrueTest can reuse assertions from previous maps. Assertions are carried over when:
- They are marked Apply to similar flows. Learn more in Add assertion to test steps.
- The matching flow does not already have a test case.
-
Ignore previous flows and overwrite existing test cases: When this option is selected, all new flows are generated independently of the previous map, and the list will display New flows only. When not selected, TrueTest will compare all new flows from the new map with the previous map to determine the Flow Status.
The user account that triggers a map generation will receive a notification email when it is finished.
View user journey map
From the map list on the User Journeys page, you can click the ID of a map or View details to access its detail page.
- TestOps Legacy
- TestOps

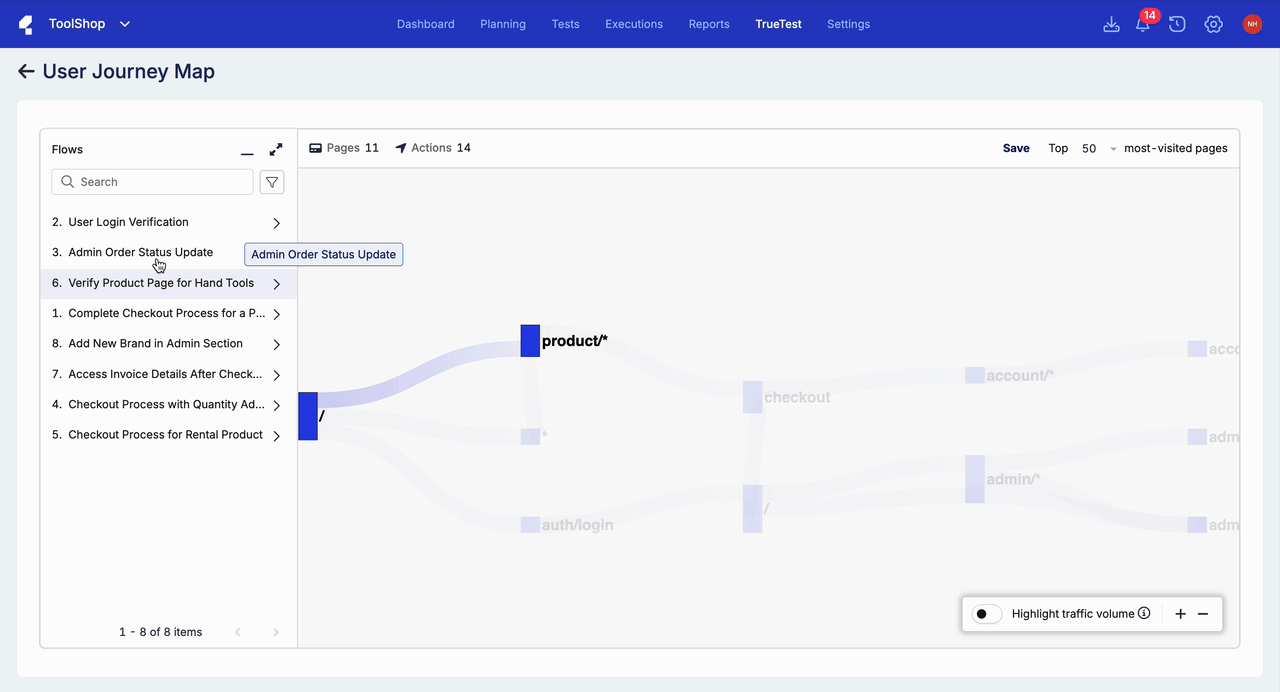
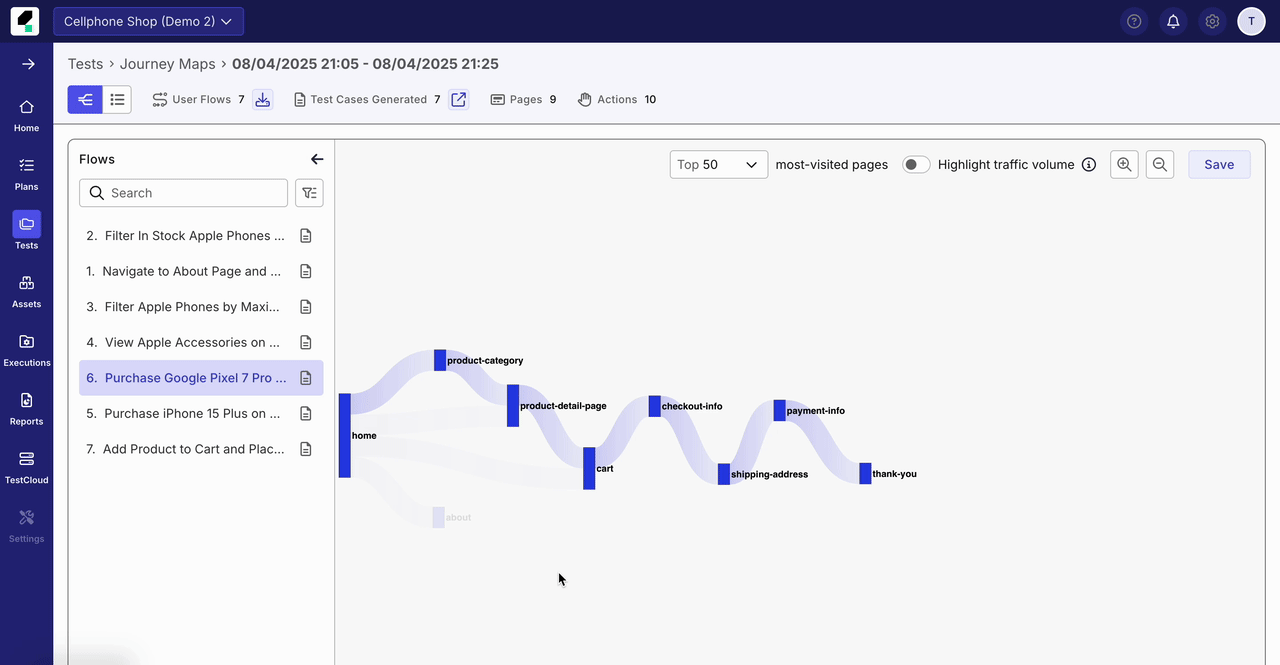
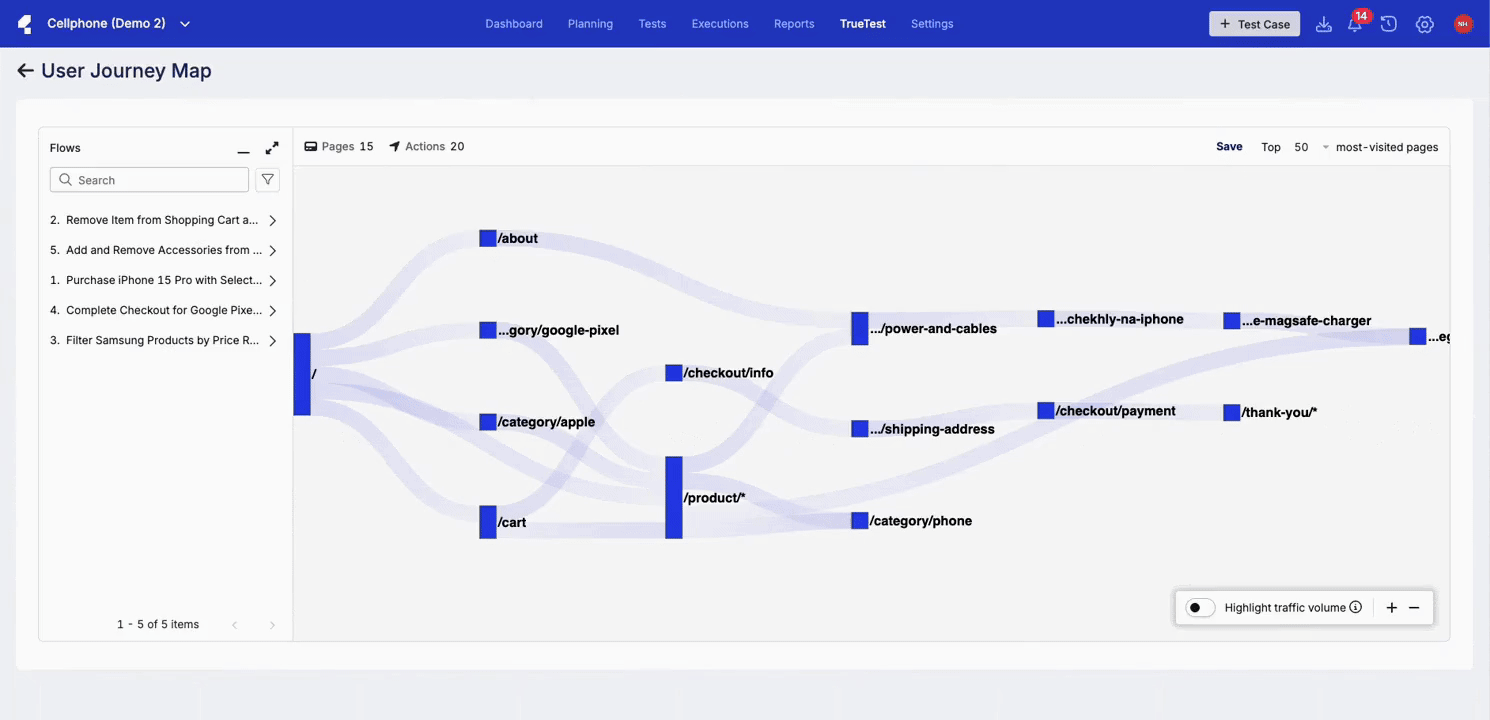
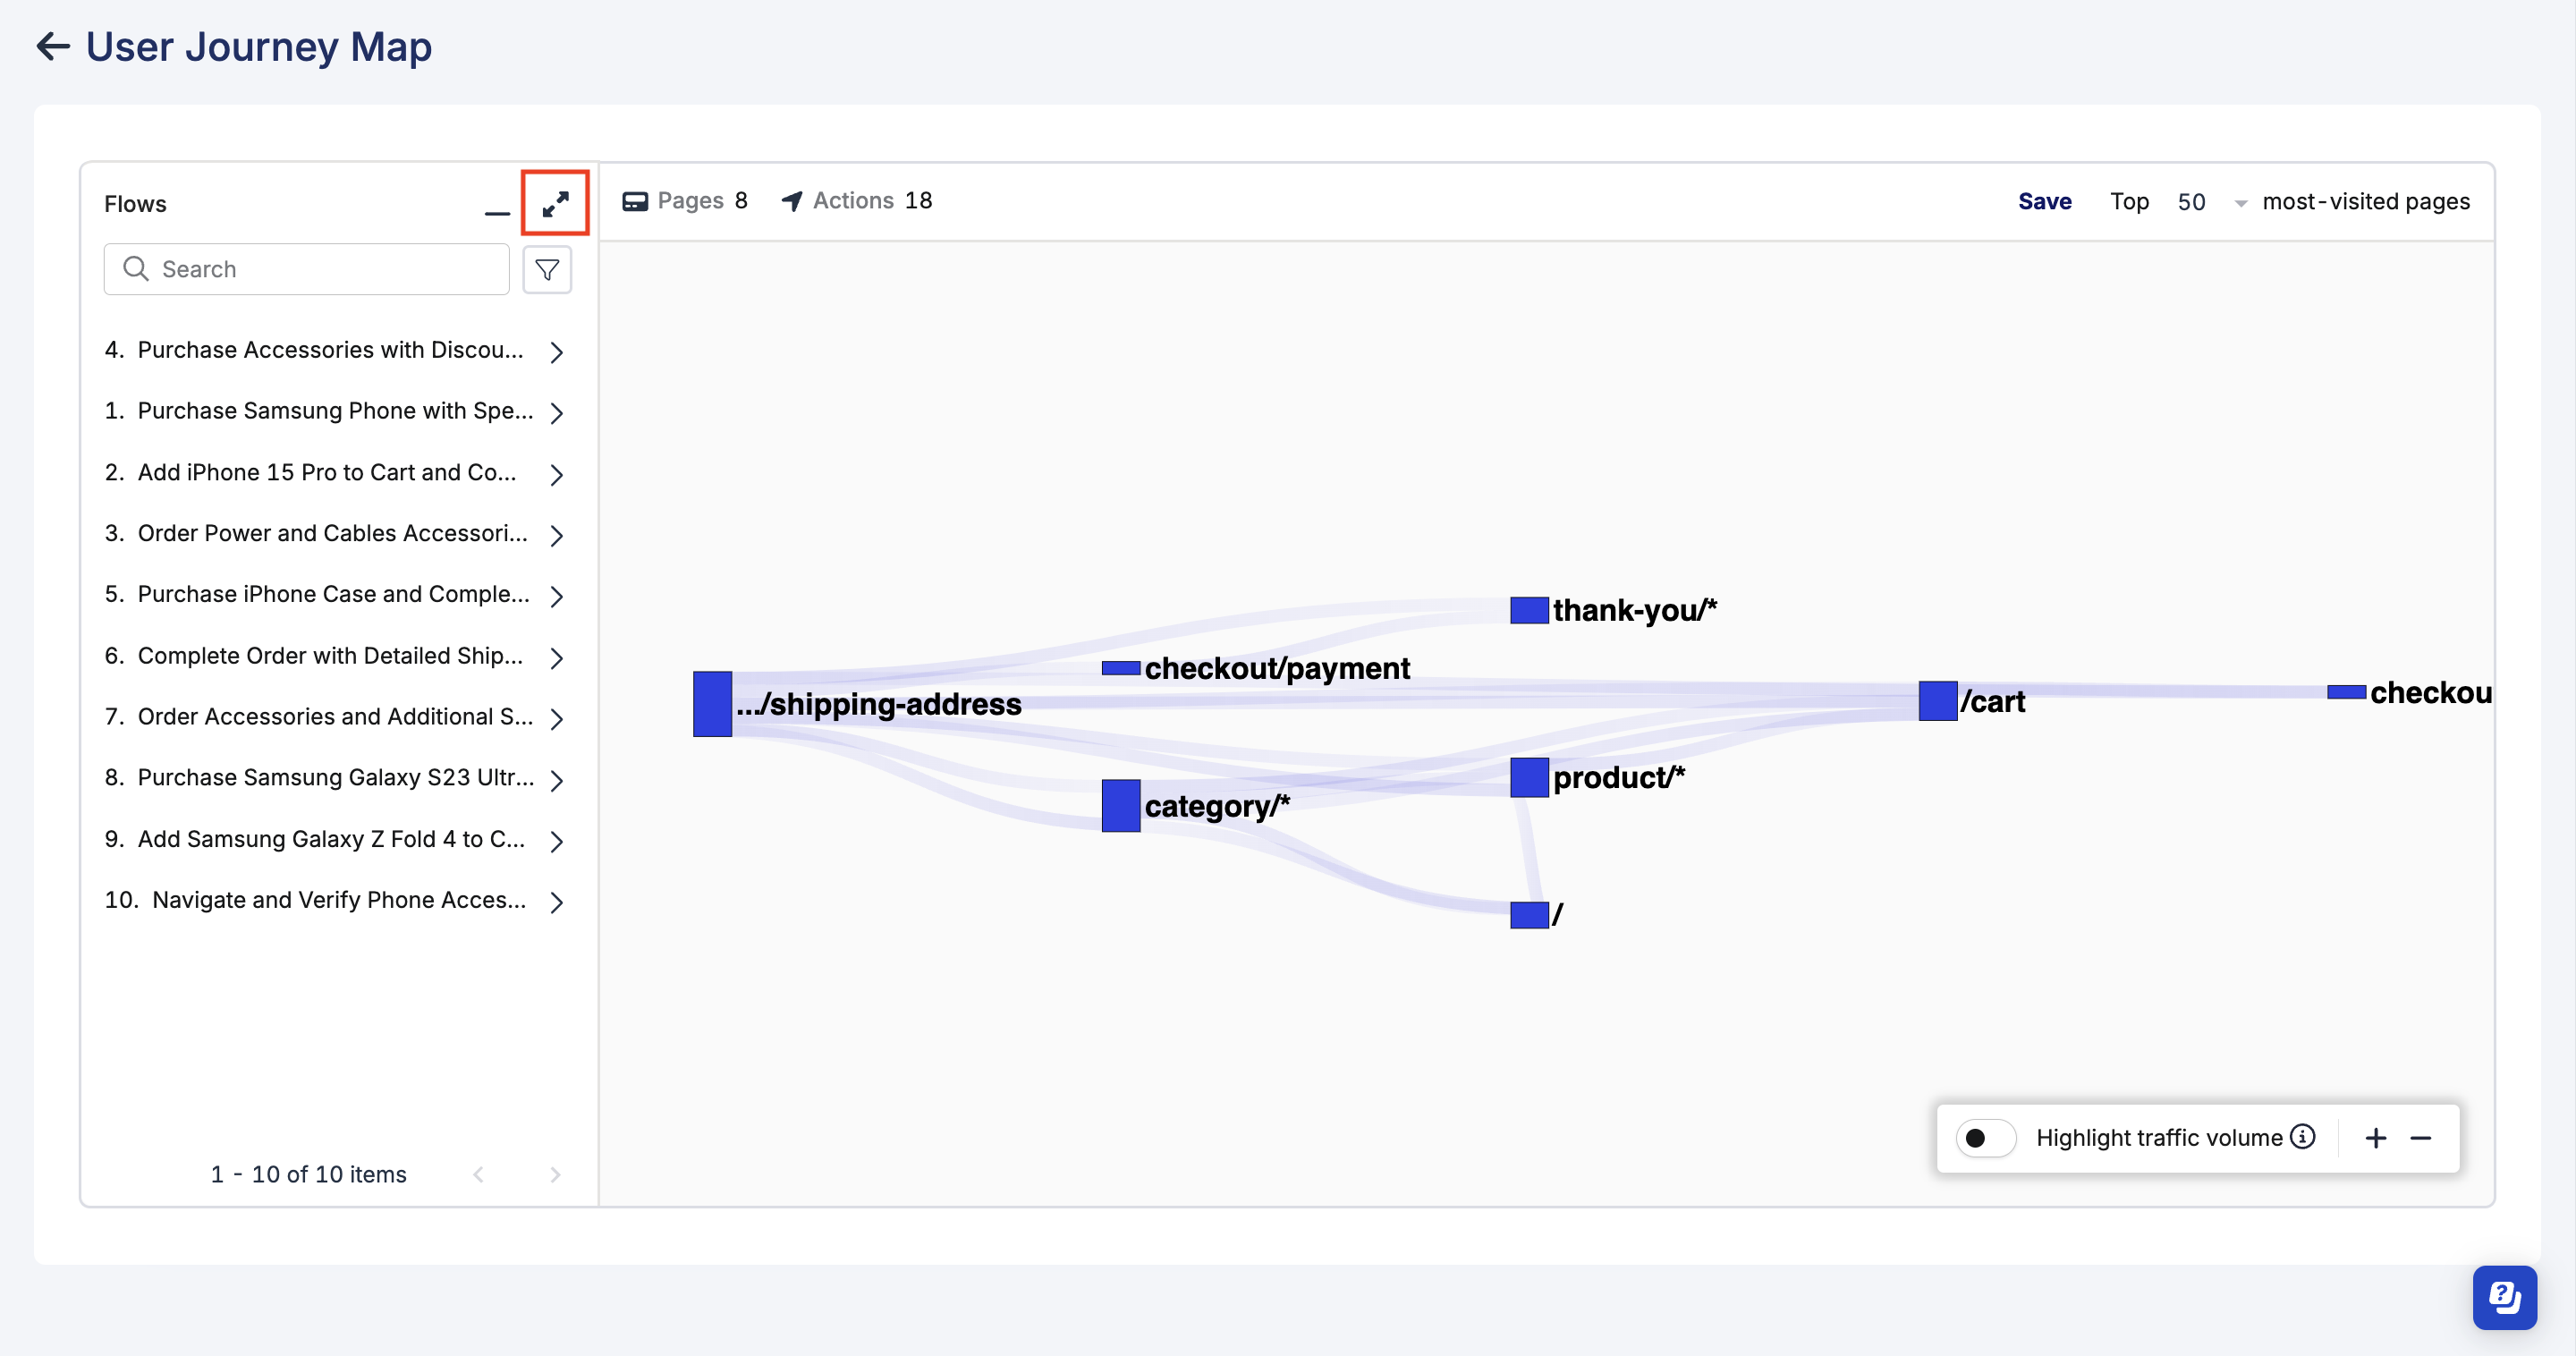
A user journey detail page has two sections: visualized map and flows.
View visualized maps
Here you can find user journeys visualized as a map. The map contains pages and actions representing connections from the source pages to the target pages. You can:
- Select a flow to highlight it in the map.
- Click and drag the pages to re-organize the map.
- Switch on the Highlight traffic volume toggle to see the amount of user activity.
- Double-click on the page to edit page information.
- TestOps Legacy
- TestOps
Show most or least-visited pages
Use the page ranking controls above the graph to focus the journey map on pages with the highest or lowest traffic:
- Select Top to show the most-visited pages, or select Bottom to show the least-visited pages.
- Select the number of pages to show.
The ranking uses the active journey map filters. When you select Bottom, pages are ranked from least visited to more visited. Select Top to restore the existing most-visited page view.
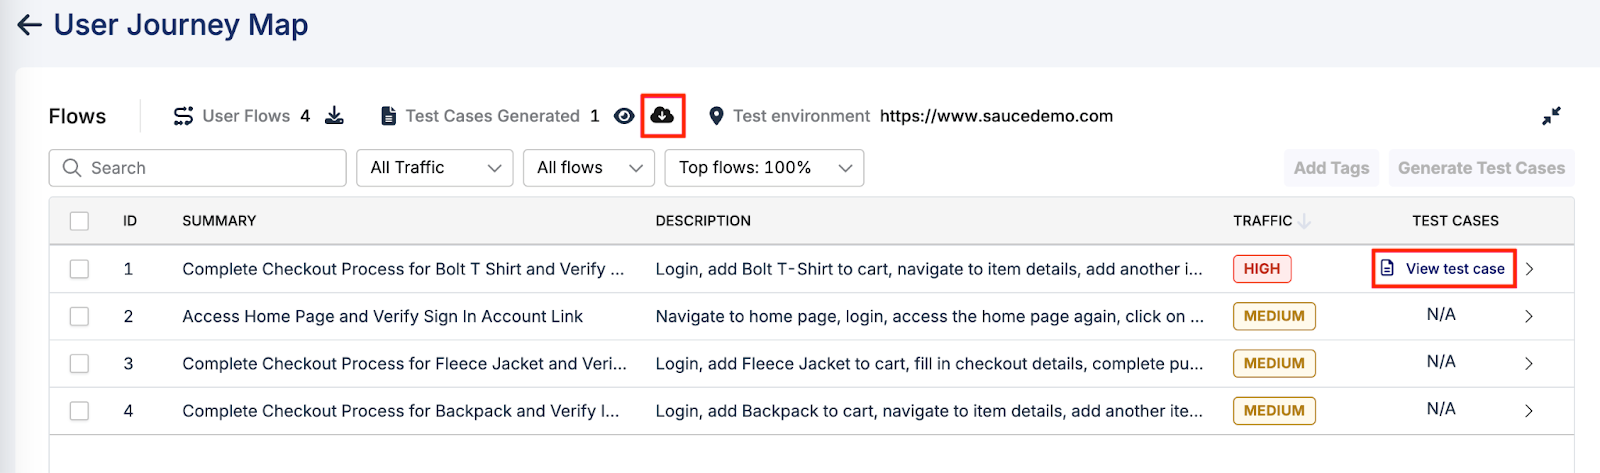
View flows
A flow represents an end-to-end path performed by a number of users on the AUT. For example, a common flow on e-commerce applications is: View a product > Add it to cart > View cart > Complete checkout.
- TestOps Legacy
- TestOps
A user journey map can have a number of different flows. To quickly view the test steps of a flow, click the see more arrow. Click Edit flow info to update the summary or description of a flow.
To view the flow entity more easily, click the icon to switch to the Flows section.
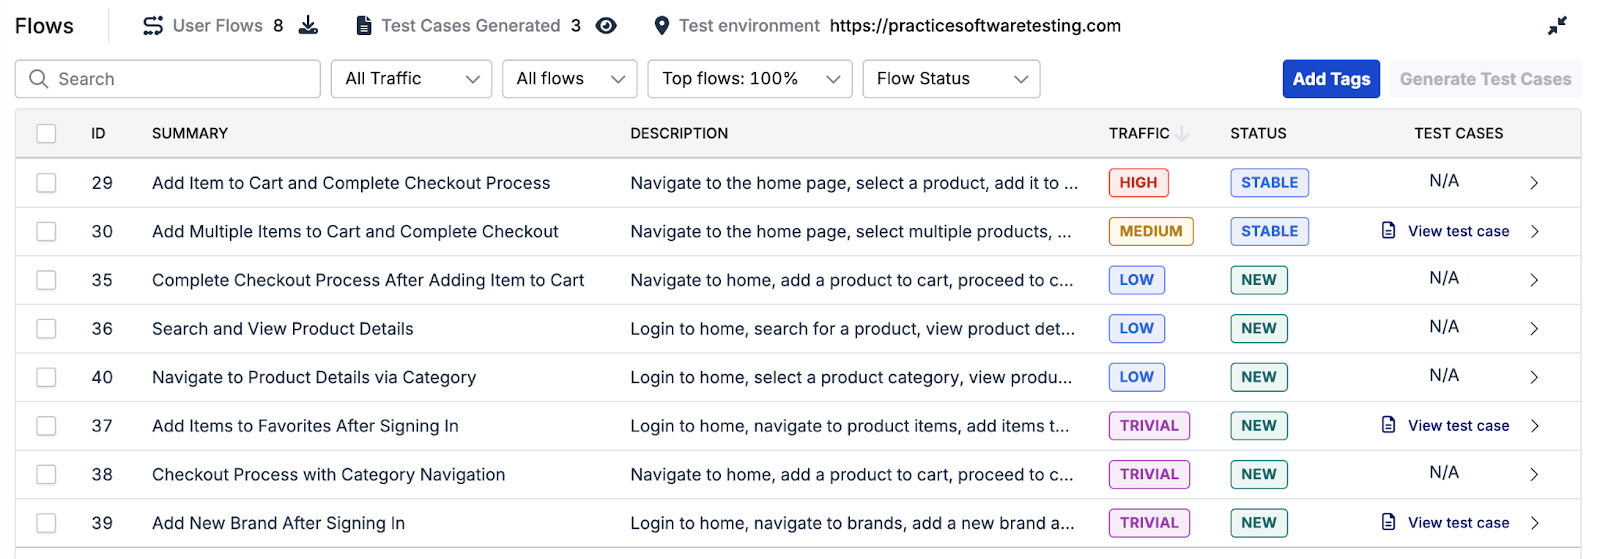
You can filter the flows by their traffic level, availability of test cases, and by flow popularity. You can also search the flows by their summary and description text.
The flow popularity filter allows you to focus on the most frequently used flows by narrowing down the list of flows to a specific percentage.
Availability of test cases indicates whether the flows have generated test cases or not.
Click Export to export and download all user flows as CSV file.
To view the visualized flow in Map View, click the flow map icon.

A user journey map can have a number of different flows. Click View test steps to see more details of a flow. Click Edit flow info to update the summary or description.
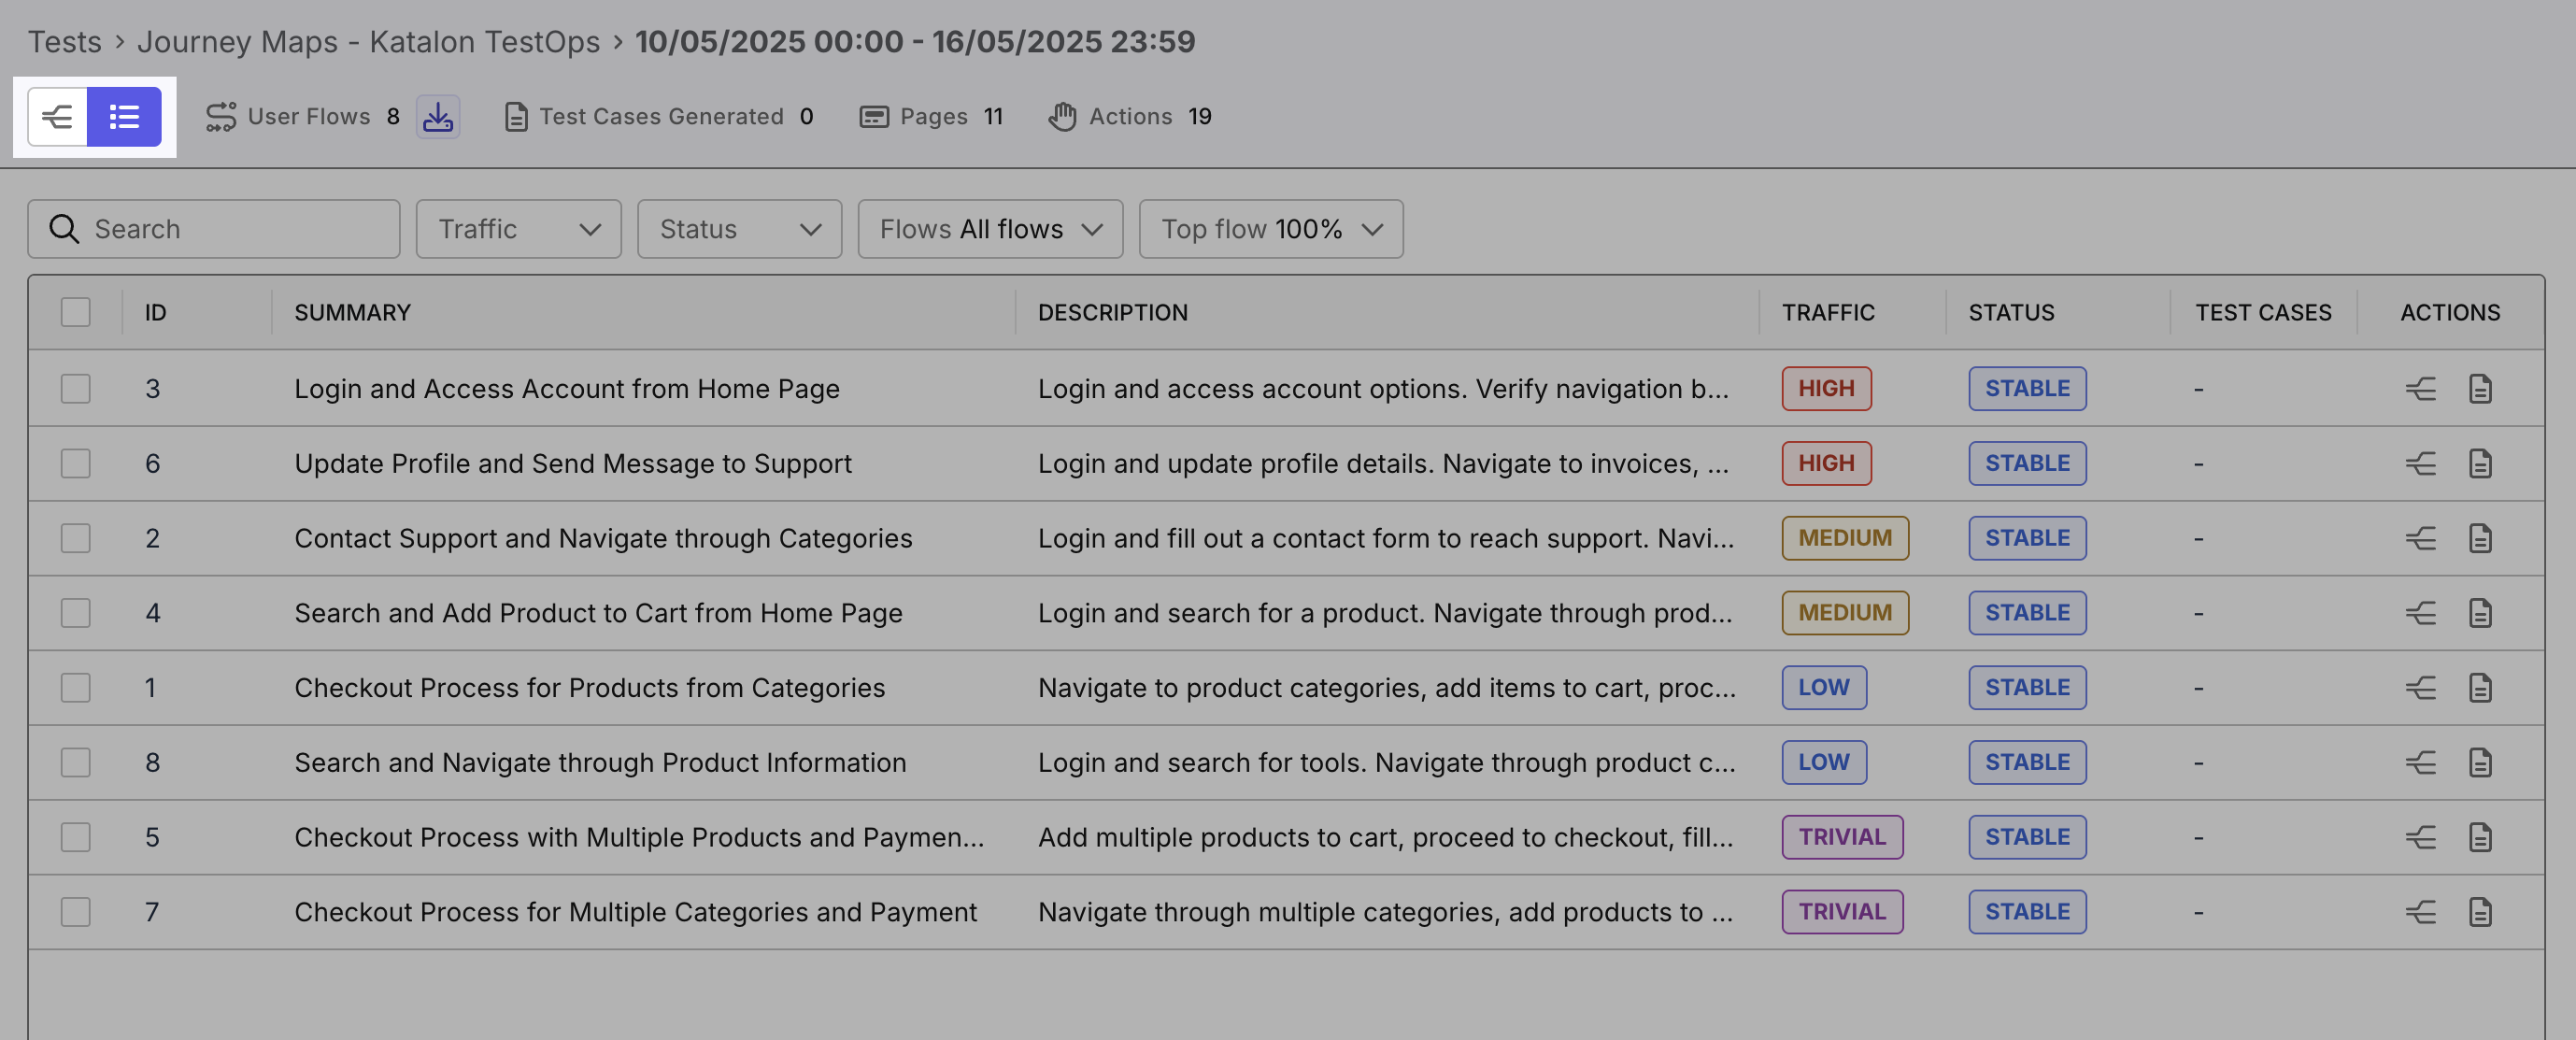
Use the toggle in the upper-left corner to switch between viewing as a branching structure and viewing as a list.
User session replay (beta)
Click Replay session (beta) to review the original user journey behind an AI-generated test. By replaying recorded sessions, you can:
- Debug unclear test flows
- Identify locator-related failures
- See exactly which elements were interacted with
Session Replay supports long and high-event sessions, helping you review complex journeys with fewer unavailable or incomplete replays.
Flow filters
You can filter the flows by their sources, traffic levels, number of test steps, and flow popularity.
- Tags - Filter or search flow using the Is or Is Not operator. See Tags.
- Source – Filter flows by what source they are generated from: User session or Manual execution.
- Traffic – Indicates the relative volume of user sessions that go through a particular flow. Learn more at Traffic levels.
- Status – Narrow flows by their stability status. See Flow status.
- Flows – Filter flows with or without test cases.
- Steps - Filter flows by specifying whether the number of steps is greater than, less than, or equal to a given value.
- Top Flow % – Focus on the most frequently used flows by selecting a percentage range (e.g., top 100%, 50%).
The Test Cases column shows whether test cases have been generated for each flow.
To export the flow data, click the Export icon. Exported flow and map files include additional metadata for analysis and reporting.
Tags
Use the Tags filter to group flows by specific criteria such as features, scenarios, or teams. You can then filter or search flows using these tags to focus on what matters most. The Tags filter supports the operators Is and Is Not, and you can select multiple tags to include in each flow.
- You can add tag individually or in bulk from either the Map View or List View.
- The maximum tag length is 30 characters.
- Tags are case-insensitive, and support the following characters: a–z, A-Z, 0–9, hyphen
-and underscore_ - Flow tags are independent from test case tags. They are not automatically transferred when generating test cases.
Flow status
From the second journey map generation onwards, TrueTest categorizes the flows as stable, new, or obsolete to simplify the review process.
- Stable: Flows with no changes that present in both the new and previous maps. Test artifacts remain intact and you can skip reviewing these flows.
- New: Flows that did not exist in the previous map and require review.
- Obsolete: Flows that appear in the previous map but are no longer in the new map. See more: Retain obsolete flows.
Generate test cases
After TrueTest has identified the flows from user interaction, you can decide which flows are relevant to generate test cases. In the Flow section, select the flow and click Generate Test Cases.
If you already know which captured sessions you want to automate, you can also generate test cases directly from User Sessions (beta) before reviewing or generating a full journey map. See Generate test cases from User Sessions.
You can also re-generate an existing TrueTest-generated test case from its flow. Re-generating lets the test case inherit the latest TrueTest generation improvements, configuration updates, and assertion changes without recreating the map or flow.
- TestOps Legacy
- TestOps
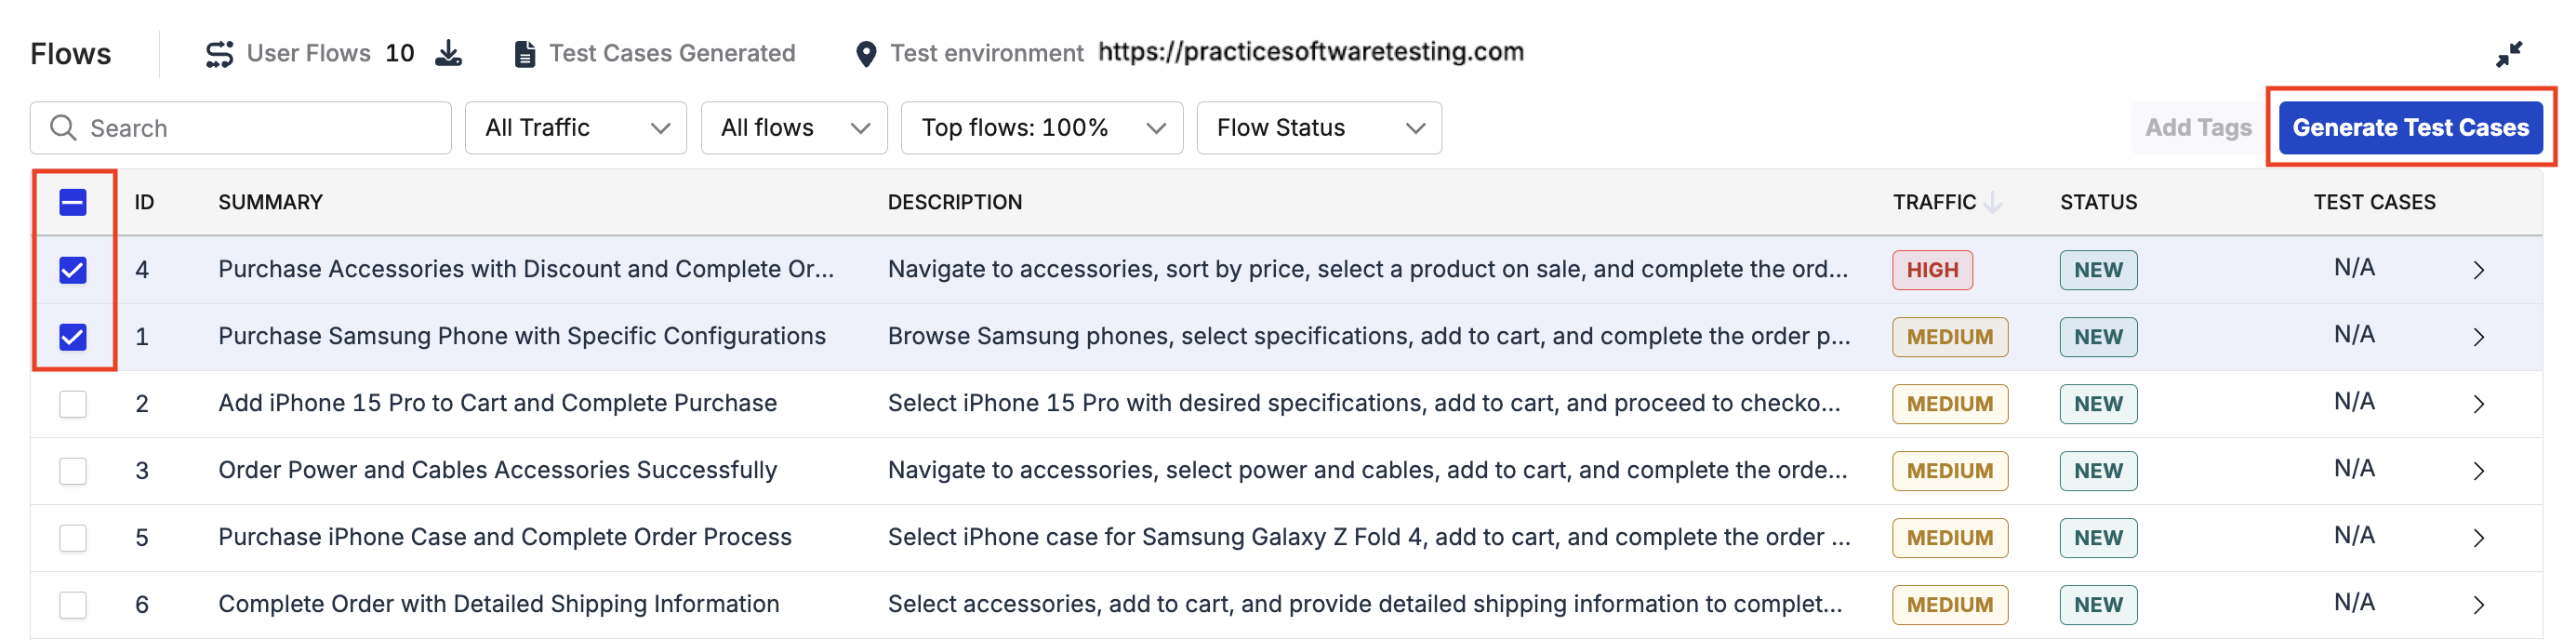
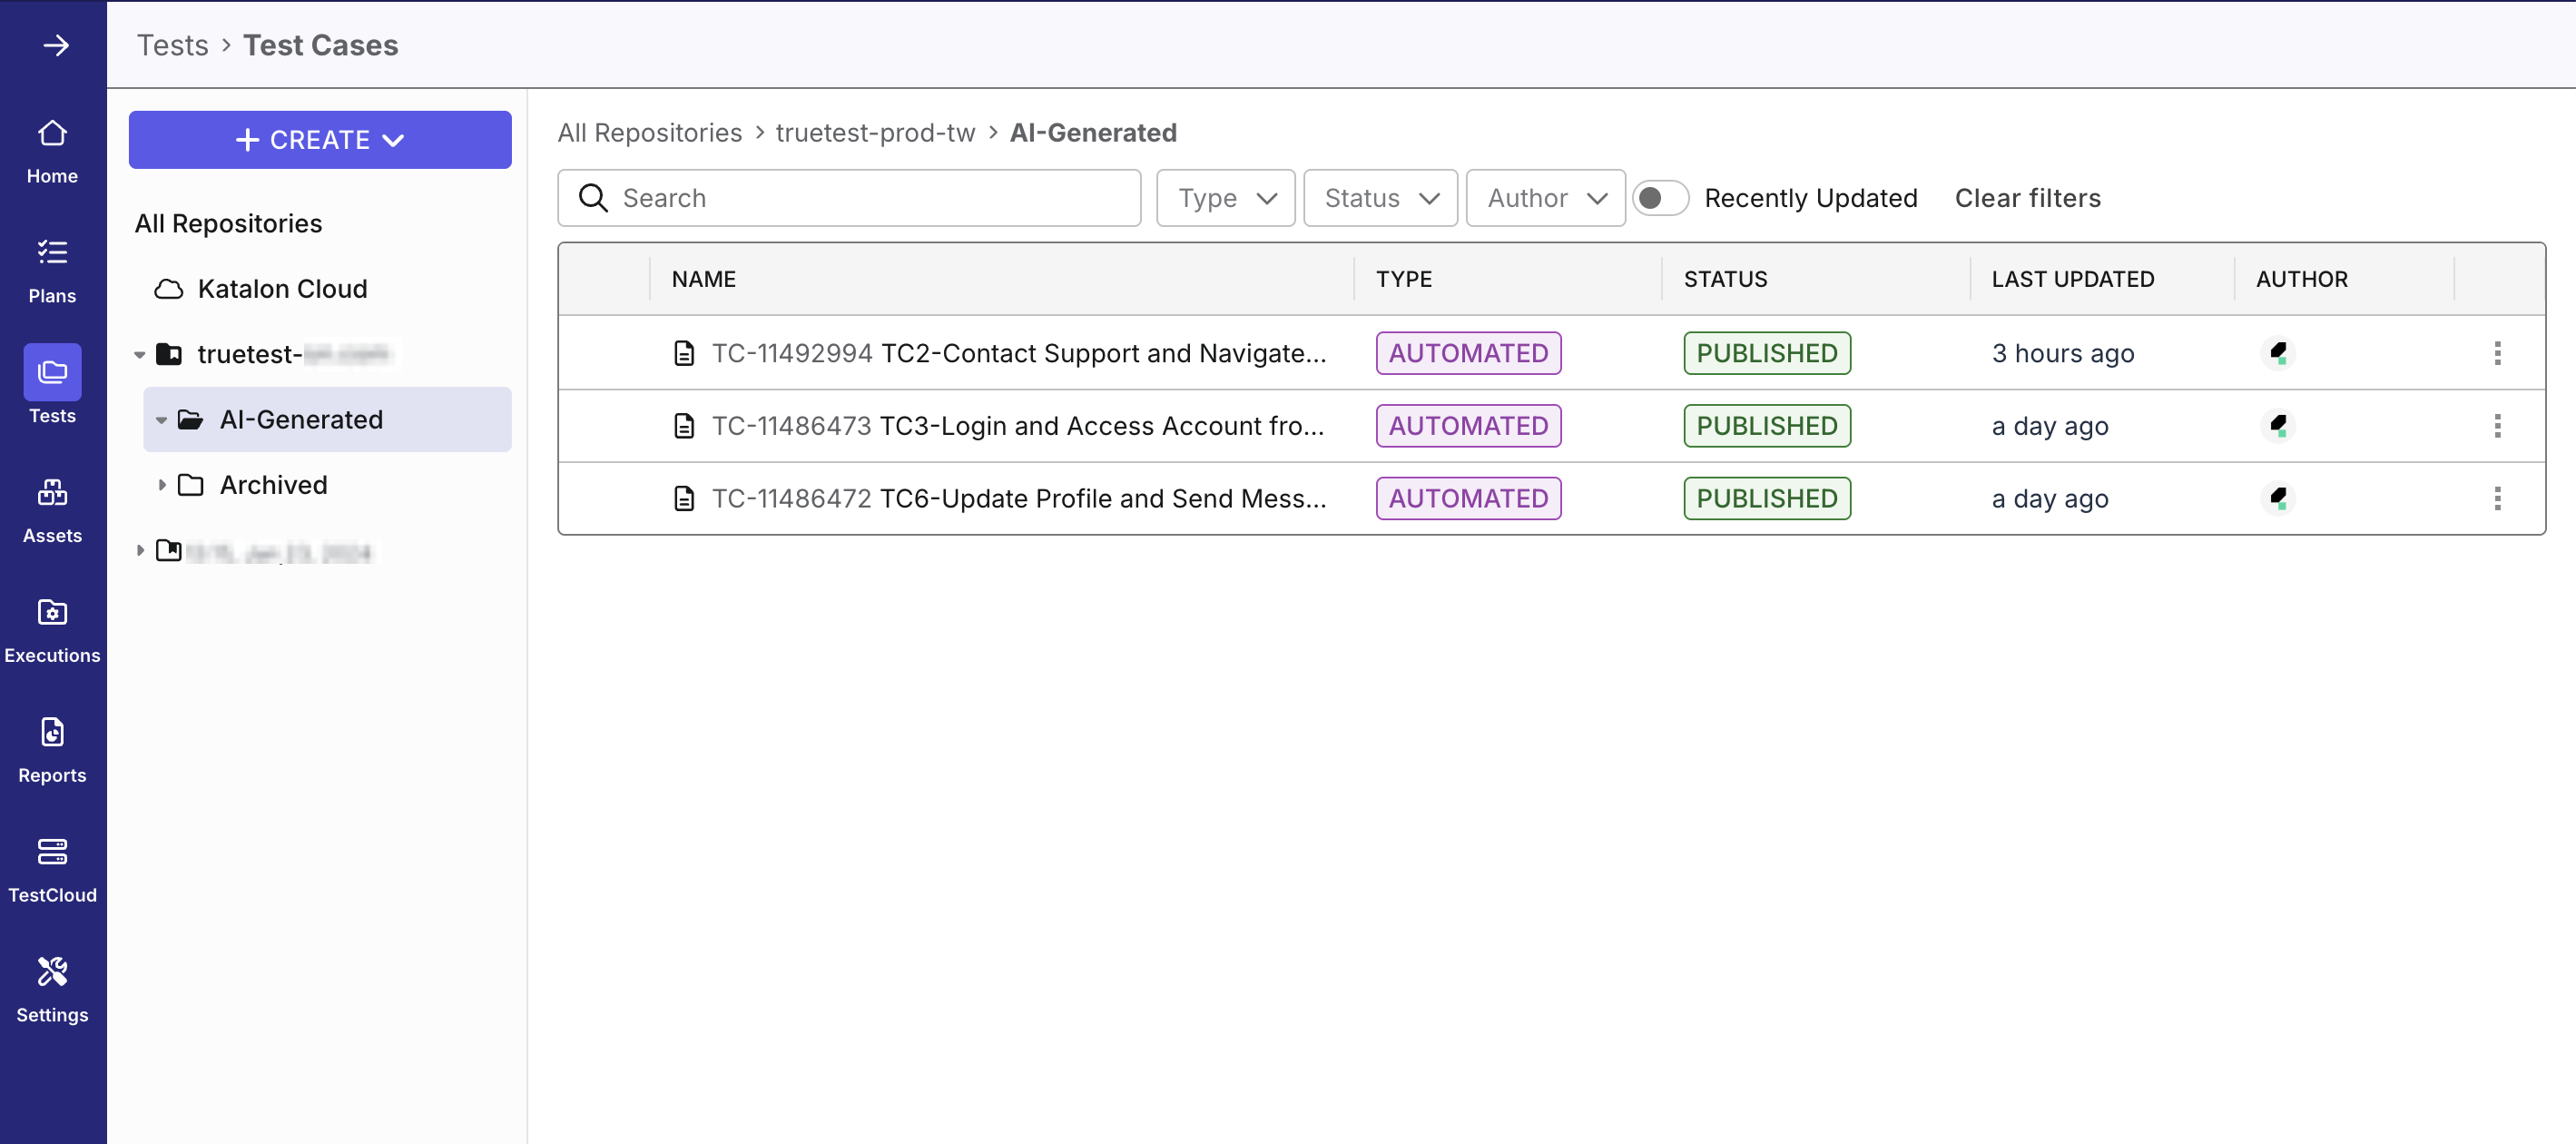
Once the test case generation has finished, you can revisit the flow and click View test case to view its details.
The generated test cases are stored in the registered script repository. Test case names are automatically generated based on the flow.
If you store test artifacts in Katalon Cloud and there is at least one test case generated, the download icon is shown and you can download the zipped file of the generated test case.
Once the test case generation has finished, you can revisit the flow and click View test case to view its details.
The generated test cases are stored in the registered script repository. Test case names are automatically generated based on the flow.
To re-generate an existing TrueTest-generated test case, revisit the flow and trigger test case generation again. Review the generated changes before using the updated script in your test project.
Retain obsolete flows
You can review obsolete flows which already have correspondingly generated test cases and decide which to keep or archive. For obsolete flows, TrueTest will archive within the Git repository.
A use flow is tagged as Obsolete in the following cases:
- The features related to those flows no longer exist in the application
- The application has been updated to introduce new flows
- No users follow the flows during the data collecting period
Follow these steps to retain and archive obsolete flows.
- TestOps Legacy
- TestOps
-
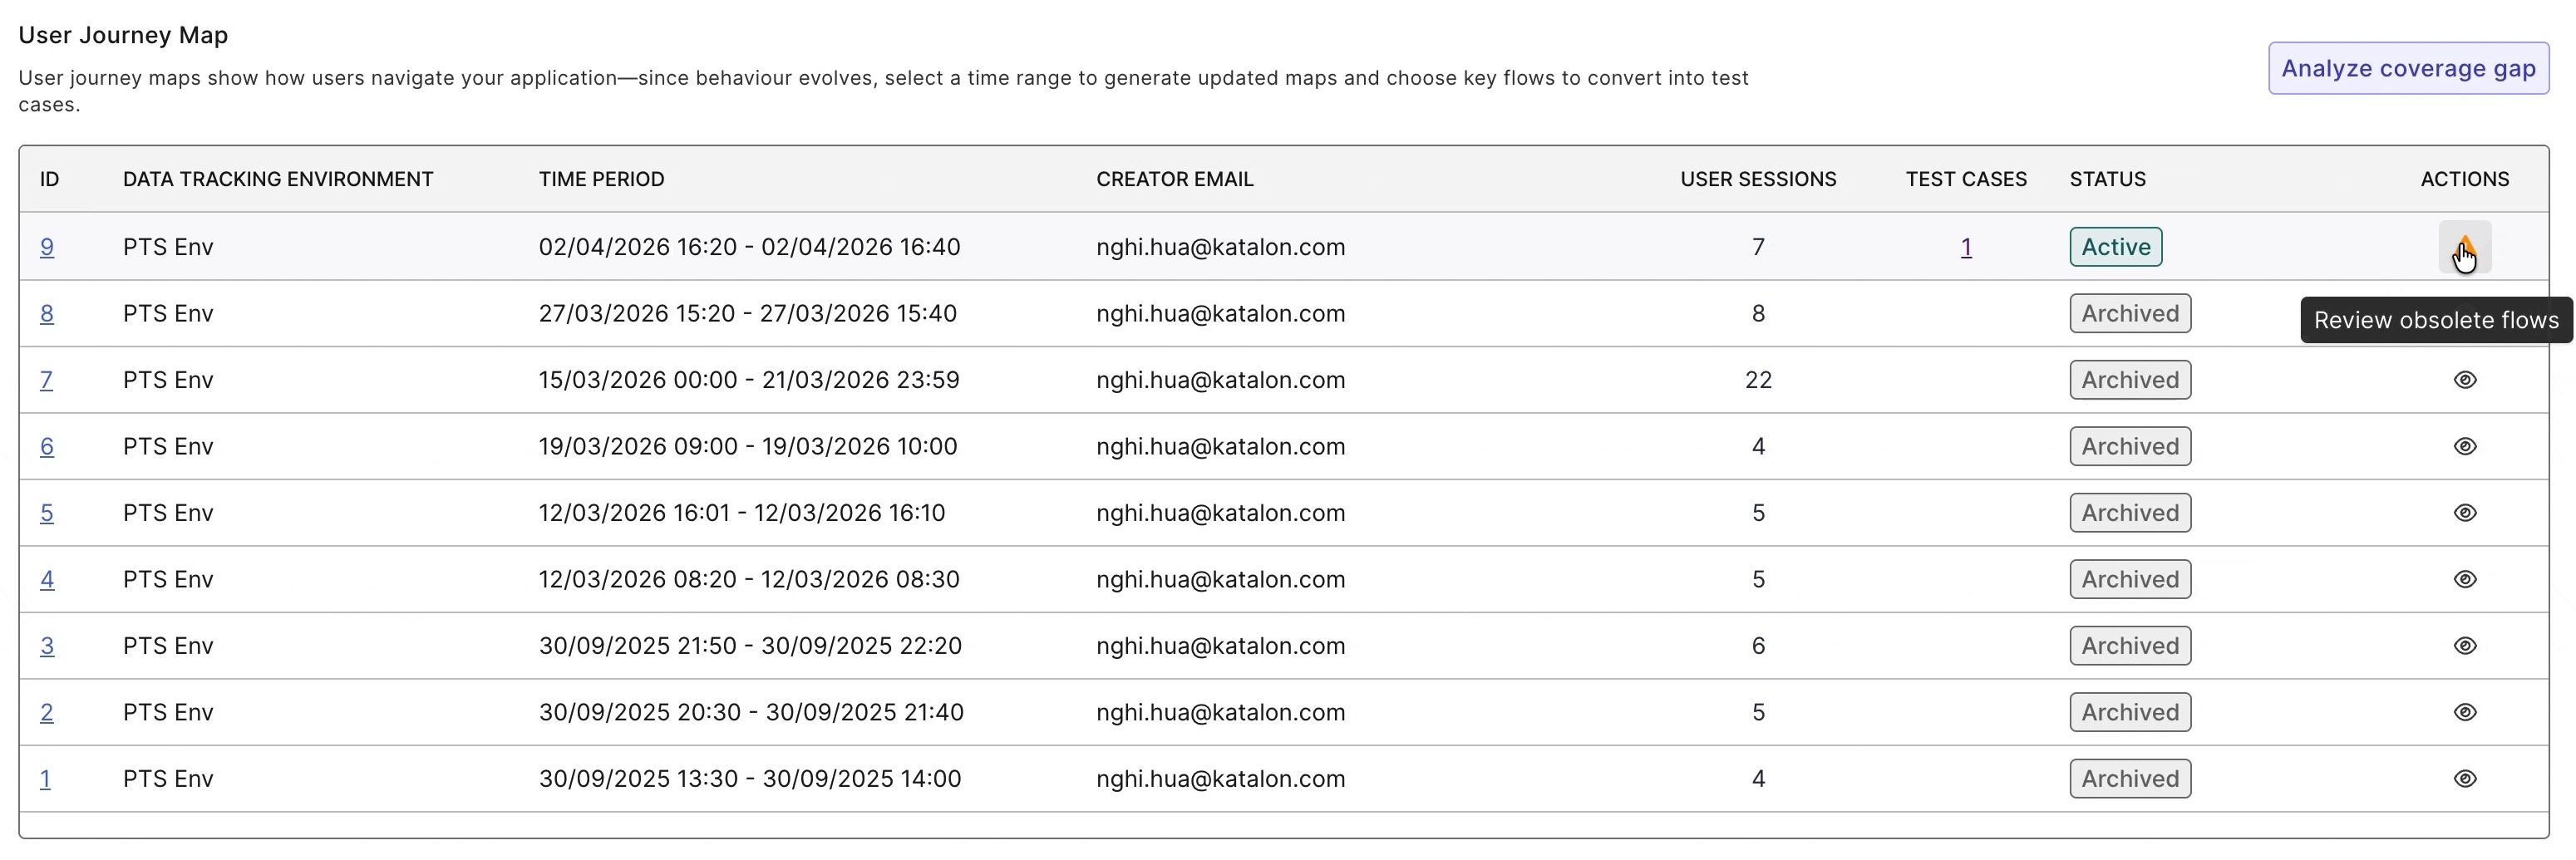
In the User Journey Map section, click Review obsolete flows of the relevant map.

-
The Obsolete flows list appears. Select the checkbox of the flow you want to keep, then click Retain.
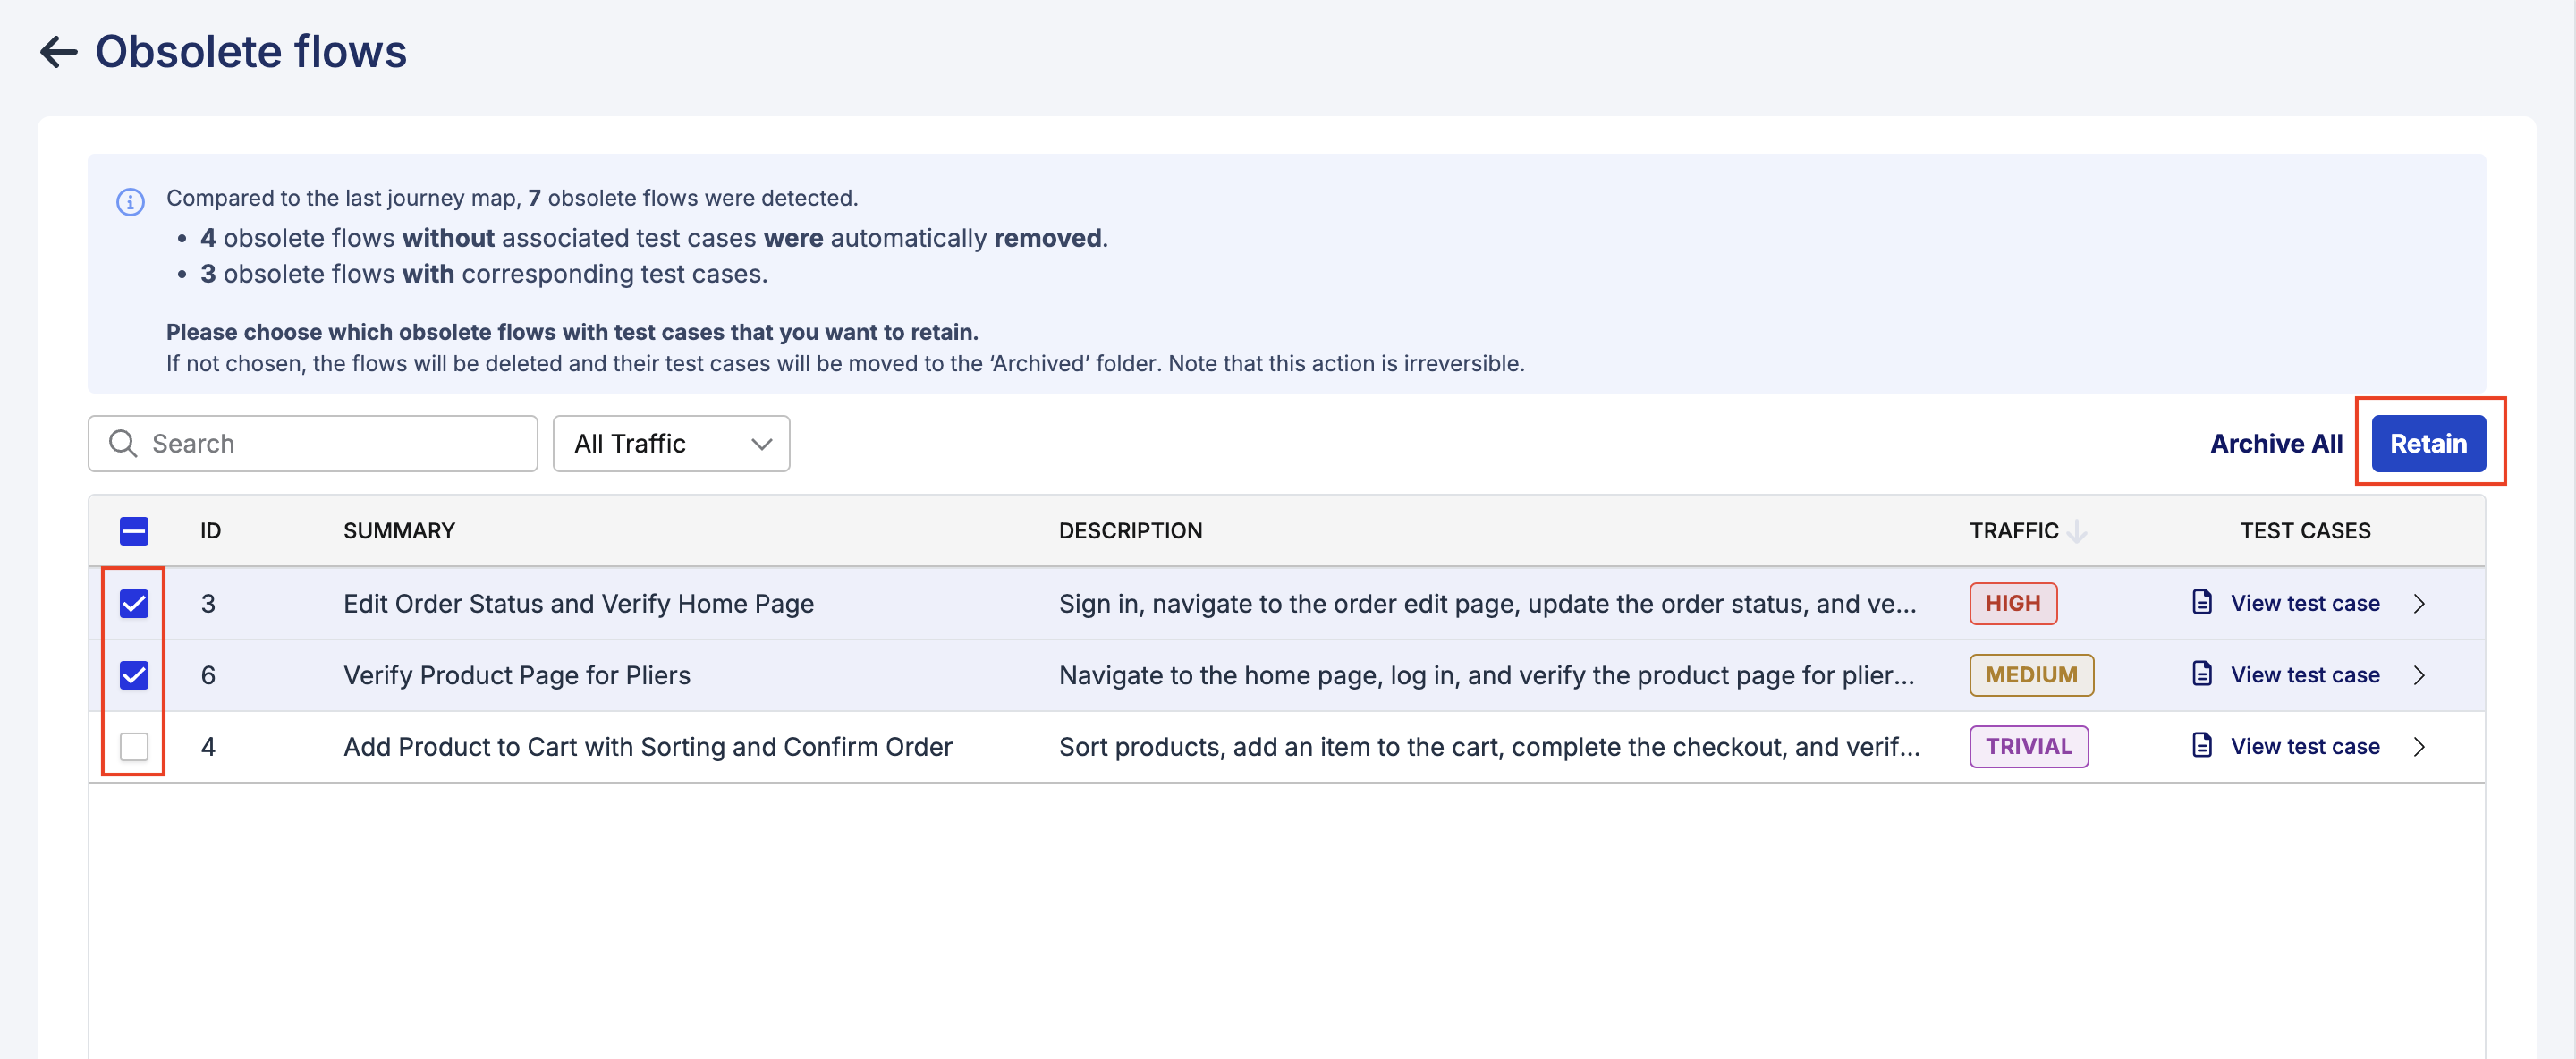
A dialog appears to confirm your action. Select Proceed.

-
In case you don't want to keep any flows, select Archive All.
You are directed to the User Journey Map page where you can see the update process of the selected map.
-
In the User Journey Map section, click the Review obsolete flows warning icon of the relevant map.
-
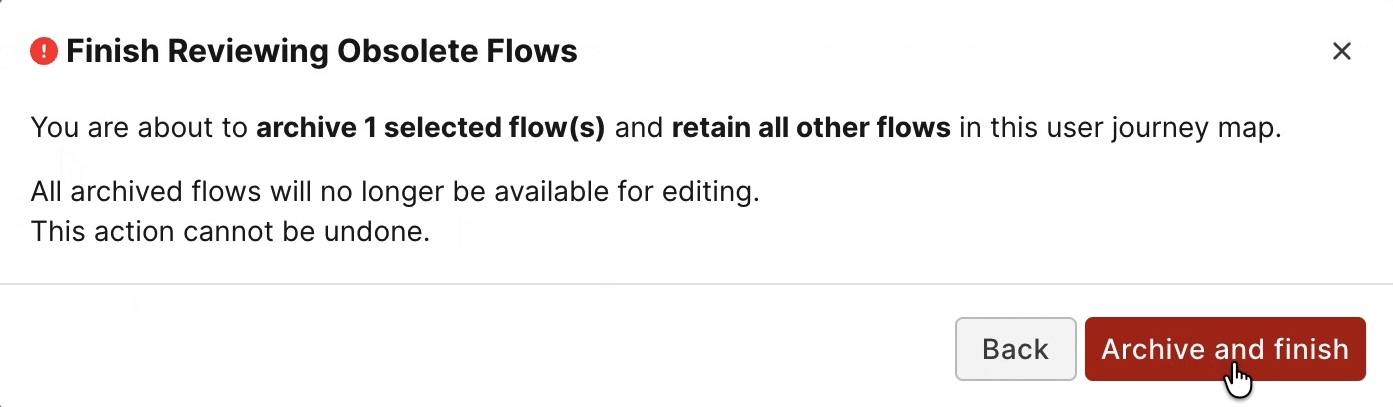
The Review Obsolete Flows window appears. Select the checkbox of the flow you want to archive, then click Archive selected flow(s).

A dialog appears to confirm your action. Select Archive and finish.
-
If you don't want to archive any, select Retain All.