Azure Repos Integration
This document explains how to set up and manage an Azure Repos integration in Katalon True Platform.
Connect Azure Repos to Katalon True Platform to sync test cases and test suites between the two systems.
Find your starting point:
- You are setting up Azure Repos for the first time? -> Start from Step 1
- Your organization is already connected and you only need to link a repository? -> Skip to Step 2
- You need to manage an existing integration (disconnect, archive, or restore)? -> Skip to Managing your Azure Repos integration
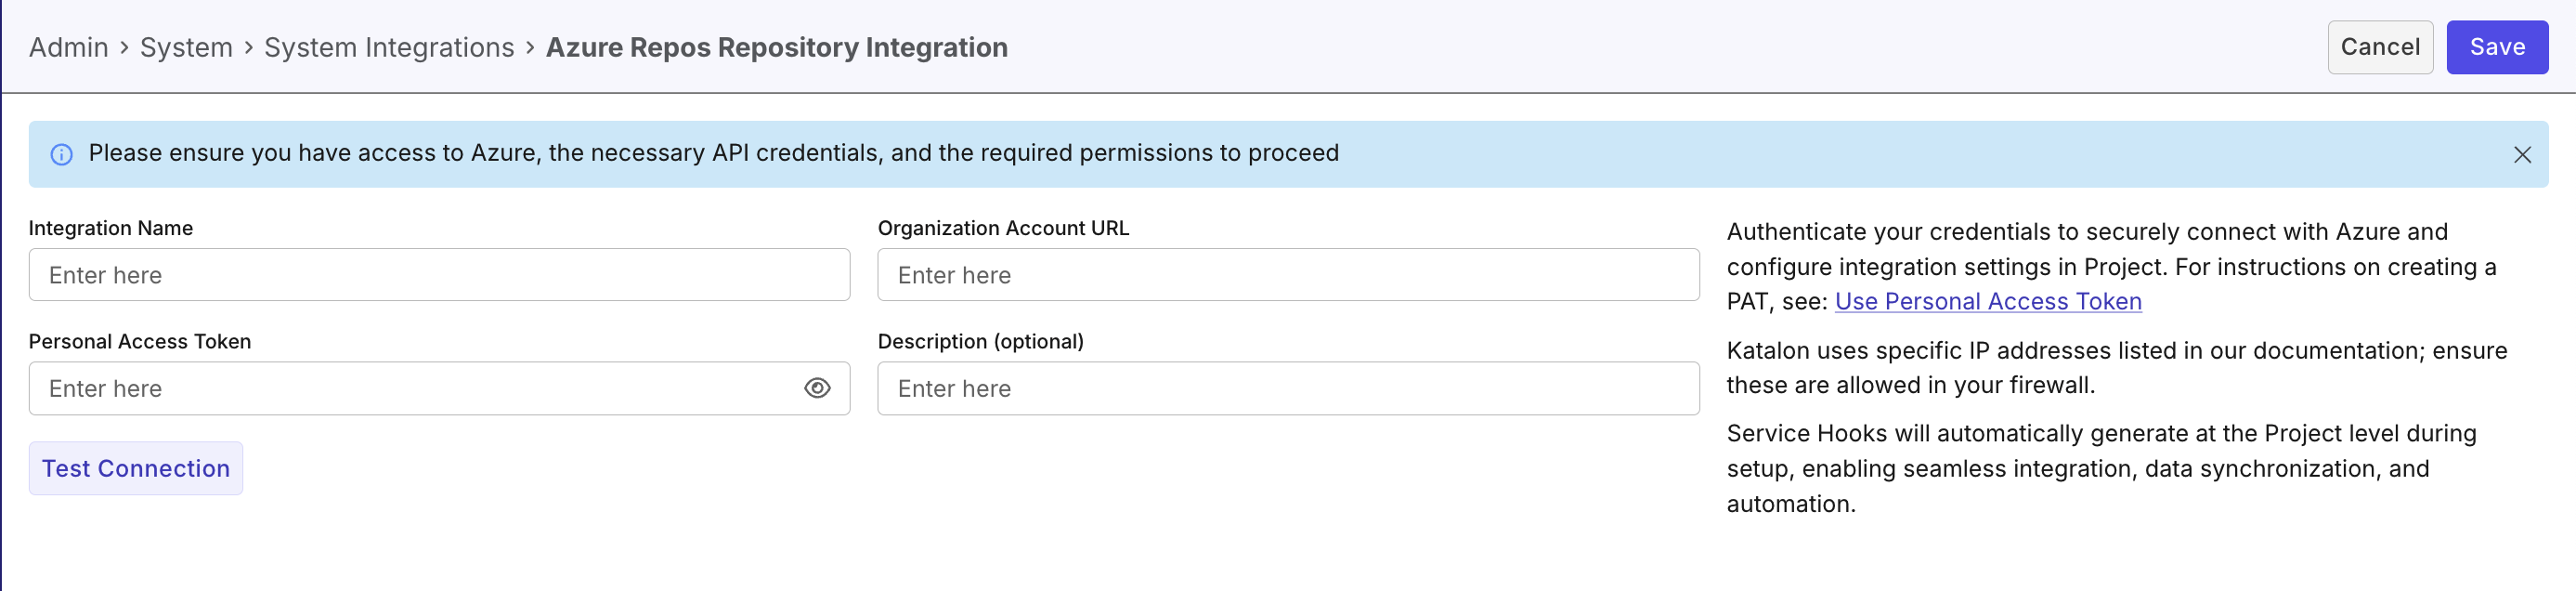
Step 1: Authorize the Azure Repos Connection (Account-level)
This step establishes the connection between Katalon True Platform and Azure Repos. No data is synced yet.
- You must have the Account Admin or System Admin role in Katalon True Platform.
- Go to Account Settings > Integrations and click
+ Create Integration. - In the Available Integration list, select Azure Repos.
- Fill in the required fields:
- Integration Name: A custom label (max 50 characters).
- Organization Account URL: Your Azure DevOps organization URL (must start with
https://).- Example:
https://dev.azure.com/your-workspace
- Example:
- Personal Access Token (PAT): Refer to Microsoft documentation on creating a PAT. Ensure it has required permissions.
- Description (Optional): Max 255 characters.
- Click Test Connection to validate, then click Save.
Result
To verify the connection is active, go to Account Settings > Integrations and check the Integration list.
- If the status initially shows Inactive, reload the page to update it to Active.
- If the status shows Error, verify all required fields, especially the PAT.
Step 2: Link Repository to Project (Project-level)
This step connects a specific Azure Repos repository, branch, or directory to your Katalon True Platform project and syncs test data.
- You must have the Project Admin role in the project.
- An Azure Repos account must already be connected at the Account-level (Step 1).
-
Navigate to your project > Settings > Integrations.
-
On your linked Azure Repos connection, click the right edge and select New configuration (Settings icon).
-
Fill in the required fields:
- Display Name: A custom name for the linked project (max 50 characters).
- URL: The URL to the repository, branch, or directory from the linked Azure Repos account.
- Example:
https://dev.azure.com/example-org/my-project/_git/my-repo?path=%2Ftests%2FTestCase&version=GBmain
- Example:
- Link existing test execution results with test cases having the exact same paths and names (Optional): Enable this to attach existing results to matching test cases and test suites.
- Description (Optional): Max 255 characters.
-
Click Proceed to sync data and finalize the connection.
- If the status initially shows Inactive, reload the page to update it to Active.
- If you click Save after modifying details, changes are saved but status may remain Inactive.
- To complete syncing, click Proceed.
-
[Optional] To edit an existing linked Azure Repos integration, click the Edit (pen) icon, update fields, and click Proceed.

Result
Your Azure Repos repository is now active within your project and data is synced to Katalon True Platform.

View Test Cases or Test Suites Synced from Azure Repos
To view synced test cases or test suites, go to Tests > Test Cases/Test Suites.

Managing Your Azure Repos Integration
Katalon True Platform provides multiple ways to manage Azure Repos integrations without losing historical data.
- Use Disconnect to disable the Azure Repos integration across all projects (Account-level).
- Use Archive to disable an Azure Repos connection for a single project (Project-level).
Katalon does not support permanently deleting integrations. This ensures audit history is preserved and enhances security and traceability.
Disconnect an Azure Repos Connection
Required role: Account Admin or System Admin.
Disconnecting makes the integration inactive across all projects. Katalon True Platform does not support fully deleting integrations, in order to preserve audit history.
For any Azure connections, modifying this connection can also affect Azure DevOps configuration when both are set up.
-
Go to Account Settings > Integrations.
-
Click the Disconnect icon next to the connection.
-
Confirm by clicking Disconnect in the dialog.
=> The status changes to Inactive. All projects using this integration lose the ability to sync with Azure Repos.
-
To reconnect, click the Reconnect icon next to the integration and confirm. All projects will resume syncing once reconnected.
Archive a Linked Repo
Required role: Project Admin.
Archiving disables the connection for one project only. Other projects using the same Azure Repos integration are not affected.
- Go to Project Settings > Integrations.
- Click the right edge of the linked connection and select Archive.
- Confirm by clicking Archive in the dialog.
Result: The integration no longer appears in the Test Cases/Test Suites module. Any scheduled test runs in the Execution module will be automatically canceled at runtime.
Restore an Archived Integration
- Go to Project Settings > Integrations.
- Click New configuration (settings icon) on the Azure Repos connection.
- Enter the same repository URL as the archived configuration and click Proceed.
Katalon True Platform restores the archived configuration instead of creating a duplicate.