Create or manage test cases
Test cases are the foundation of your testing strategy in Katalon True Platform. There are several ways to get your test cases into Katalon True Platform, depending on your workflow:
- Manual creation: Build test cases directly in the Katalon True Platform interface with full control over test steps, metadata, and organization.
- CSV import: Import existing test cases from a CSV file to quickly migrate test cases maintained outside Katalon True Platform.
- ZIP upload: Import test cases, test suites, and test suite collections by uploading a Katalon Studio project as a ZIP file to a Local repository.
- Repository integration: Sync test cases automatically from version control systems like GitHub, GitLab, and other supported repositories through Git integration.
Learn how to create test cases and manage them using any of these methods.
Create test case manually
Use this workflow when you want to create a test case directly in Katalon True Platform and start organizing test steps, ownership, and metadata.
If you want to create automated test cases instead of executing the test manually, you can use Katalon AI Assistant in Katalon Studio to generate the automated test script, sync the project to Katalon True Platform, and then create an automated test run.
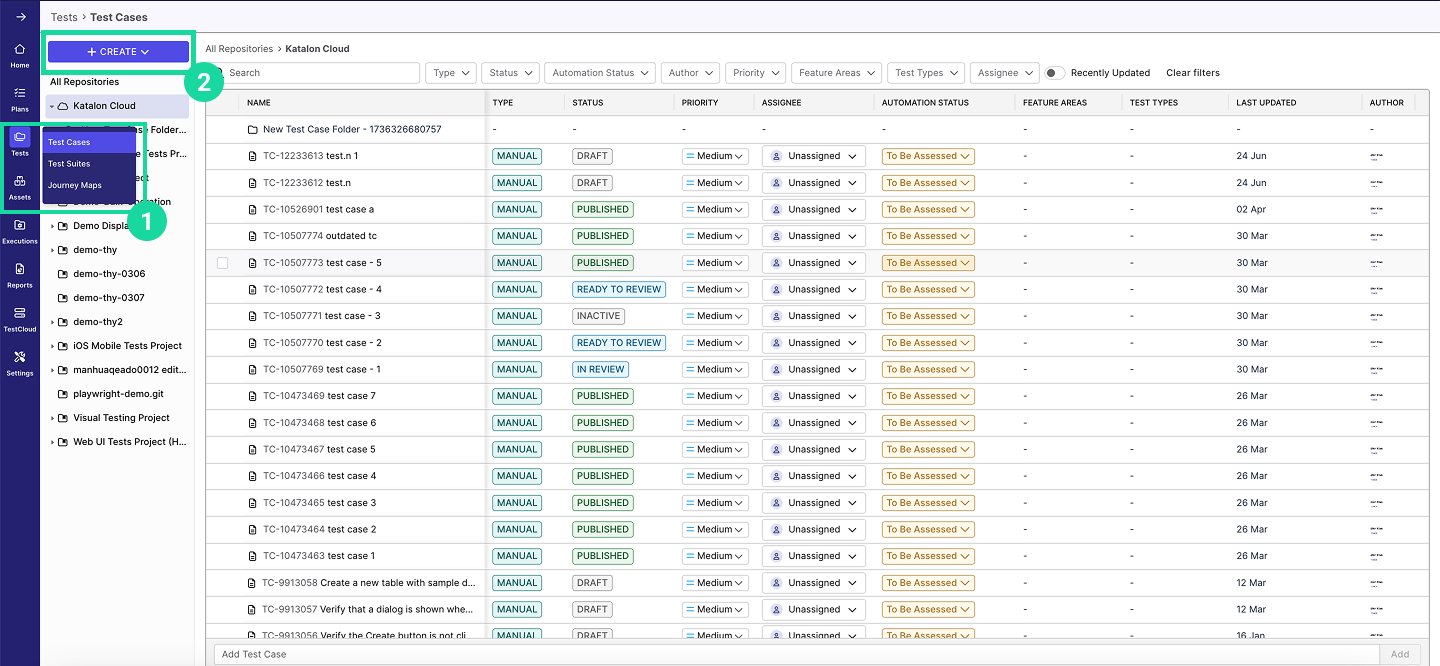
- Navigate to your specific project's UI > Tests > Test Cases.
- Click on the + Create button. Select Test Case.
- Fill out the following information:
- Account Admins can configure project-level custom fields in Admin Settings, and those fields become available after the test case is created—use the table below to fill out the built-in fields first.
- Learn more on how to set up Custom Field here.
| Field | Requirement | Description |
|---|---|---|
| Name | Required | Input the label for your test case. |
| Automation Status | Required | Select the current stage of the test case in the automation lifecycle. |
| Priority | Required | Set the priority level (e.g., High, Medium, Low). |
| Assignee | Required | Select the person responsible for the test case. |
| Feature areas | Optional | Parts of the application this test covers. |
| Test types | Optional | Kind of testing (e.g., Functional, Regression). |
| Tags | Optional | Project-level labels (up to 50 characters, no special symbols) used to categorize test cases for filtering and analytics. Whatever you add here automatically syncs to linked Katalon Studio projects, so the same tags appear in both tools. |
| Description | Optional | Input details about your test case. |
| Precondition | Optional | List the prerequisites for your test case. |
| Location | Required | Select where you want to save your test case. |
- Click Create.
- Alternatively, click on "Save & Create Another" to immediately input information for an additional test case without navigating away from the current screen.
You can also create test cases with Katalon AI Assistant by providing these details and asking the assistant to generate test cases. See Refine requirements and generate test cases for more details.
Manage test cases
After a test case is created (or imported), you can update it, duplicate it, or move it to a different location in your repository.
To manage an individual test case:
- Click on its name to open the Test Case Detail page.
- Use the action buttons in the upper right:
- Move – Move the test case to a different location.
- Duplicate – Create a copy in the same location.
- Delete – Remove the test case from your repository (its result history is retained).
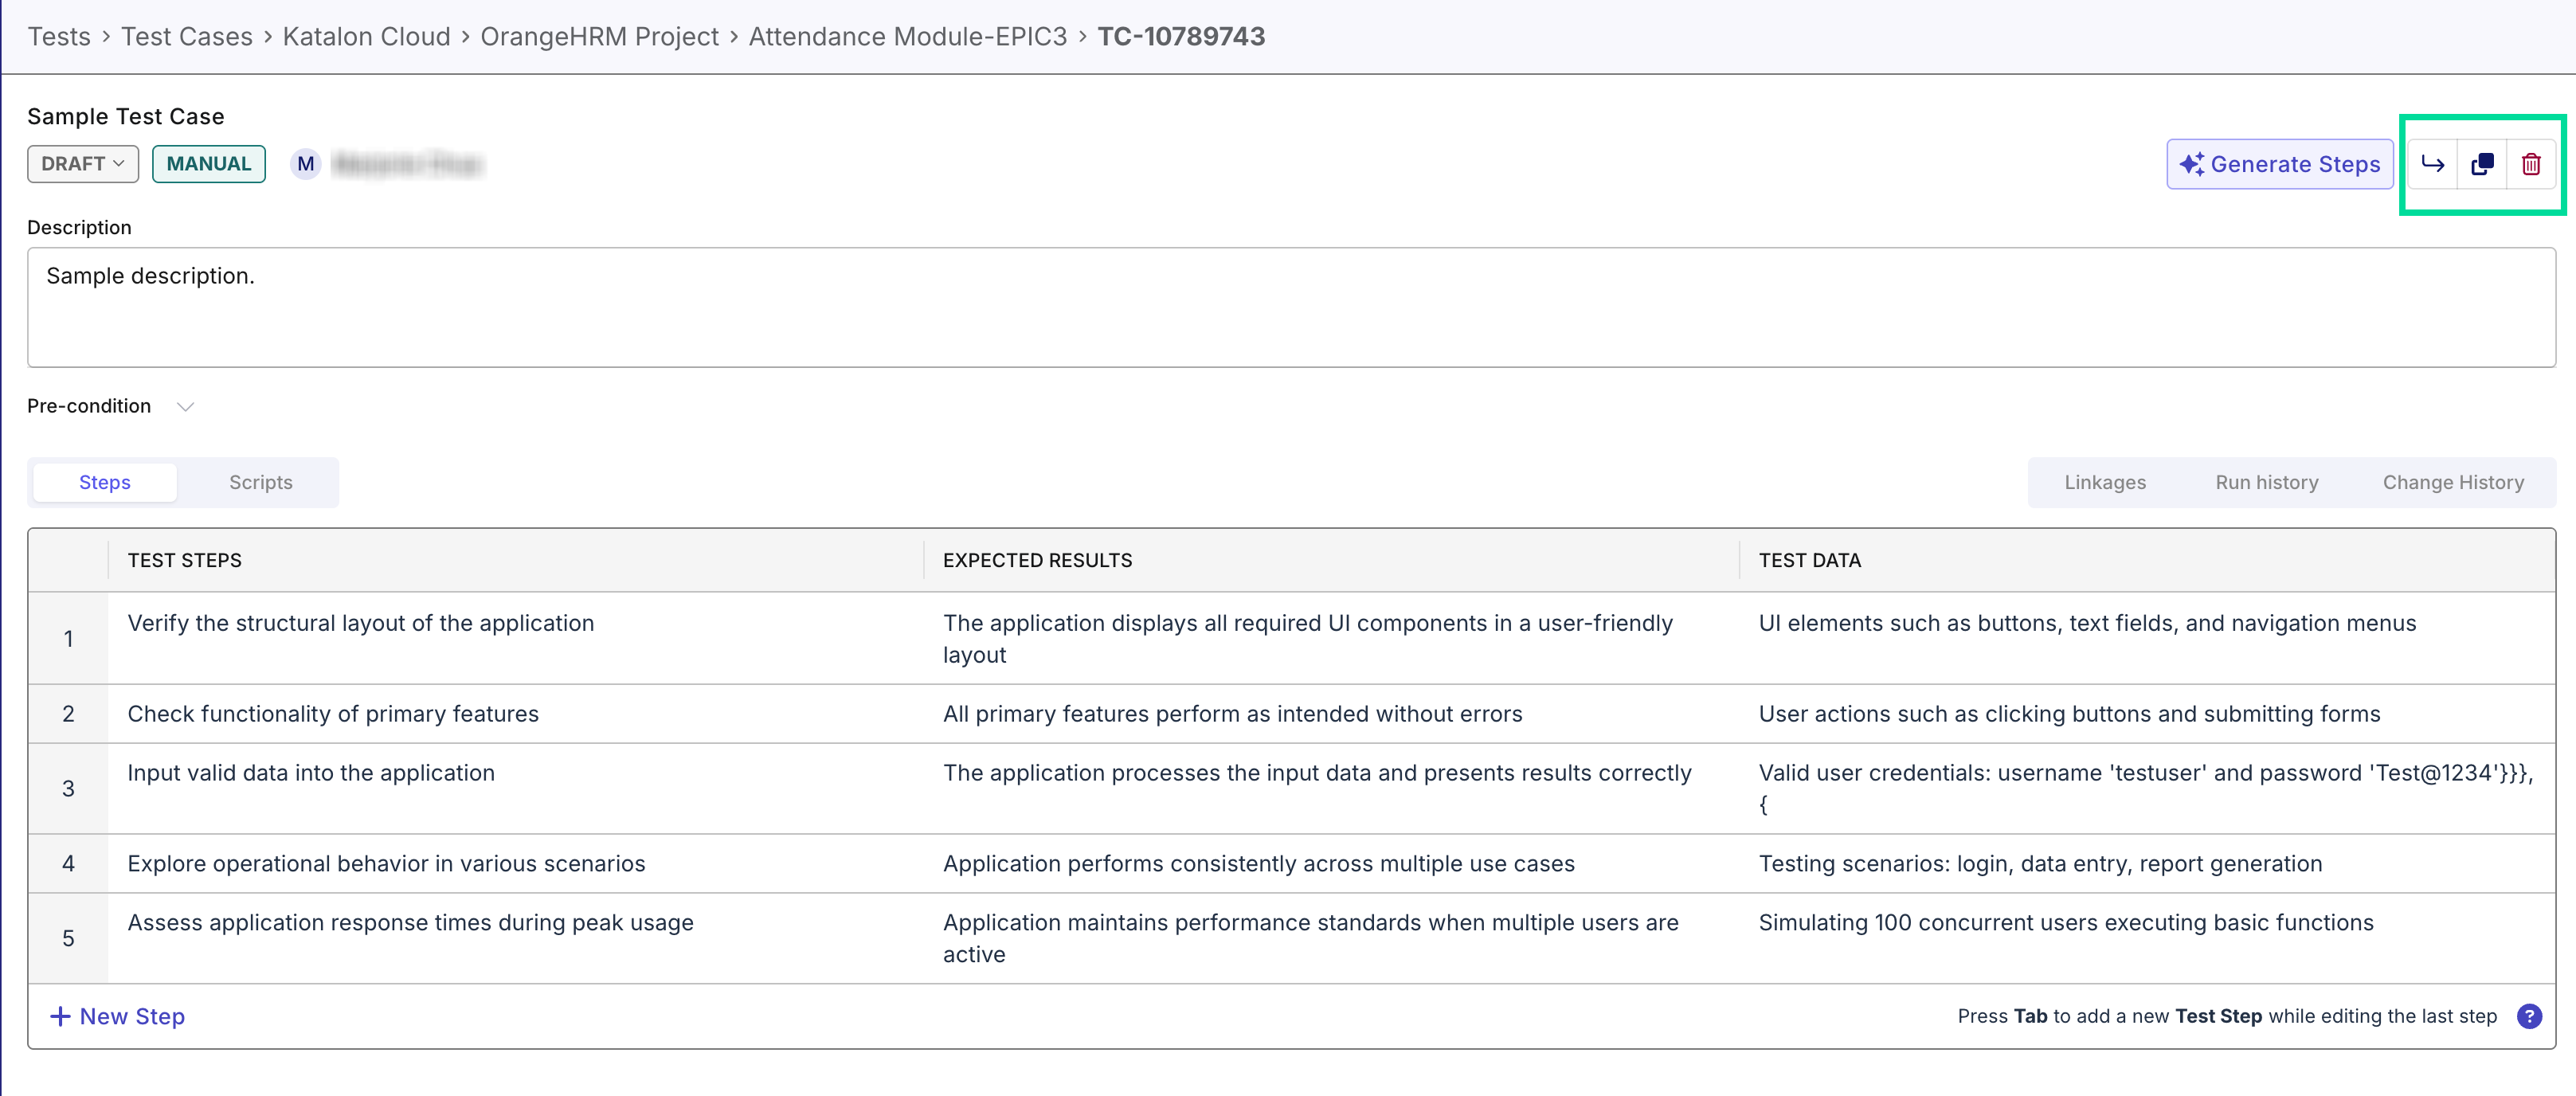
Manage test steps
Test steps describe what to do and what to expect. Use them to keep manual test cases readable and to standardize execution instructions.
Within a test case, you can define and manage individual test steps using the following fields:
- Description: Specify the action to perform.
- Expected Results: Define the criteria for success based on the action's outcome.
- Test Data: Provide any data needed for the step.
To add or edit test steps:
-
Click + New Step to create a test step and fill in the required details.
-
To modify an existing step, click the step number and choose an option from the pop-up menu to:
- Duplicate the test step
- Insert above
- Insert below
- Delete the test step
-
All changes are saved automatically.
Import test cases
If you already maintain test cases outside Katalon True Platform, you can bring them in by importing a CSV file.
- Names and paths must start with: Lowercase letters (a–z), numbers (1–9), or an underscore (_)
- Allowed characters within names and paths: Parentheses (), commas ,, periods ., hyphens -, and underscores _
- Please avoid the following:
- Using .. (double periods) anywhere in the name or path
- Ending a test case name with a period (.)
- We also recommend splitting your import file into smaller batches (around 500 test cases per file).
You can import test cases from a CSV file into Katalon True Platform. During import, all CSV values are automatically mapped to their corresponding Katalon True Platform fields, including any requirements linkages from your configured ALM integrations (e.g., Jira or Azure DevOps).
- Navigate to your specific project's UI > Tests > Test Cases.
- Click the + Create button, then choose Import Test Cases.
-
Upload your CSV file from your device and click Next.
-
Katalon True Platform will automatically map each field in your CSV file to a corresponding Katalon True Platform field. You can adjust these mappings if needed.
-
Review the mapped fields in the preview. When you're ready, click Import.
Upload test cases through ZIP upload
If you don’t use any Git-based integration to sync your repository, you can manually upload either a Katalon Studio project or a ZIP file containing .tc files to import test cases into a Local repository (ZIP Upload) in Katalon True Platform, including the original folder structure inside the ZIP file.
- Click the + Create button and select Upload Repository.
- On the Script Repositories page:
- Enter a Name for the repository (required).
- (Optional) Add a Description to help identify the repository.
- In the Upload section, click Choose File and select a ZIP file that contains:
- A full Katalon Studio project, or
- One or more test case files (
.tc).
- Click Import to upload and create the repository.
Once the upload is completed, Katalon True Platform extracts the ZIP file and imports all supported test cases while preserving the original directory and folder hierarchy.
Sync tests through repository integration
If you use Git-based version control, you can connect your repository to Katalon True Platform to automatically sync test cases, test suites, and test suite collections. Once the integration is set up, your tests will be synced automatically.
To set up repository integration, see:
After successfully configuring your Git integration, Katalon True Platform will automatically sync your test artifacts from the connected repository.
Linkages
Once your test cases are in Katalon True Platform, use Linkages to connect them to requirements and other artifacts for end-to-end traceability.
In Katalon True Platform, Linkages let you associate a test case with requirements from your ALM tools (like Jira or Azure DevOps), or with other test cases. This ensures clear traceability between requirements and what’s being tested—visible directly within each test case.
Currently, you can link a test case to:
- Requirements
- Other Test Cases
- Defects
- ADO Test Cases
Import linkages
If you’re importing test cases from CSV, you can also import their requirement linkages in the same file.
To link Requirements, Defects, ADO Test Cases, make sure you’ve configured an ALM integration, such as, Jira or Azure DevOps (ADO).
When importing test cases from a CSV file, you can include a column that links each test case to a requirement in your ALM tool. If a cell is left blank, that test case won’t be linked to any requirement.
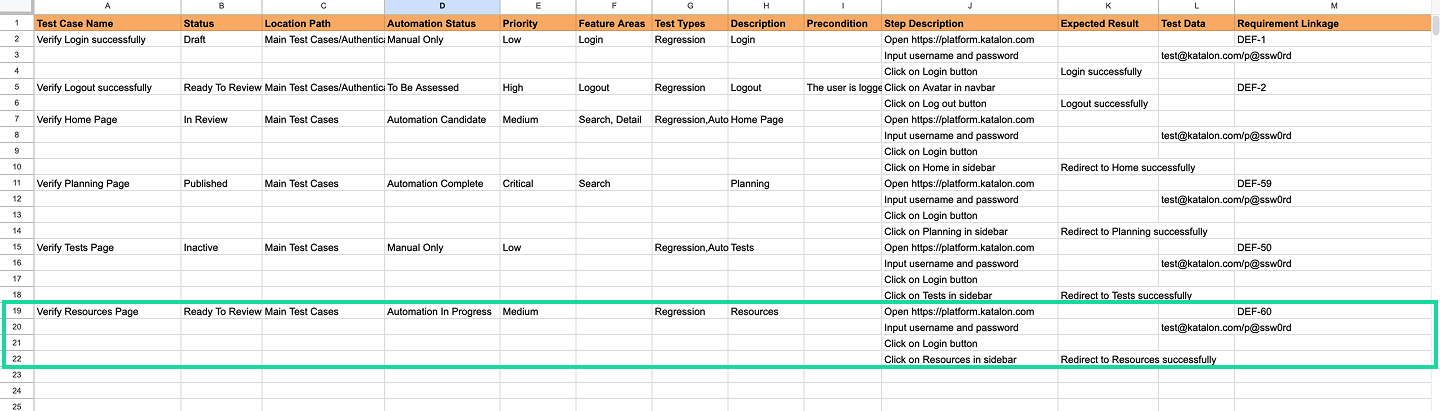
For example, if your ALM has an issue called DEF-60, and your imported CSV file includes a column that lists DEF-60 for a test case:
Result
Katalon True Platform will automatically link the imported test case to the corresponding issue.
In this case, the Verify Resources Page test case will be automatically linked to the issue DEF-60.
Manage linkages
Use this option when you need to add, remove, or correct linkages after creating or importing test cases.
After importing or creating test cases, you can update their requirement linkages at any time to reflect changes or correct mappings.
-
Open the test case you want to update.
-
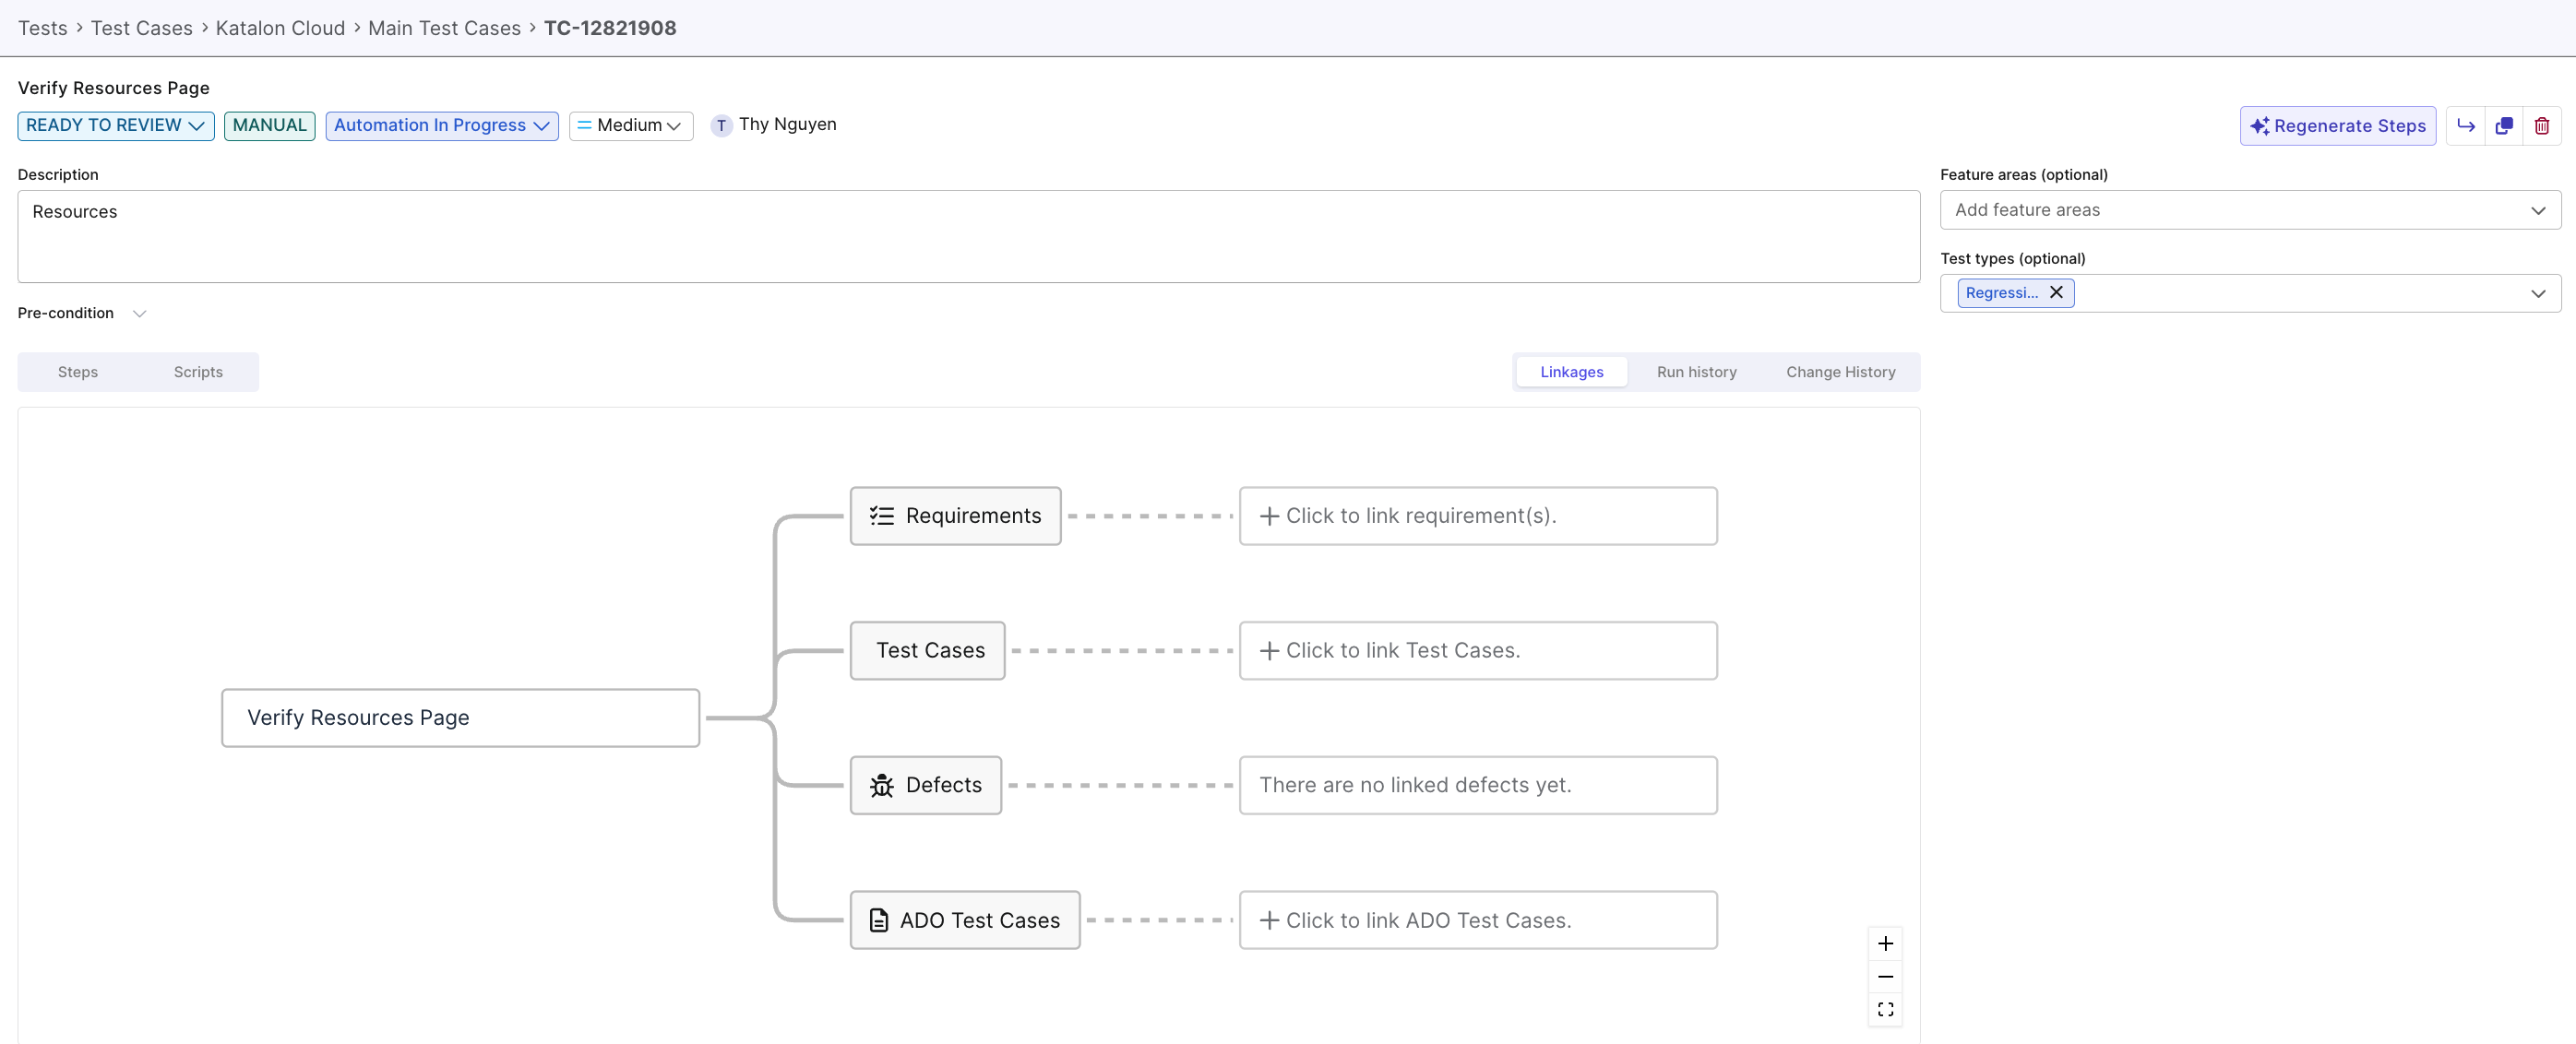
In the test case detail view, go to the Linkages panel.
-
You can do the following:
- To add a linkage, click Click to link..., then search for and select the requirement(s) from your connected ALM tool.
- To remove a linkage, click the Unlink icon next to the linked issue. Changes are applied automatically.
-
Click Link to apply your changes.