Jira integration
This document shows you how to set up an integration for Jira within Katalon True Platform.
If your Jira or Git instance is hosted on‑premise or behind a corporate firewall, use this guide together with the Private Jira/Git integration (Network configuration guide) to ensure all required firewall rules and tunnels are in place.
Connect a Jira account to Katalon True Platform
Before configuring Jira integration at the Project level (selecting board, mapping fields...), you must first set up the connection at the Account level.
You must have the Account Admin or System Admin role to perform this action.
To set up the connection:
-
Go to Account Settings > Integrations.
-
Click
+ Create Integration. In the Available Integration list, choose Jira. ✅ A green check mark indicates that the integration is currently available. -
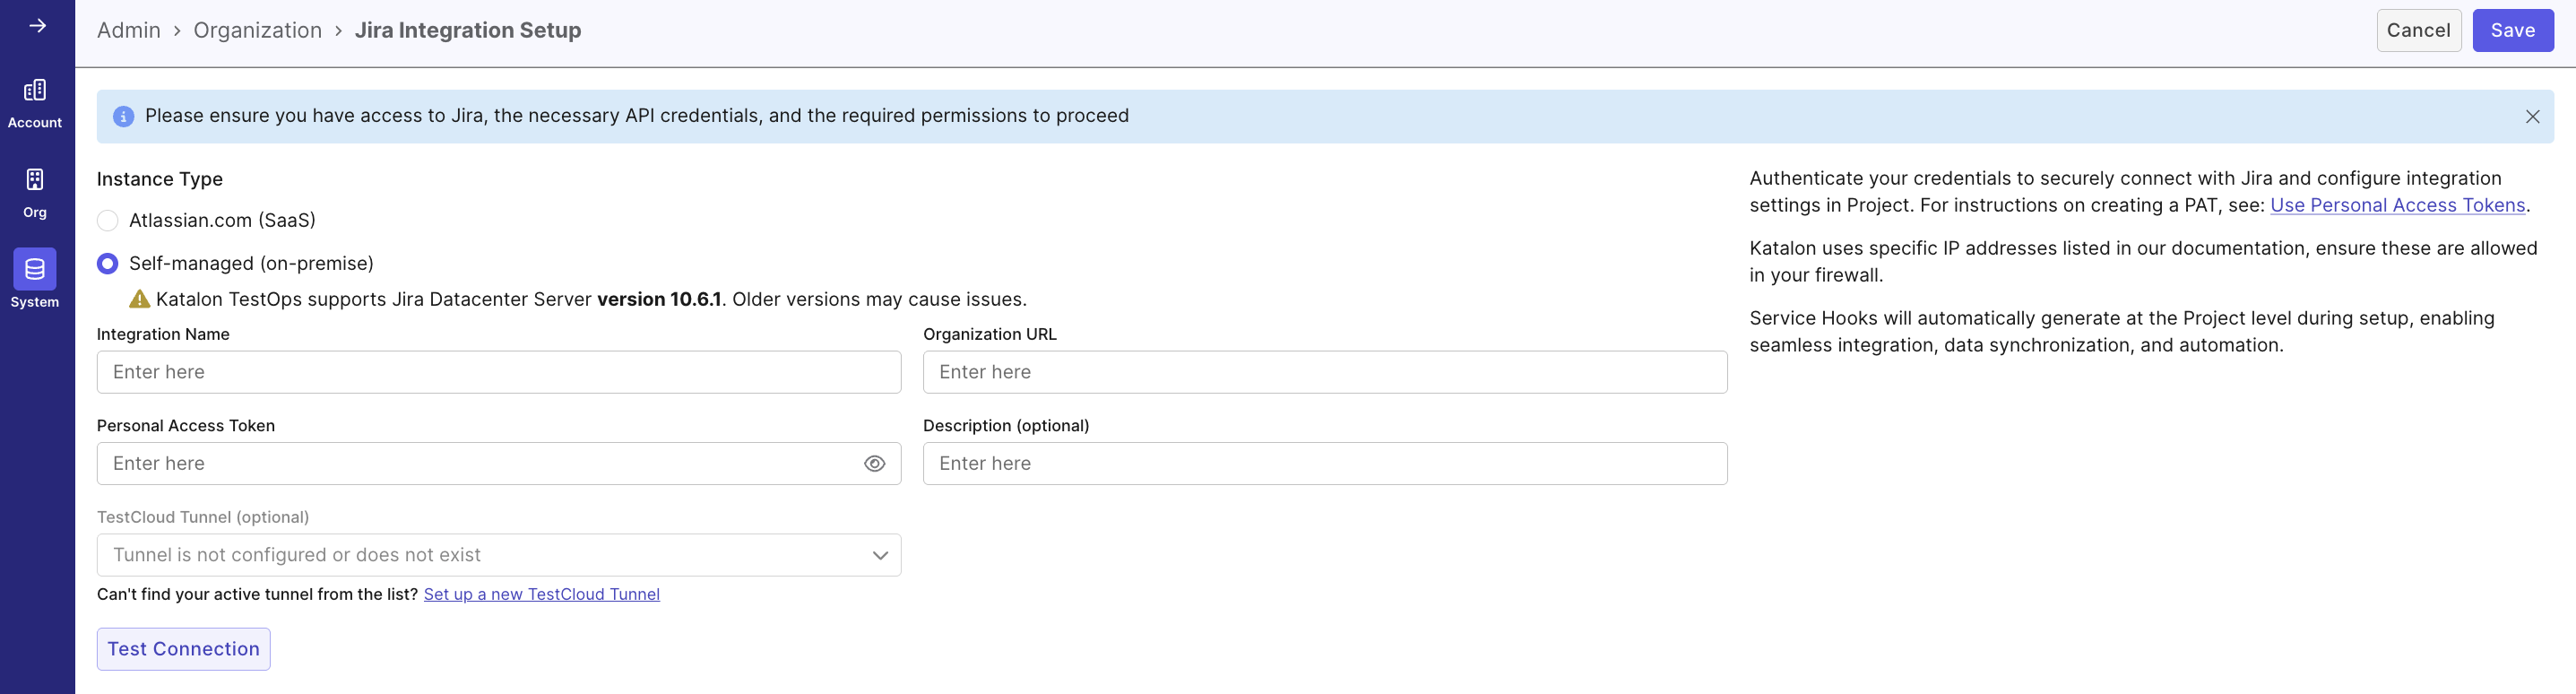
Fill in the required fields to establish the connection. Katalon True Platform supports two types of Jira instances:
Jira Cloud or Atlassian.com (SaaS)
- Integration Name: A custom name for the integration (max 50 characters).
- Organization URL: The Jira Organization URL.
- Example:
https://katalon-product-demo.atlassian.net - Must start with
https://
- Example:
- Personal Access Token (PAT): Enter your Jira PAT. To generate a PAT, refer to this documentation. Please make sure the PAT has required permissions.
✅ Jira Permissions Required for Katalon TruePlatform Integration
Integration Feature Required Permission(s) Notes Manual Sync Browse ProjectsAllows Katalon True Platform to retrieve project data from Jira. Link Defects Browse ProjectsEnables linking Jira issues to Katalon True Platform test cases. Create Defects Browse Projects,Create IssuesAdditional permissions may be required depending on Jira field configurations (see below). Optional: Assign Issues,Modify Reporter,Link Issues,Resolve Issues,Schedule IssuesThese become required if the corresponding fields ( Assignee,Reporter,Issue Links,Fix Versions,Due Date) are marked as required in Jira.Handle Webhook Events Browse ProjectsNeeded to associate Jira events with Katalon True Platform updates. Webhook Setup Administer Jira(global permission)Required only when configuring webhooks from Jira to Katalon True Platform. - Description (Optional): Brief description of the integration (max 255 characters).
🔁 Service Hooks will be automatically created at the project level for real-time syncing and automation.
Jira Datacenter Server or Self-Managed (On-Premise)
TIPS- Supported Version: Jira Datacenter Server 10.6.1 and above. Older versions may not be fully compatible with Katalon True Platform and could cause connection issues.
- Use HTTPS for Jira Data Center: If your Jira Data Center instance uses HTTP, modern browsers will block or auto-upgrade those requests to HTTPS. If the server doesn’t support HTTPS, embedded resources (images, icons, videos) will fail to load. We strongly encourage switching your Jira DC server to HTTPS and updating its base URL. This ensures secure communication and allows all embedded resources in Katalon True Platform to load properly.
-
Fill in the same fields as listed above.
- For private, firewall-restricted environments, make sure the network paths between Jira and Katalon True Platform are configured as described in this Private Jira/Git integration – network configuration guide document.
- Test Execution - Cloud Tunnel (optional). See Local testing with Test Execution - Cloud in Katalon True Platform for steps to install the agent, generate tunnel, and manage tunnel availability.
-
Click Test Connection to validate the integration.
-
Once validated, click Save, or click Cancel to exit without saving any changes.
Result
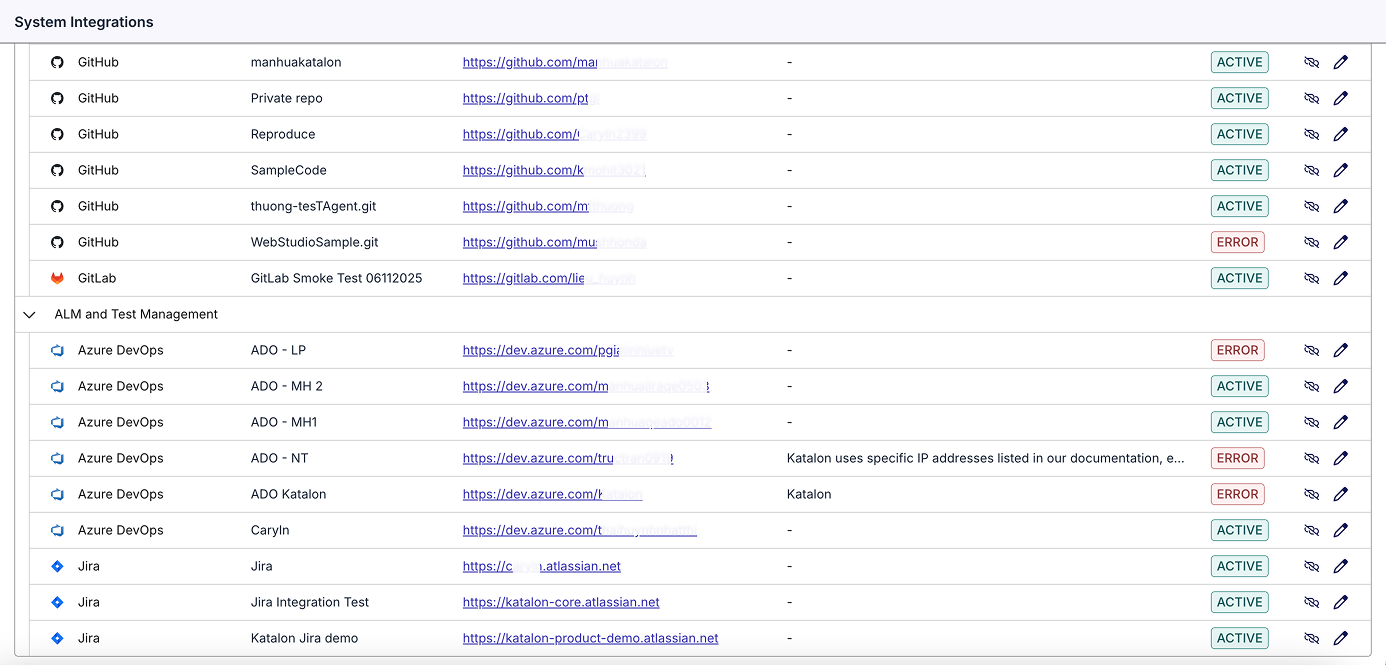
To verify if the connection is active, navigate to Admin > System > Integrations. Your Jira integration will be listed under the Integration list.
- If the status initially shows as Inactive, reload the page to update the status to Active.
- If the status shows Error, verify all required configuration fields, especially the Personal Access Token (PAT), and confirm it is valid and configured correctly in the account-level integration.
Configure Jira integration at Project level
- You must have the Project Admin role to perform this action.
- You have connected a Jira account at the Account-level
Once the connection is established, you can now configure the integration and perform these actions:
- Select Projects and Boards
- Pull requirements
- Map fields
Follow these steps:
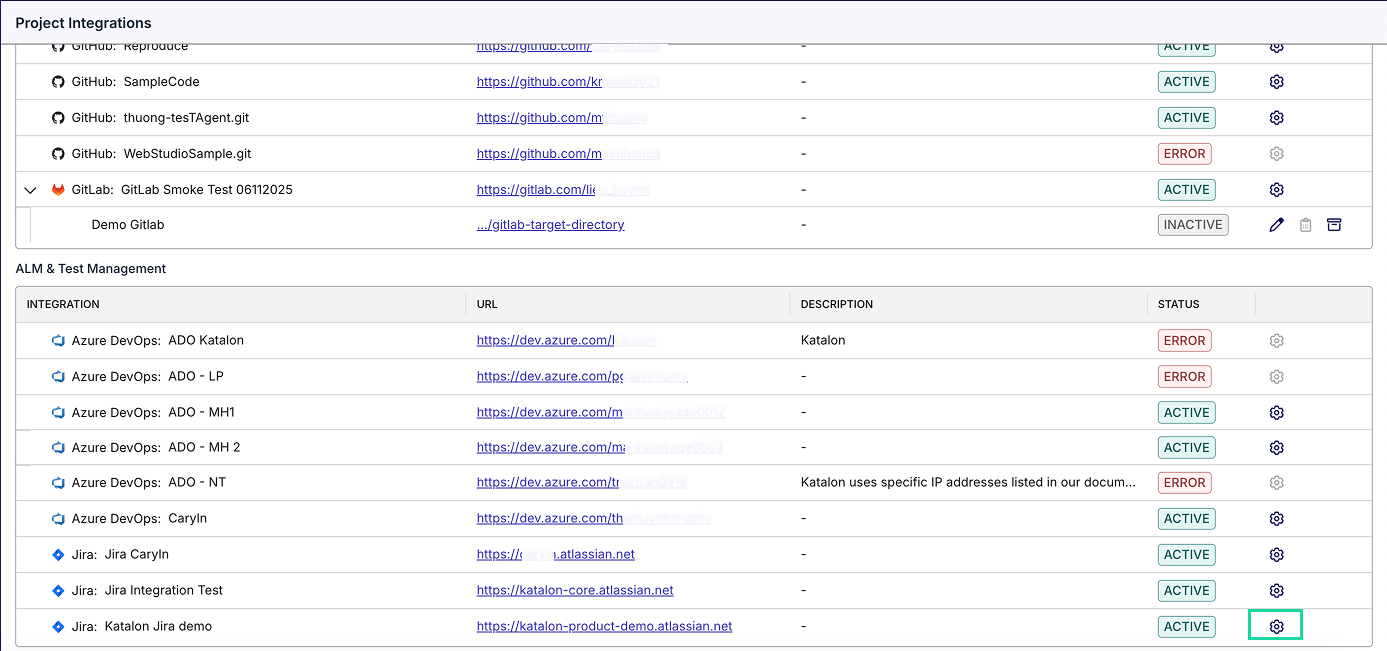
- Navigate to your specific project's UI > Settings > Integrations.
- Click the right edge of your linked connection and select New configuration (Setting icon).
-
Fill in the required fields:
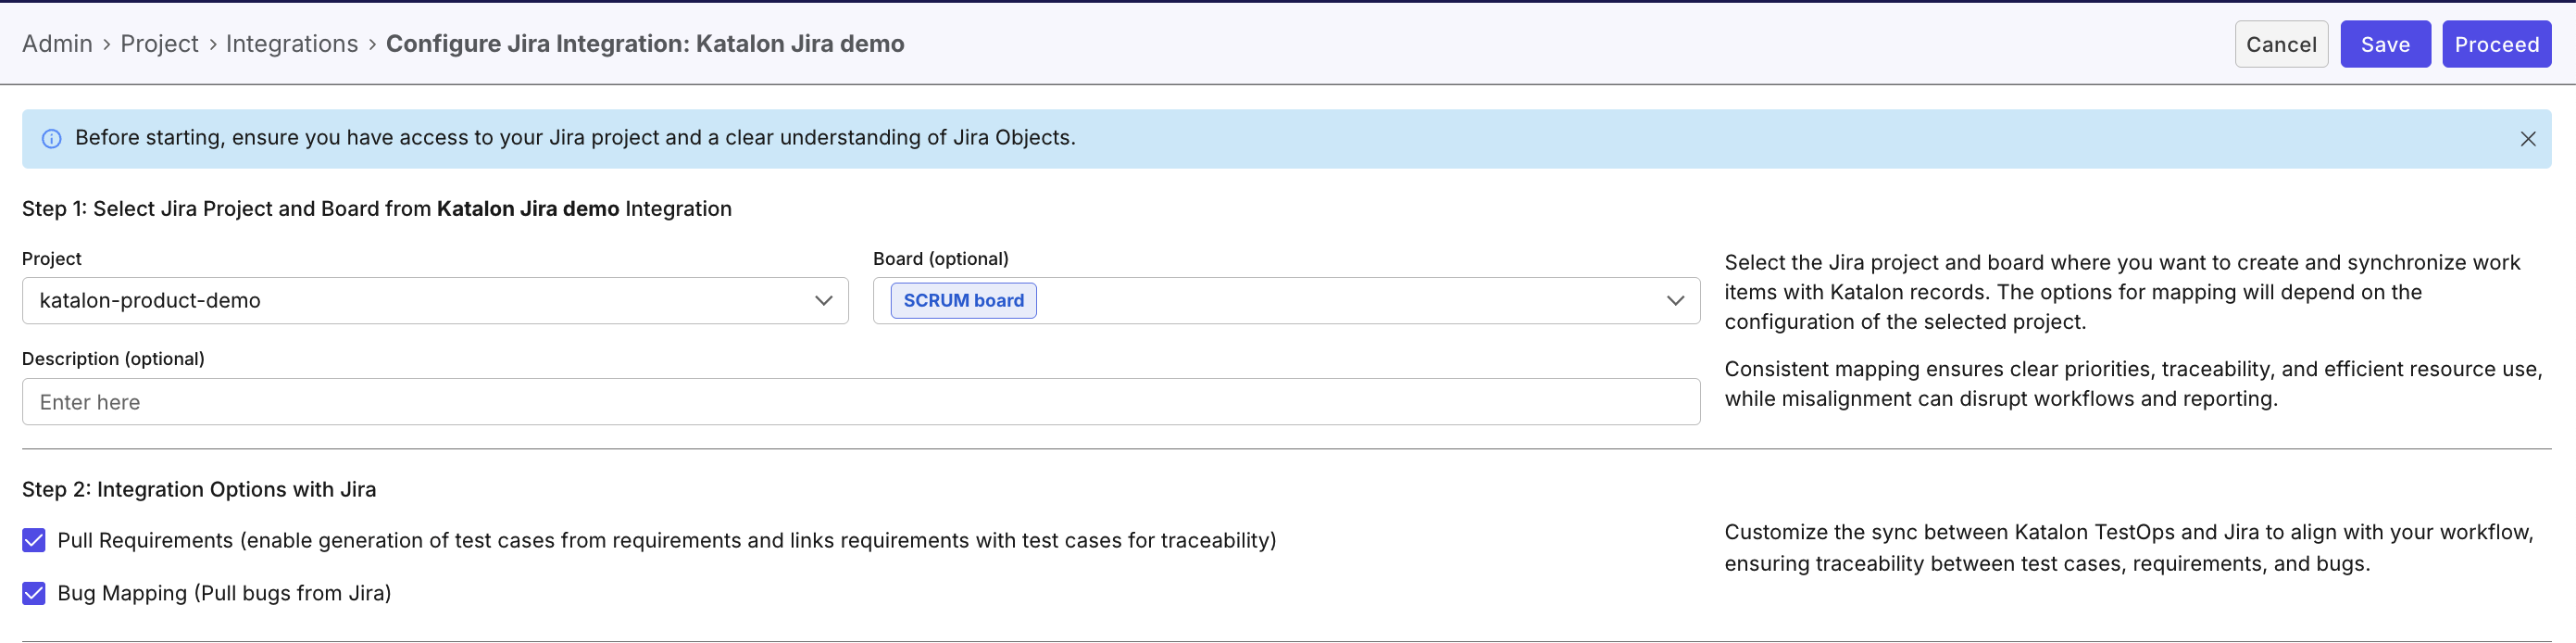
Step 1: Select the Project and Board
- Project: Select the Jira Project to link from the dropdown list. This defines which work items will be synced to Katalon True Platform.
- (Optional) Board: Select a board to link to enhance collaboration.
- (Optional) Description: Brief description of the linked project (max 255 characters).
Step 2: Additional integration settings
This section helps you customize synchronization between Katalon True Platform and Jira for streamlined traceability across test cases, requirements, and bugs.
- Tick on Pull Requirements (enable generation of test cases from requirements and links requirements with test cases for traceability) to enable this feature.
- Tick on Bug Mapping (Pull bugs from Jira) to enable this feature.
notesTicking on either feature will enable/disable the corresponding section in the next steps.
Step 3: Release and Sprint Mapping
noteThis step is enable only if Pull Requirements and/or Bug Mapping is selected (Step 2)
In this step, you define how Release and Sprint data will be mapped from your Jira project.
Note: Sprint will be disable if no board is selected (Step 1).

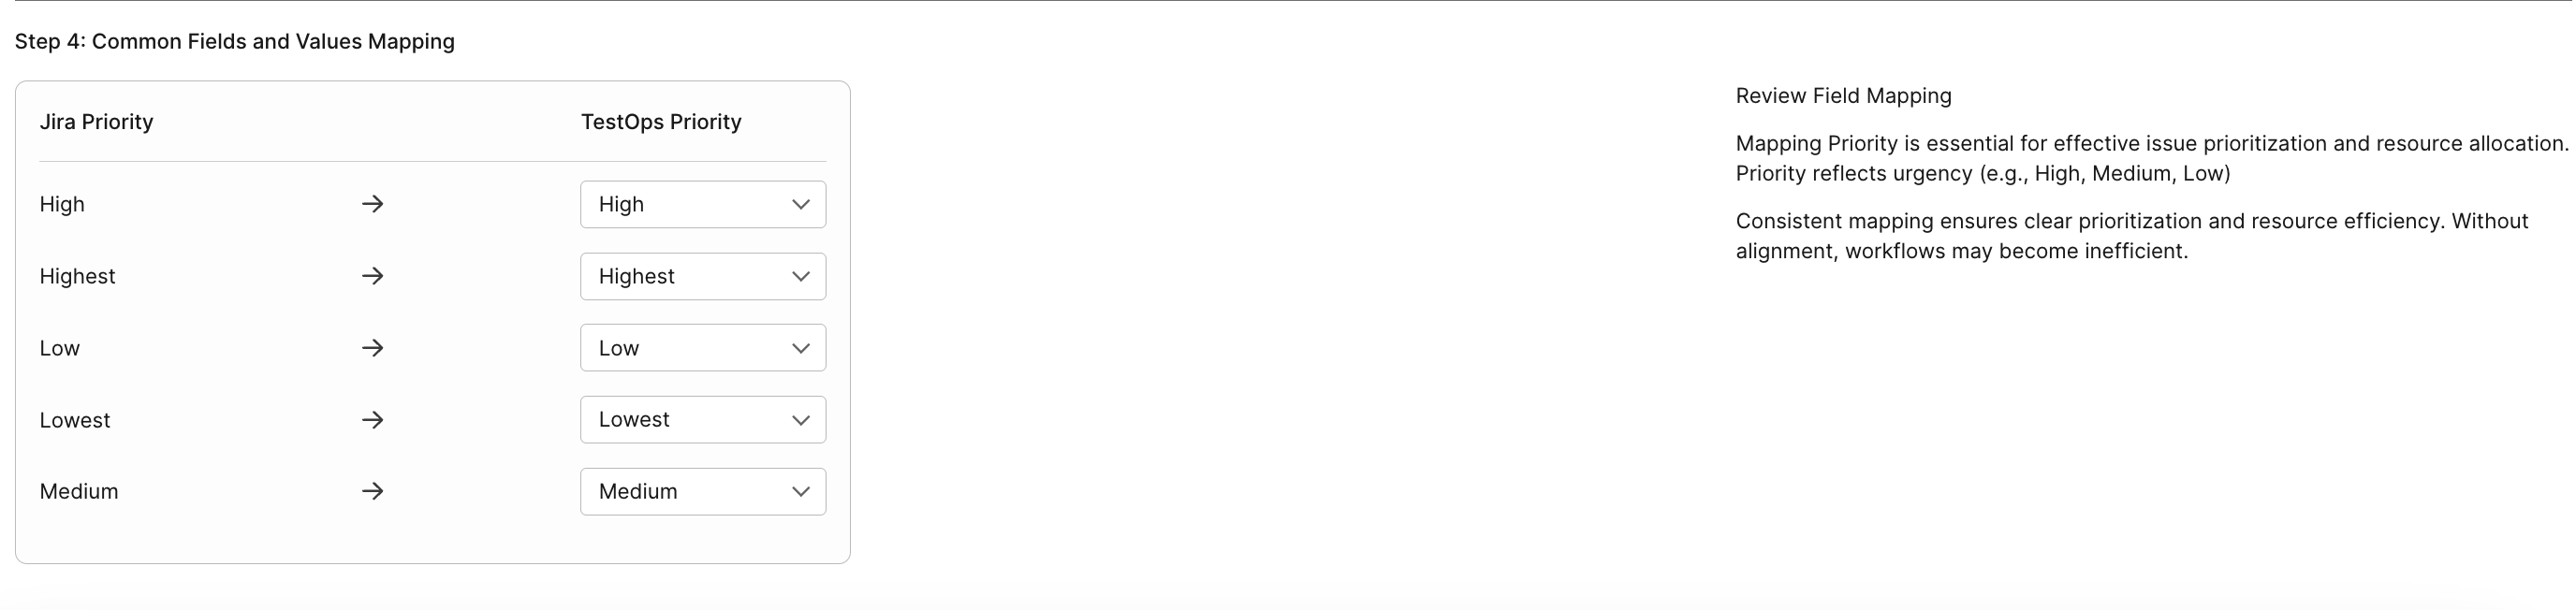
Step 4: Common Fields and Values Mapping
notesThis step is enable only if Pull Requirements and/or Bug Mapping is selected (Step 2)
This section allows you to map priority for effective issue prioritization and resource allocation, ensuring clear prioritization based on urgency (e.g., High, Medium, Low). Consistent mapping helps maintain workflow efficiency and prevents misalignment that could lead to inefficiencies.
Map Jira Priority levels your chosen Katalon True Platform Priority levels based on your workflow.
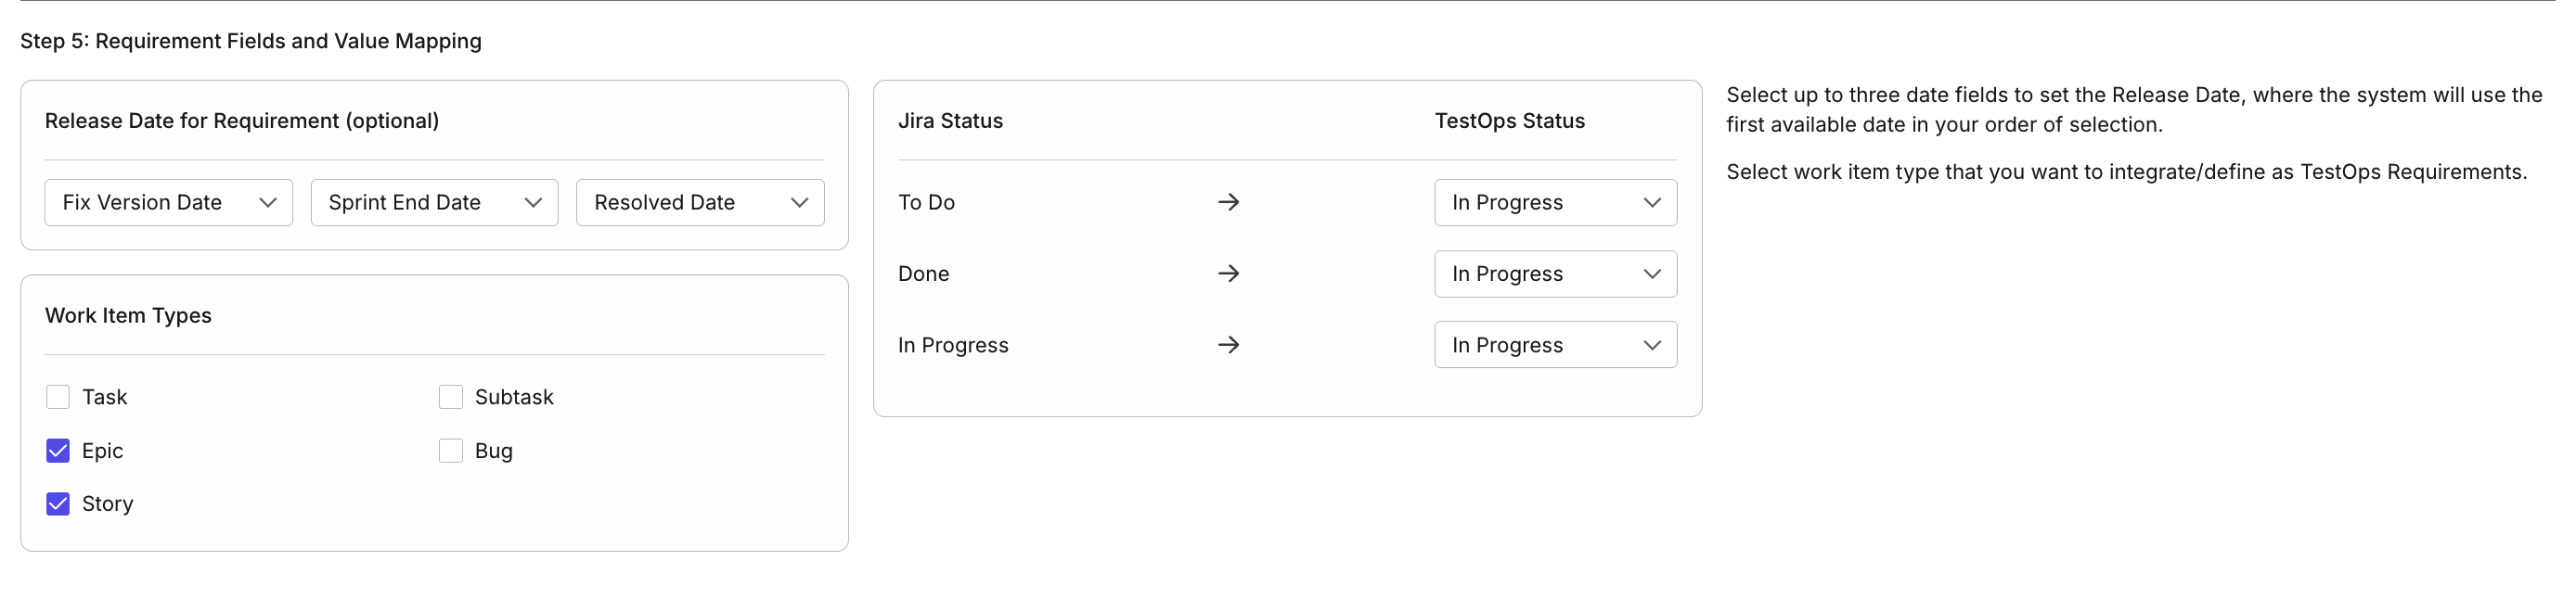
Step 5: Requirement Fields and Value Mapping
notesThis step is enable only if Pull Requirements and/or Bug Mapping is selected (Step 2)
This section allows you to select up to three date fields to set the Release Date, with the system using the first available date in your order of selection. You can also set an Jira State's equivalent Katalon True Platform Status.
-
Release Date for Requirement (Optional): Select three Jira fields as potential sources for the release date of a requirement. These fields are used in a priority order (left to right) to determine the release date:
- Field 1 (e.g., Fix Version Date): This is the highest priority field. The system will first check if this date is available for the work item. If it is, this will be used as the release date.
- Field 2 (e.g., Sprint End Date): If Field 1 is not available or empty, the system will fall back to this second-priority field to determine the release date.
- Field 3 (e.g., Resolved Date): If both Field 1 and Field 2 are unavailable, the system will use this third-priority field as the release date.
-
Map Jira Status to your chosen Katalon True Platform State
-
Work Item Types: Select Jira Work Item Types to be synced.
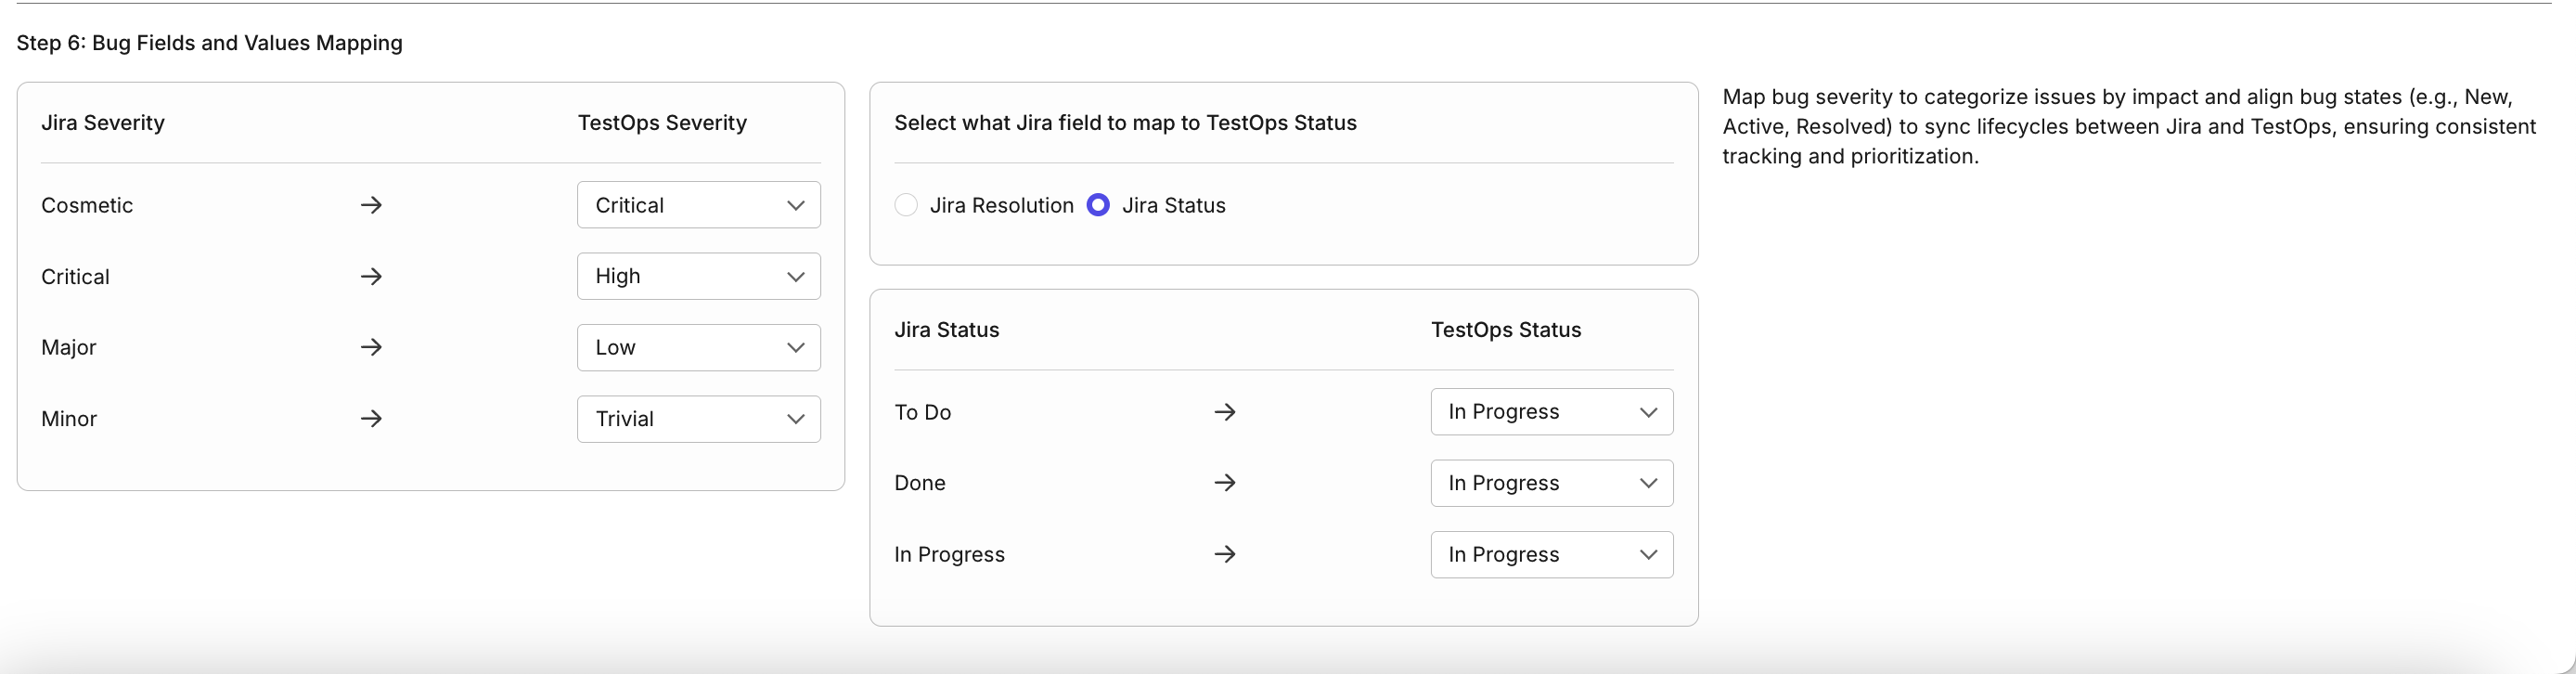
Step 6: Bug Fields and Values Mapping
notesThis step is enable only if Pull Requirements and/or Bug Mapping is selected (Step 2)
This section allows you to map the fields and values of bugs to the corresponding fields and values in Katalon True Platform.
-
Map Jira Severity levels to your chosen Katalon True Platform Severity levels based on your workflow.
-
Map Jira Status levels to your chosen Katalon True Platform Status.
-
Select either Jira Resolution or Jira Status to your chosen Katalon True Platform Status.
-
Click Proceed to sync data and finalize the connection.
- If the status initially shows as Inactive, reload the page to update the status to Active.
- If you modify the connection details and click Save, your changes will be saved, but the status may remain Inactive. To sync data and finalize the connection, click Proceed.
-
[Optional] To edit an existing linked Jira integration, click the Edit (pen) icon, make the necessary changes, and click Proceed. After editing, reload the page to ensure data is refreshed.
Result
Your Jira integration is now active within your project.

View release plans synced from linked Jira Integration
To view release plans synced from linked Jira integration:
- Navigate to your specific project's UI > Plans.
- In the left-right dropdown menu, select the linked Jira integration.
- Click the Sync button to fetch the latest data.
Managing Your Jira Integration
Katalon True Platform provides multiple ways to manage Jira integrations without losing historical data. This section covers how to disconnect, archive, and restore an integration when needed.
- Use Disconnect to disable Jira integration across all projects (Account-level).
- Use Archive to disable Jira connection for a single project (Project-level).
Katalon does not support permanently deleting integrations. This ensures audit history is preserved and enhances security and traceability.
Disconnect a Jira Connection
Required role: Account Admin or System Admin to perform this action.
Disconnecting makes the integration inactive across all projects. Katalon True Platform does not support fully deleting integrations, in order to preserve audit history.
-
Go to Account Settings > Integrations.
-
Click the Disconnect icon next to the connection.
-
Confirm by clicking Disconnect in the dialog.
=> The status changes to Inactive. All projects using this integration lose the ability to sync with Jira.
-
To reconnect, click the Reconnect icon next to the integration and confirm. All projects will resume syncing once reconnected.
Archive a Linked Jira integration
Required role: Account Admin or System Admin to perform this action
Archiving disables the connection for that project only — other projects using the same Jira integration are unaffected. Archived configurations no longer appear in Project Settings, and any scheduled test runs will be canceled at runtime.
- Go to Project Settings > Integrations.
- Click the right edge of your linked connection and select Archive.
- Confirm by clicking Archive in the dialog.
Result: The integration no longer appears in the Plans module.
Restore a Linked Jira integration
- Go to Project Settings > Integrations.
- Click New configuration (settings icon) on the Jira connection.
- Enter the same repository URL as the archived configuration and click Proceed.
Katalon True Platform will restore the archived configuration rather than creating a duplicate.