Quick guide for administrators
For the legacy version of this guide, refer to this document.
This quick guide helps administrators set up and manage Katalon accounts, organizations, projects, licenses, and users effectively.
Recommended Setup Flow after initial purchase:
- Set Up General Account – Define account details for alignment with your organization’s identity.
- Configure Security Settings – Set up a custom domain and complete other mandatory security configurations.
- Create an Organization or sub-Organization (or a Project) – Projects must always reside within an Organization or sub-Organization.
- Assign Dedicated Licenses – Assign dedicated licenses to specific organizations or sub-Organizations.
- Invite Users – Add users to organizations or projects.
- Assign Licenses to Users – Grant users licenses from the organization’s pool.
Requirements
- You have created a Katalon account. Register for a Katalon account if you don't have one.
- You must be assigned the Account Admin role to perform this action.
Set up Account's General Information
Start by defining your account details and ensuring the system aligns with your organization’s identity.
-
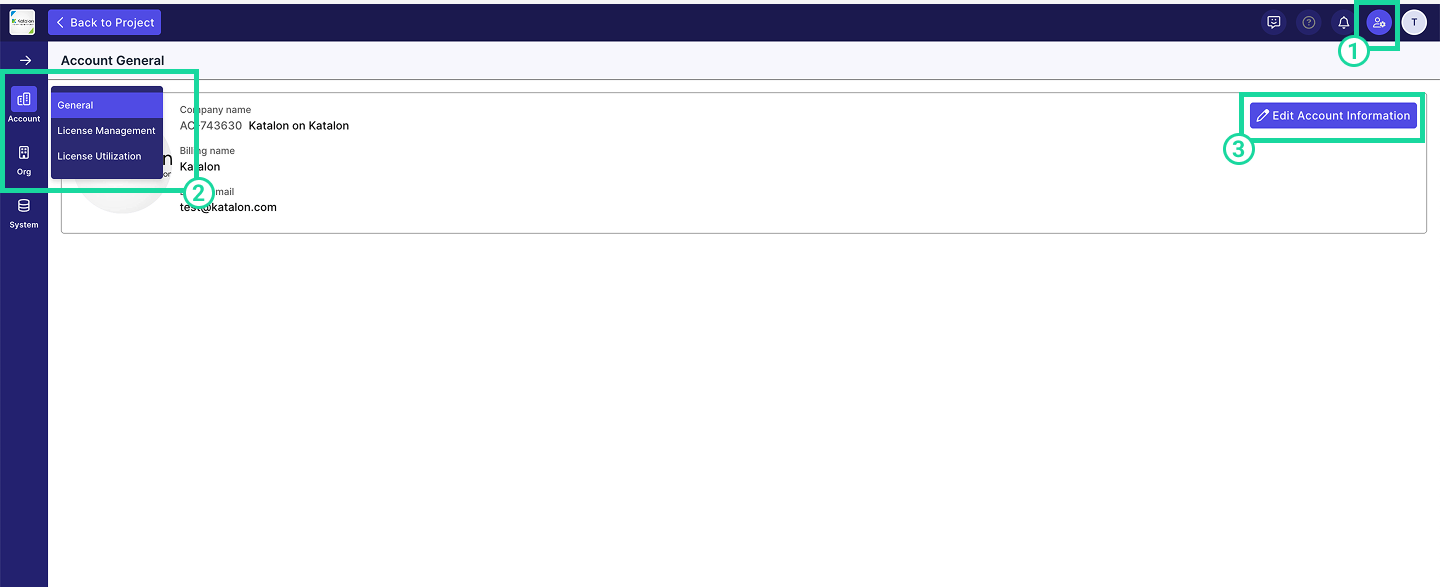
Go to Admin Settings > Organization. You can find Admin Settings in the upper-right corner of the page, indicated by a cog icon.
-
Click Account > General.
-
Click on the Edit Account Information button located at the upper right corner of your account's information box.
-
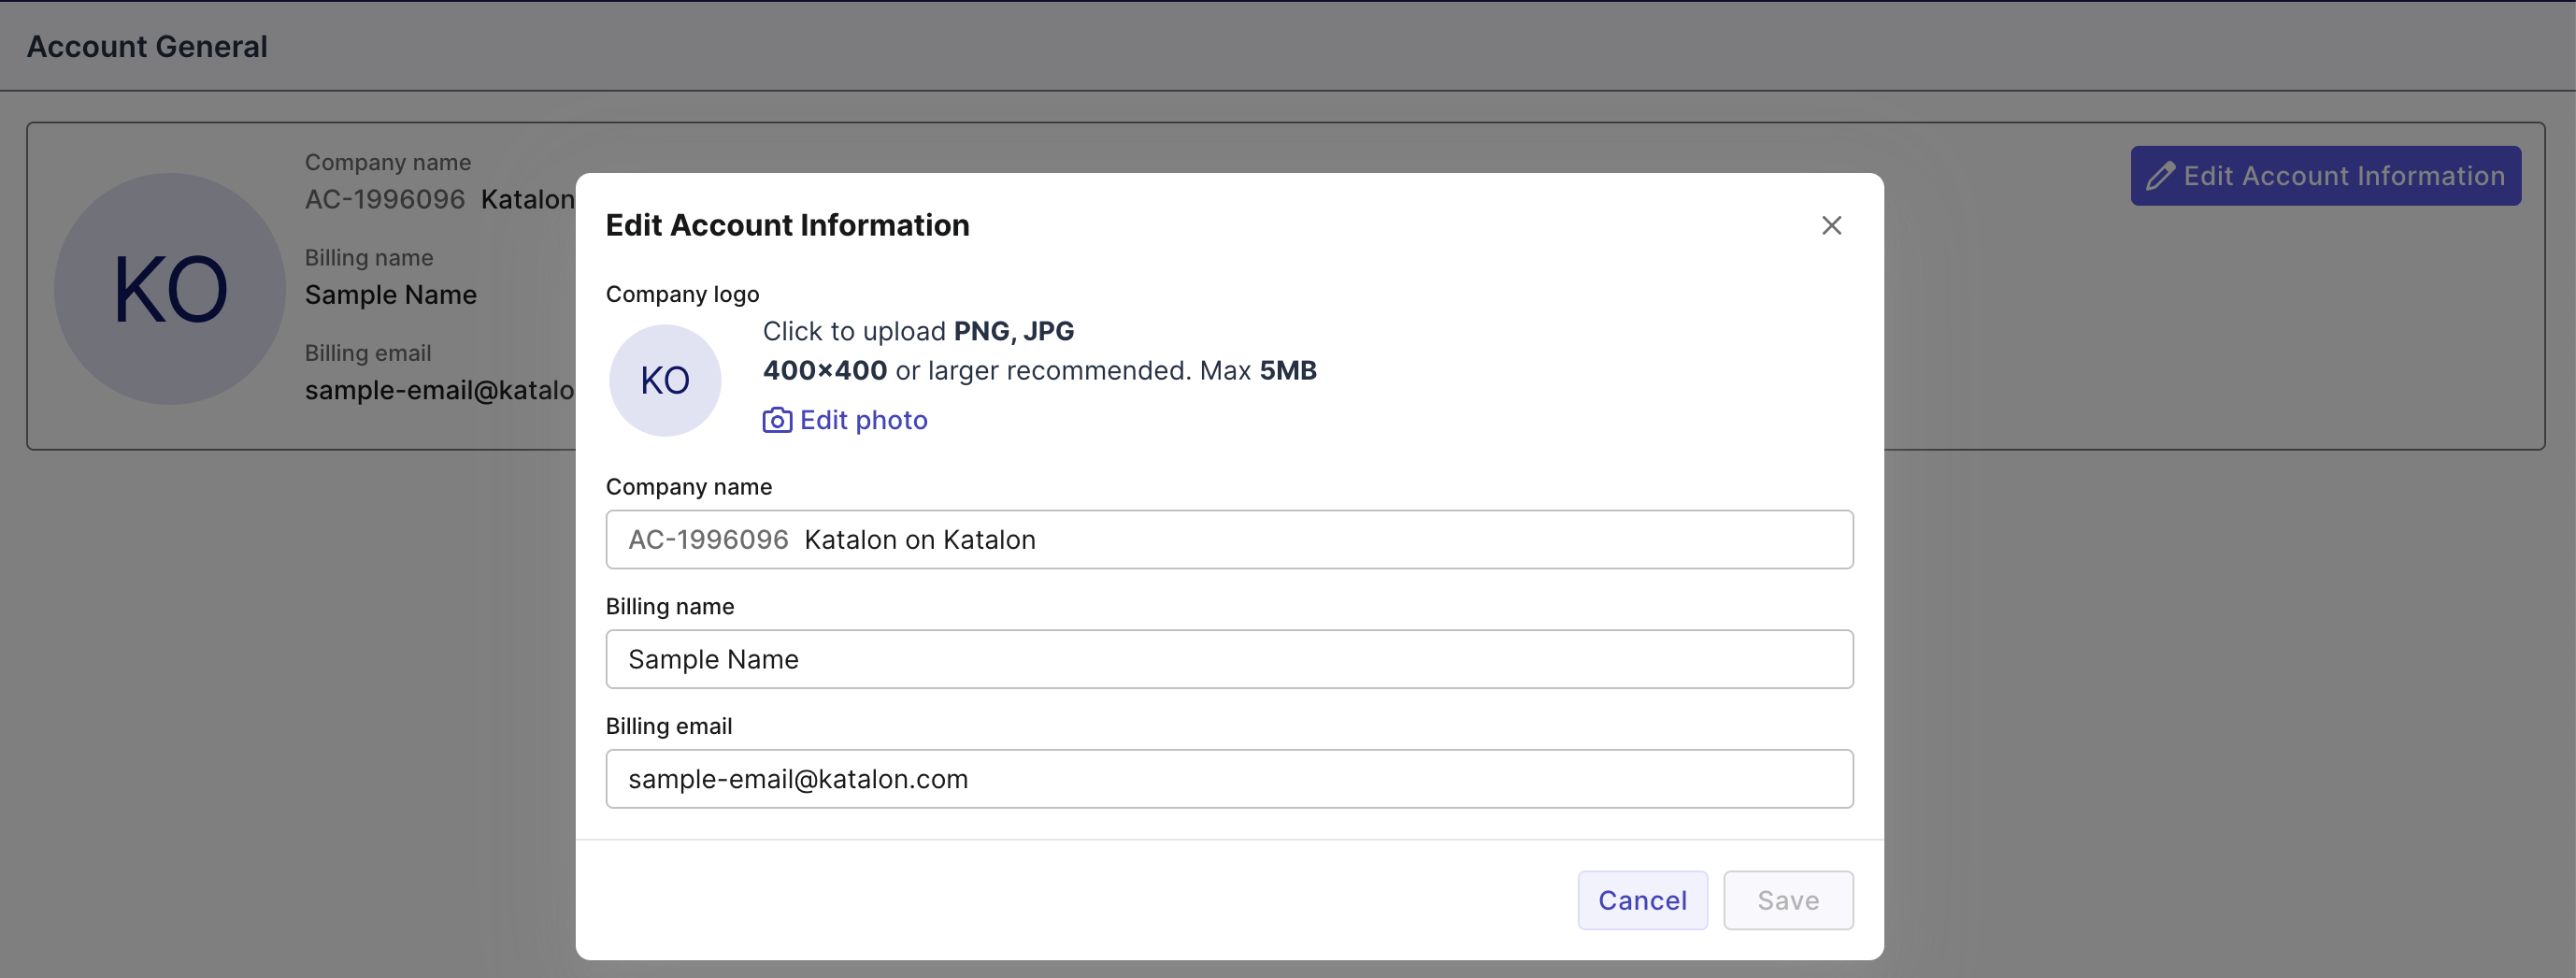
The Edit Account Information dialog box pops up. Input or edit your information as required.
-
Click Save.
Create Organizations, sub-Organizations, or Projects
Organizations and sub-Organizations represent your company’s structure (departments, teams). Projects must always reside within an Organization or sub-Organization.
-
Go to Admin Settings. You can find Admin Settings at the upper right corner of the page
-
Click Org > Organization Management
-
Click on
+ Create. Select Organization from the dropdown.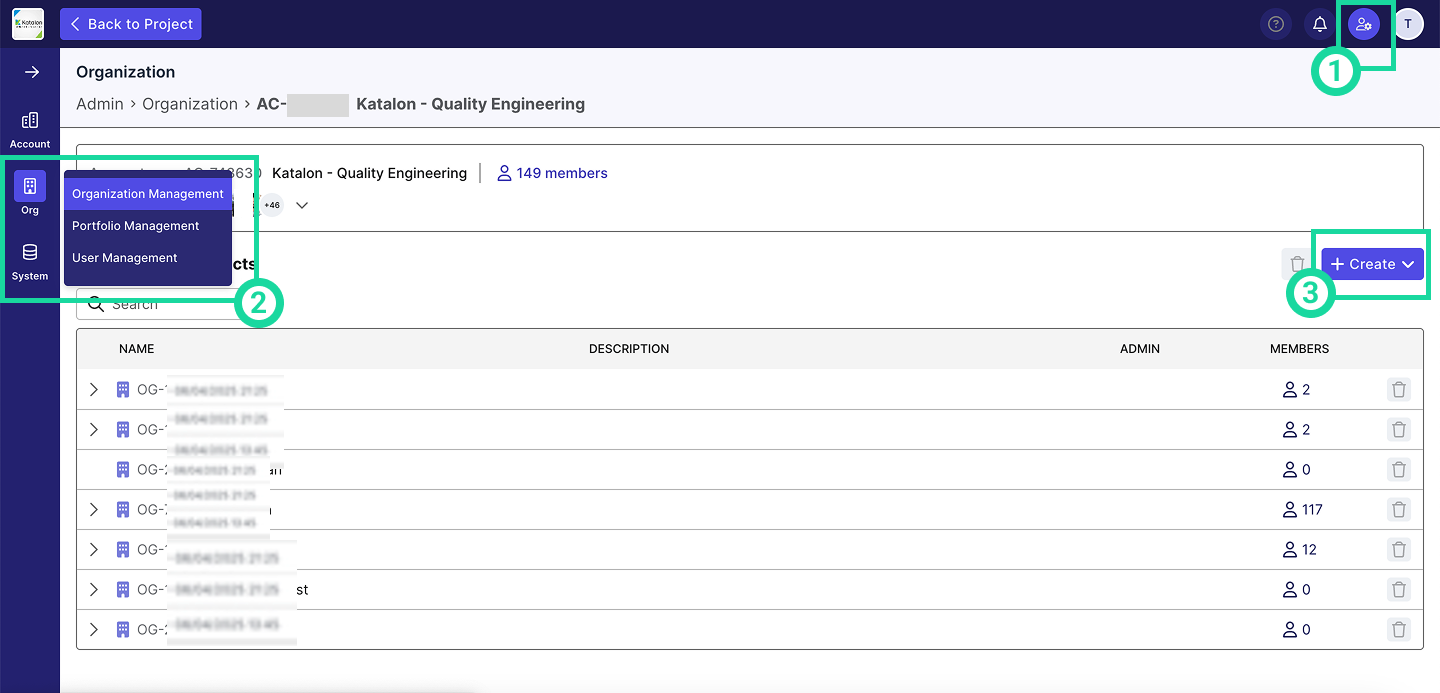
-
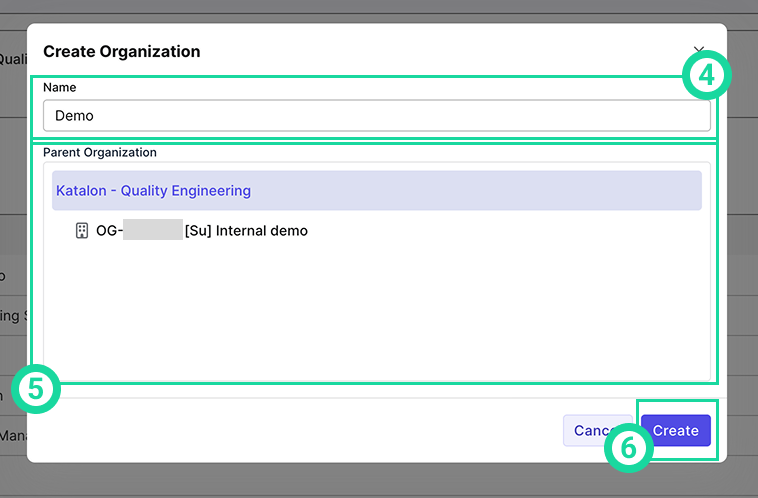
Input the name you want.
-
Under Parent Organization, select your Account to create a new Organization, or choose an existing Organization to create a sub-Organization.
-
Click Create to finish.
To create a Project
-
Go to Admin Settings. You can find Admin Settings at the upper right corner of the page
-
Click Org > Organization Management
-
Click on
+ Create. Select Project from the dropdown.
The Create Project dialog box appears. Input the requested information:
- Name
- Description
- Admin: The users you would like to assign as Project Admins.
- Parent organization: The Organization to which you would like to add this project to.
- Click Create.
License Management
Licenses are provisioned at the Account-level by default. You may either:
- Use the default setting (licenses consumed at Account-level), or
- Assign dedicated licenses to Organizations/sub-Organizations and consume from there for tighter governance (recommended).
Dedicated Licenses Explained
A dedicated license is a fixed number of licenses allocated to a specific Organization, limiting how many licenses that Organization/sub-Organization can use and manage.
When you purchase Katalon licenses, they are added to your Account-level license pool by default. This pool is shared across all users in the account, making licenses accessible to everyone. To improve license governance, you can assign dedicated licenses to Organizations and sub-Organizations.
Once Organizations are set up, you can:
- Assign dedicated licenses to each Organization or sub-Organization.
- Define limits on how many licenses each group can access and manage.
Examples 1
The following examples illustrate how dedicated licensing functions across Accounts, Organizations, and Sub-Organizations:
First example: This account has 200 TestOps licenses. They assign 20, 10, 1, and 5 licenses to four Organizations, respectively. These numbers represent the dedicated licenses each Organization can use and they cannot exceed that amount.
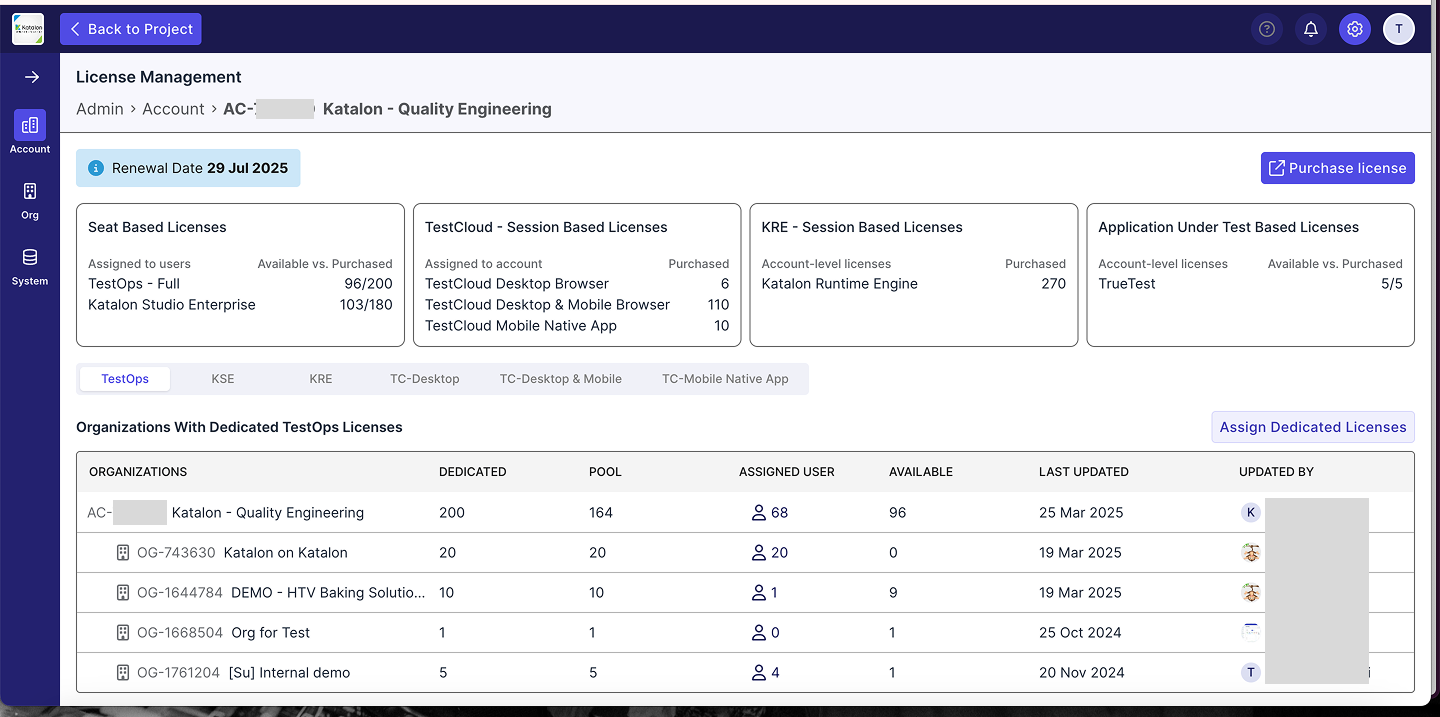
- Dedicated: The total number of licenses explicitly assigned to an Account, Organization, or Sub-Organization.
- Pool: The number of licenses still available after allocation to sub-levels (e.g., from Account to Organization, or Organization to Sub-Organization).
- Assigned User: The number of users who have actively claimed a license in that specific level.
- Available: The number of unclaimed licenses remaining at that level, ready to be assigned to users.
Examples 2
This Organization receives 10 dedicated licenses. It then assigns 5 licenses to a sub-Organization, reducing its remaining pool to 5 licenses.

If they later create a second sub-Organization, they can assign it up to 5 licenses, depending on what's left in the parent Organization’s pool.
Assign Dedicated Licenses to Organization
To assign licenses to Organization that has not received any dedicated licenses yet:
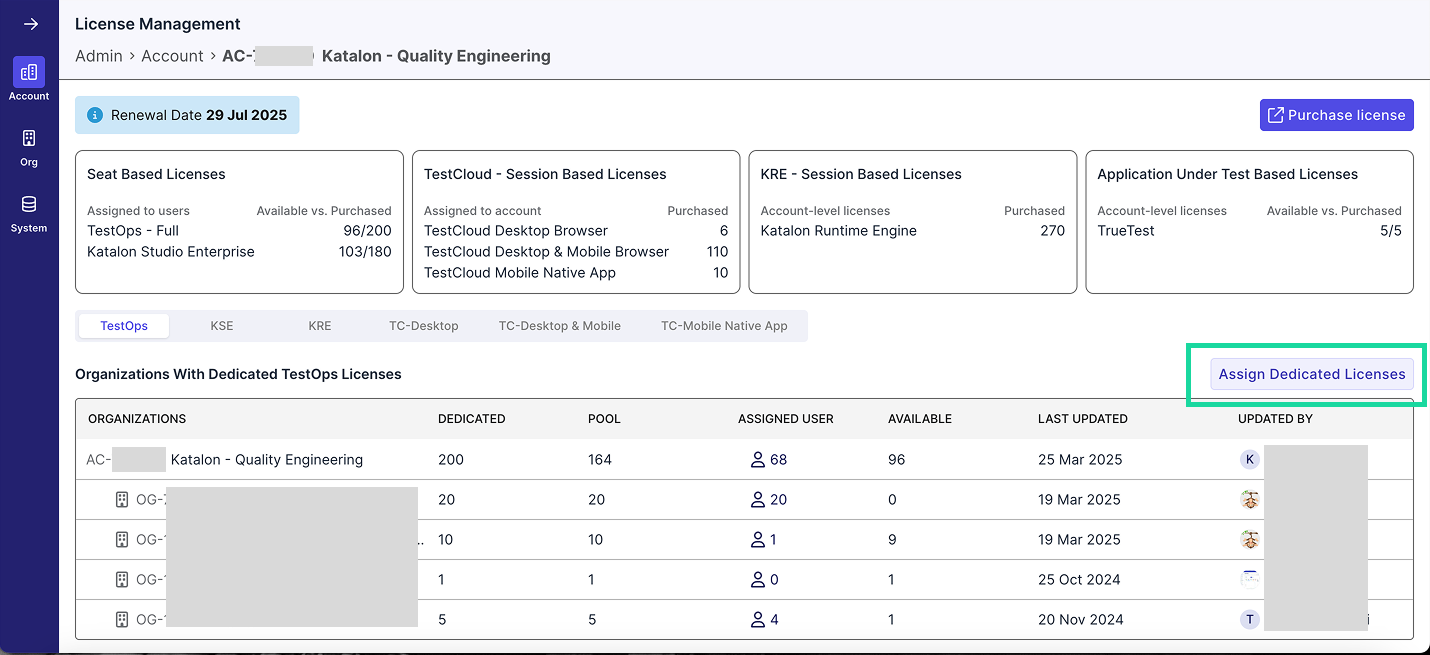
- Click Assign Dedicated Licenses.
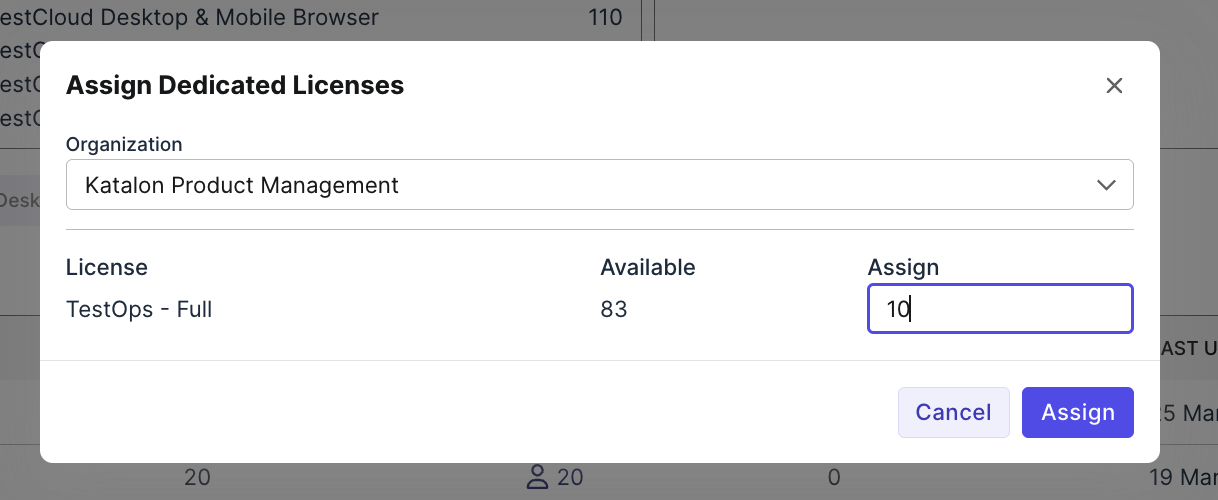
- Select an Organization from the dropdown, enter the amount, and click Assign.
Edit Dedicated Licenses given to Organization
This section shows you how to edit number of dedicated licenses given to organization.
- Go to Admin Settings. You can find Admin Settings at the upper right corner of the page.
- Click Account > License Management.
- Hover over the Edit icon (pen icon) of the organization you want to edit the dedicated license for.
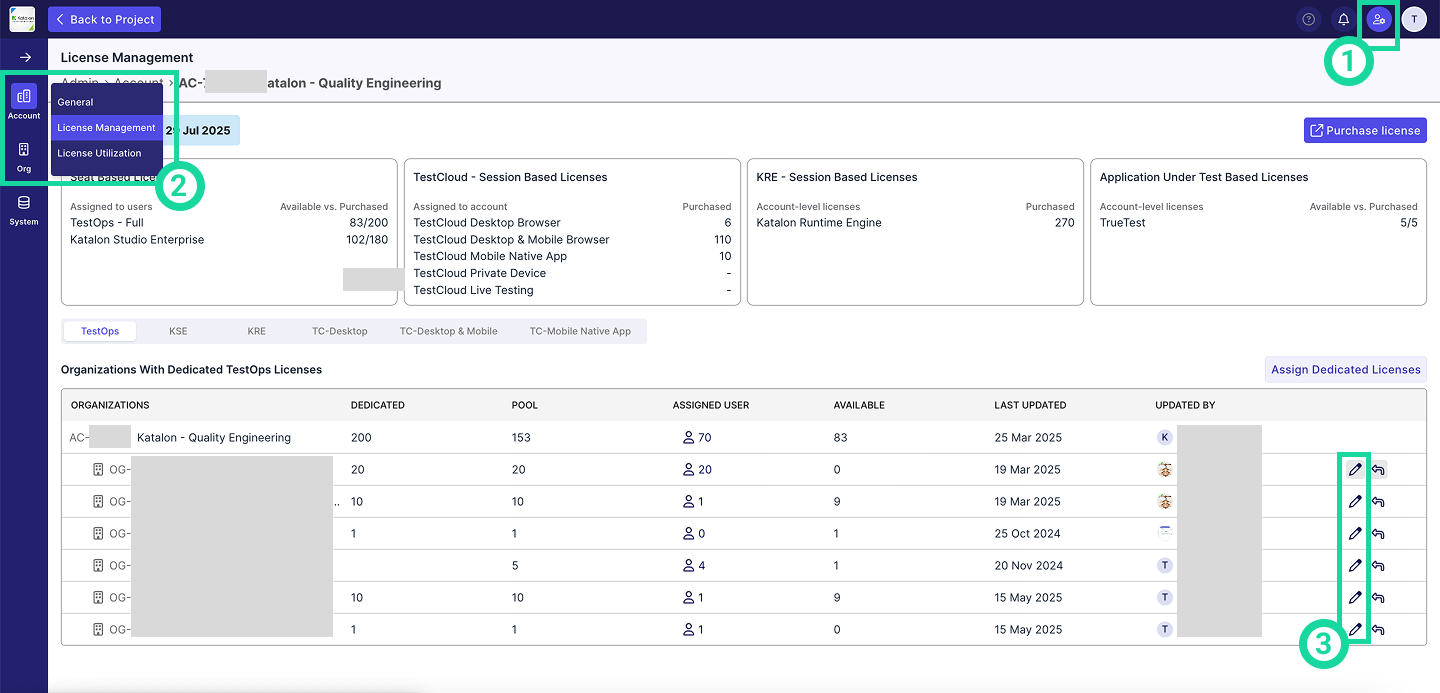
- You can increase or decrease the initial license amount:
For example, if your account has 200 TestOps licenses and you've assigned 5 to an Organization (with 4 already in use):
- Increasing adds more licenses to the Organization from the Account-level pool (e.g., from the remaining 195).
- Decreasing reduces the Organization’s allocation:
- You cannot reduce below the number currently in use.
- Setting the value to 0 revokes all dedicated licenses from the Organization, including those in use.
- Click Save to proceed.
Revoke Dedicated Licenses from Organization
If needed, you can revoke all dedicated licenses from an Organization:
Any claimed or in-use licenses will now be taken from the Account license pool, if available.
- Go to Admin Settings. You can find Admin Settings at the upper right corner of the page
- Click Account > License Management.
- Hover over the Revoke icon (left-arrow icon) of the organization you want to revoke all dedicated licenses from.
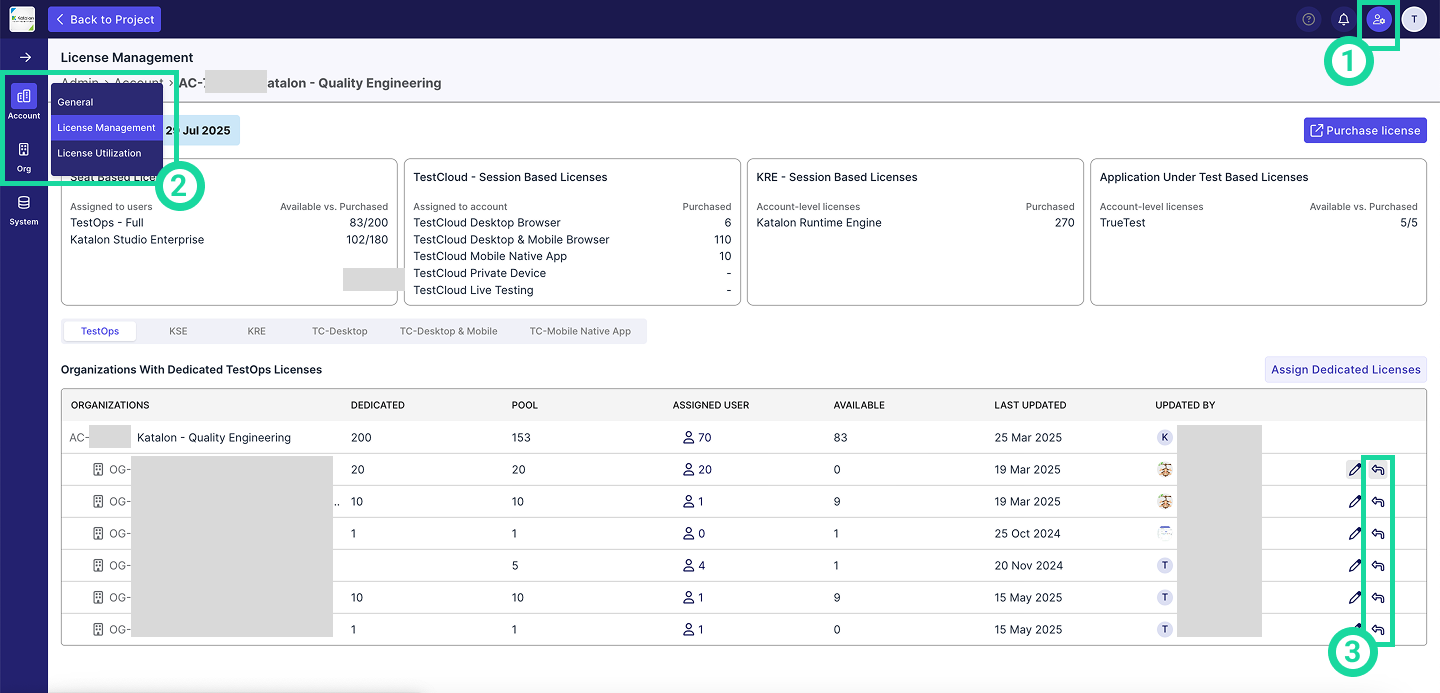
- A confirmation box will appear. Click Revoke to continue.
User Management
Invite users to join an Organization
As an administrator, you can invite new users to join your organization and immediately assign them licenses (Given if you have already assigned dedicated licenses to your Organization)
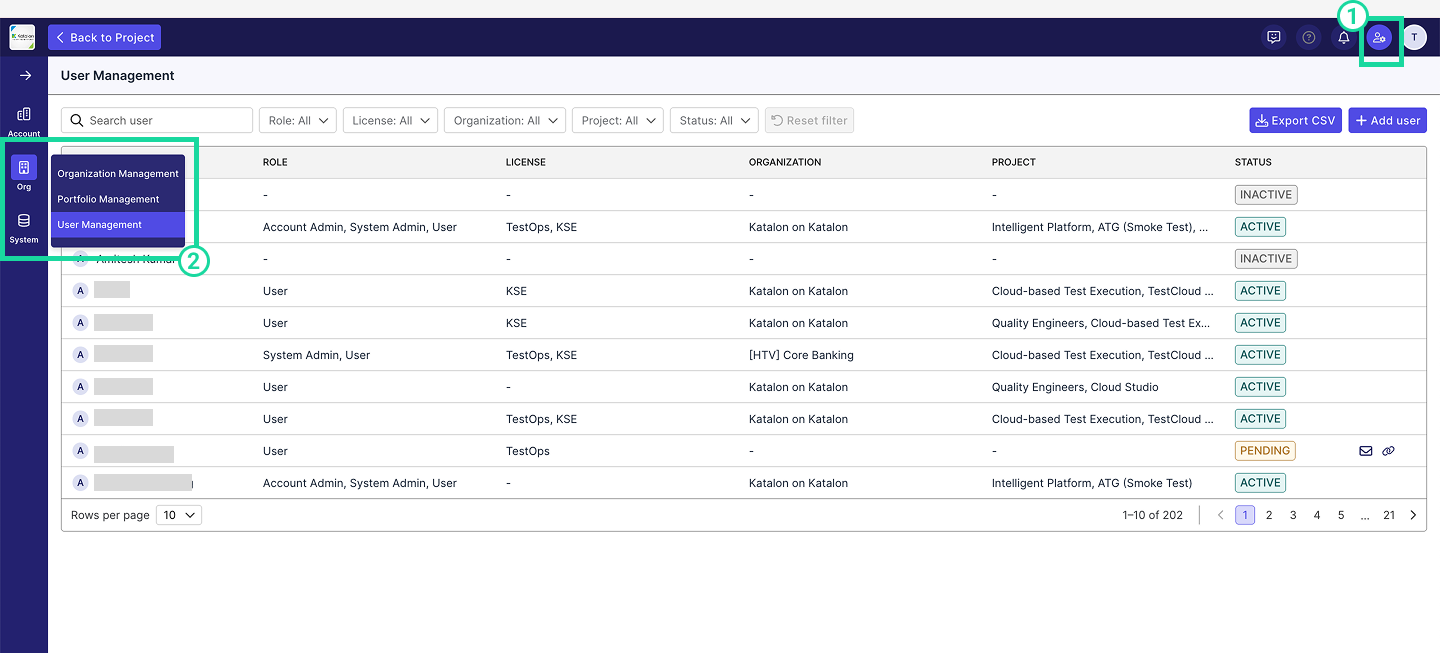
- Go to Admin Settings. (You can find Admin Settings at the upper right corner of the page).
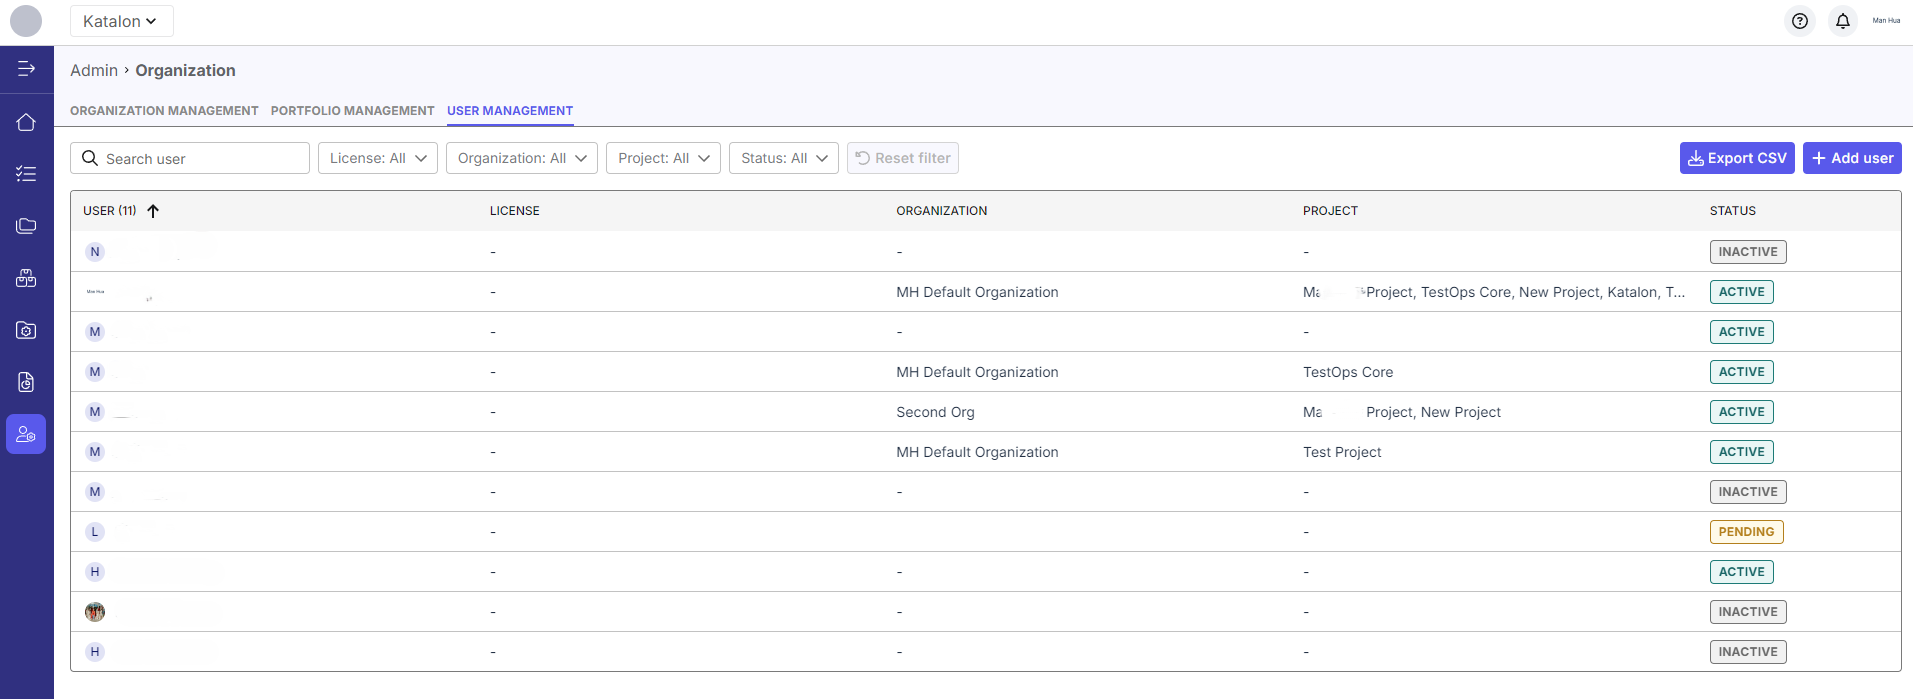
- Click Org > User Management tab. The user directory appears with all users in a list.
- Click + Add user. The Add Users dialog box appears.

- Input the email addresses of the Users you would like to invite.
- Separate entries by pressing space or enter.
- You can copy-paste email entries.
Assign licenses during user invitation
-
Select the licenses you want to assign by checking the boxes.
The license source in the dropdown indicates where the licenses are available within the Account.
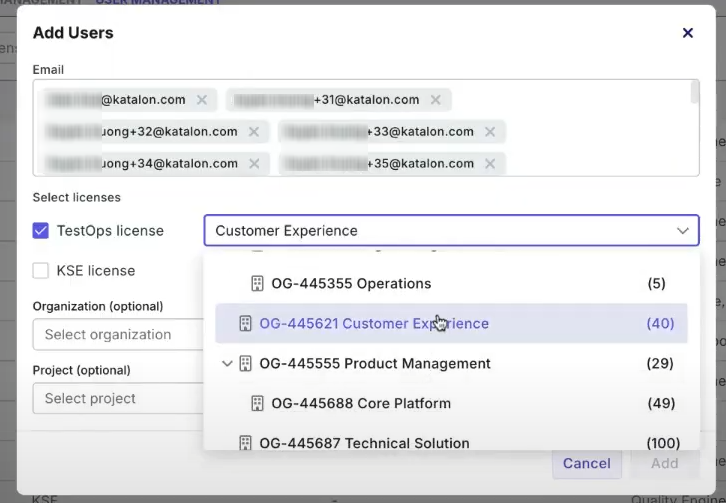
- (Optional) Select the Organization you would like these Users to belong to.
- (Optional) Select the Project you would like these Users to work on.
- Click Add to proceed.
Assign licenses after invitation
If the user is already existing in your account:
- Go to Admin Settings. (You can find Admin Settings at the upper right corner of the page).
- Click Org > User Management tab. The user directory appears with all users in a list.
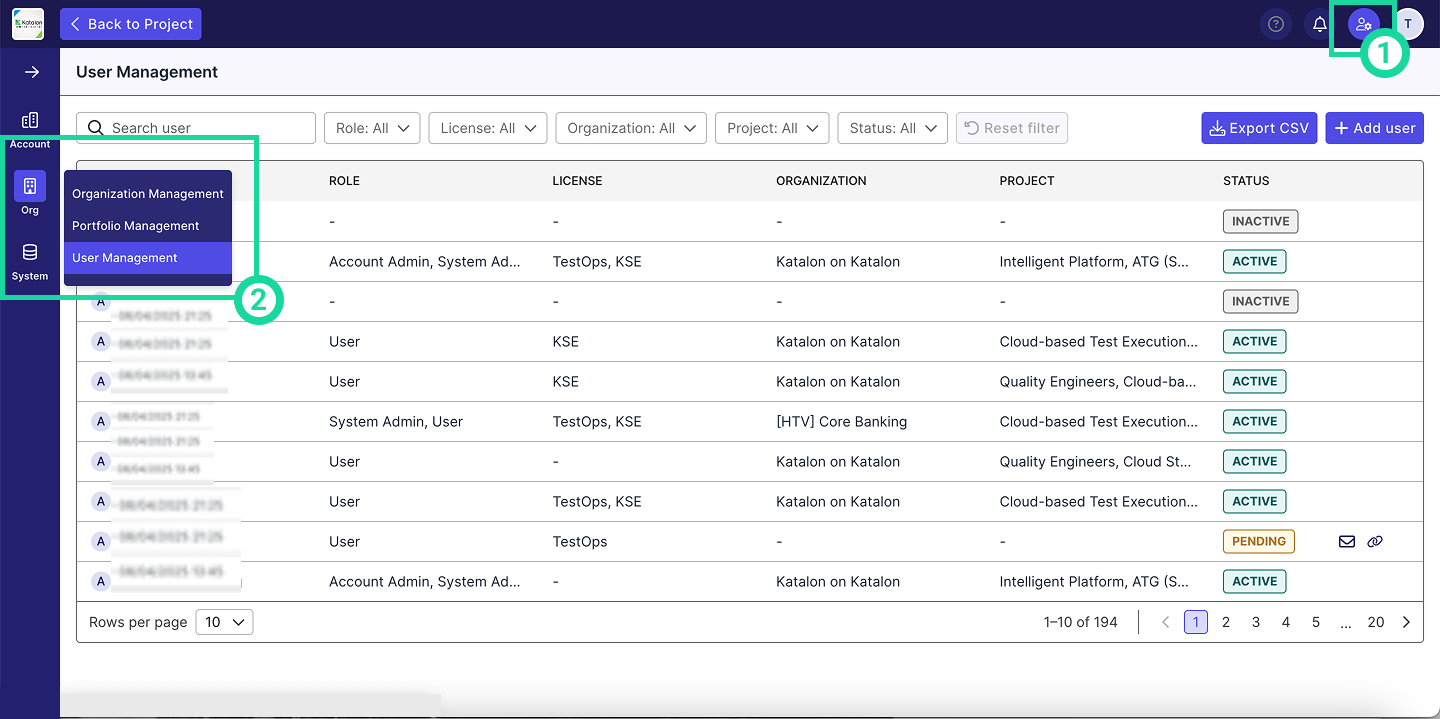
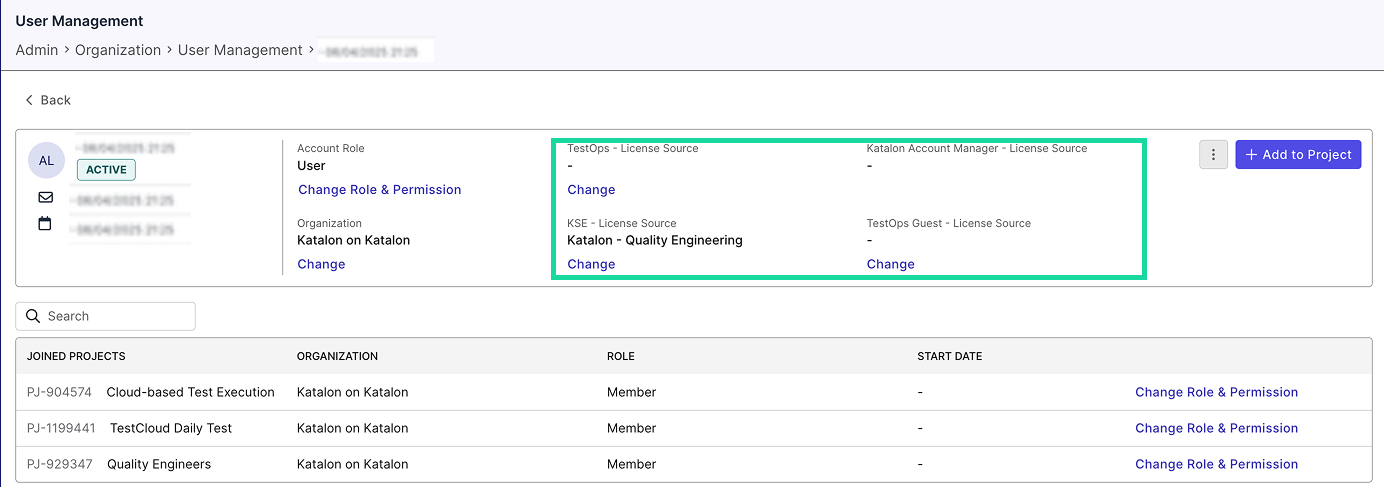
- Locate the user you want to assign a license to and open their detail page.
- Click Change next to the license type.
- Select a license source from the available pools in your Account.
View the User Detail Page
- Go to Admin Settings > Organization. You can find Admin Settings in the upper-right corner of the page, indicated by a cog icon.
- Click Org > User Management.
- In the user directory, click on the name of the user whose details you want to view.
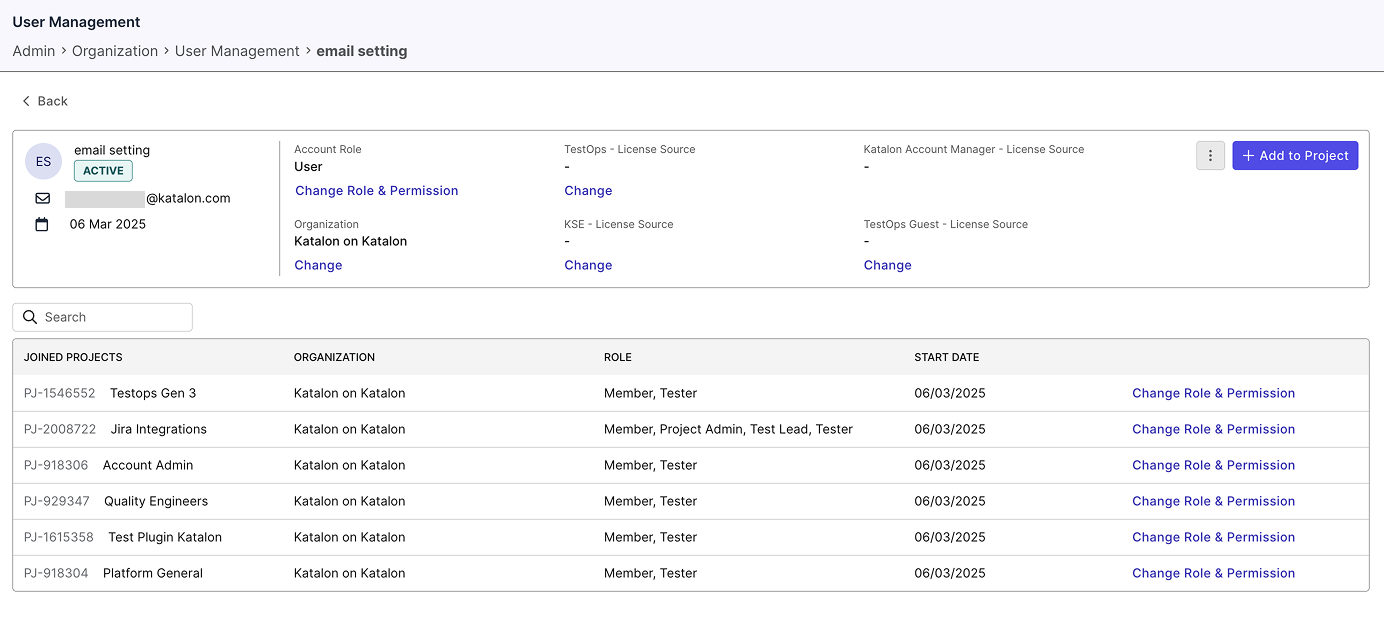
The User Detail page displays the following information:
- Full name
- Profile picture
- Contact details
- Employment start date
- Account-level role – Determines if the user is an account-level admin
- Affiliated Organization – The organization the user belongs to
- Licenses possessed – Includes sources like:
- TestOps - License Source
- KSE License Source
- TestOps Guest - License Source
- Joined Projects List – Projects the user is a member of
Change a User's Account Roles
To change a user's Account roles:
- Go to Admin Settings > Organization. You can find Admin Settings in the upper-right corner of the page, indicated by a cog icon.
- Click Org > User Management.
- In the user directory, click on the name of the user whose details you want to view.

- Click on the Change Role & Permission under the label Account Role
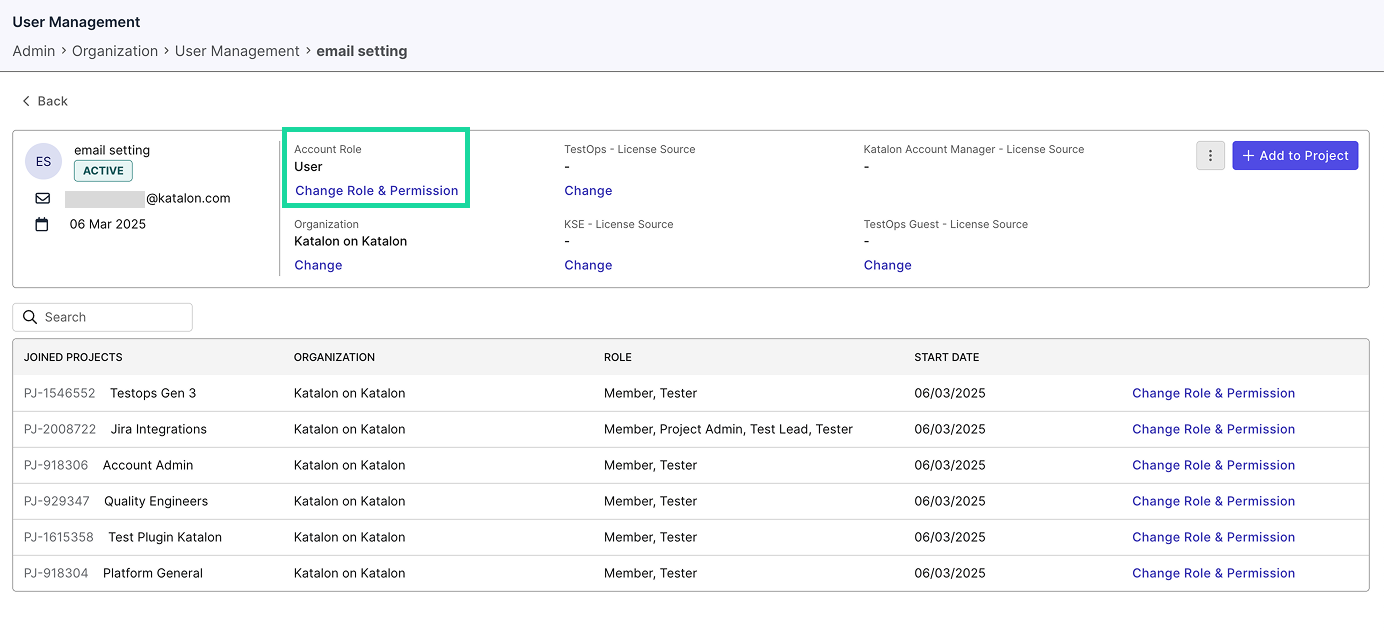
- The Change Role and Permission dialog box appears. Click on the dropdown menu at the upper left corner and assign roles as needed.

- Click Update.
Change a User's Project Roles
To change a user's Project roles:
- Go to Admin Settings > Organization. You can find Admin Settings in the upper-right corner of the page, indicated by a cog icon.
- Click Org > User Management.
- In the user directory, click on the name of the user whose details you want to view.

-
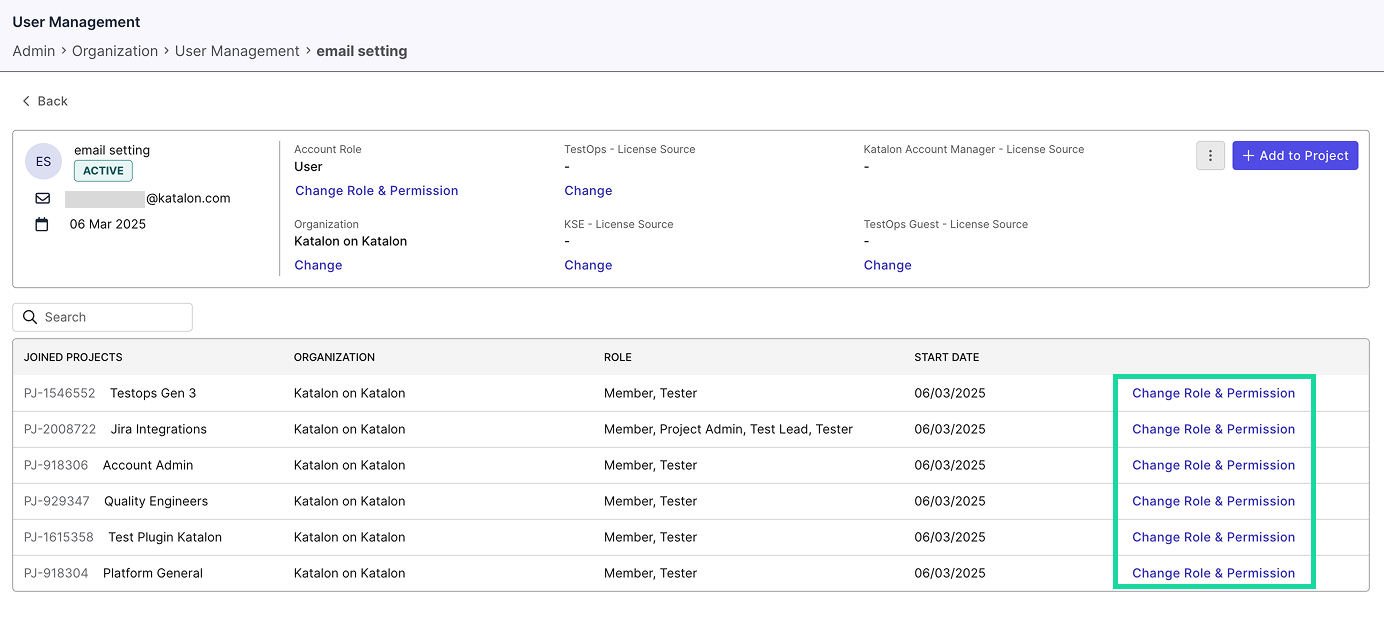
Click on the Change Role and Permission button that corresponds to the same row of the Project you'd like to change the User's permissions in.
-
The Change Role and Permission dialog box is displayed. In the dropdown labeled Project Role, select the Roles you'd like to add for the User.

-
Click Update.
Change a User's Organization
To change a user's Organization:
-
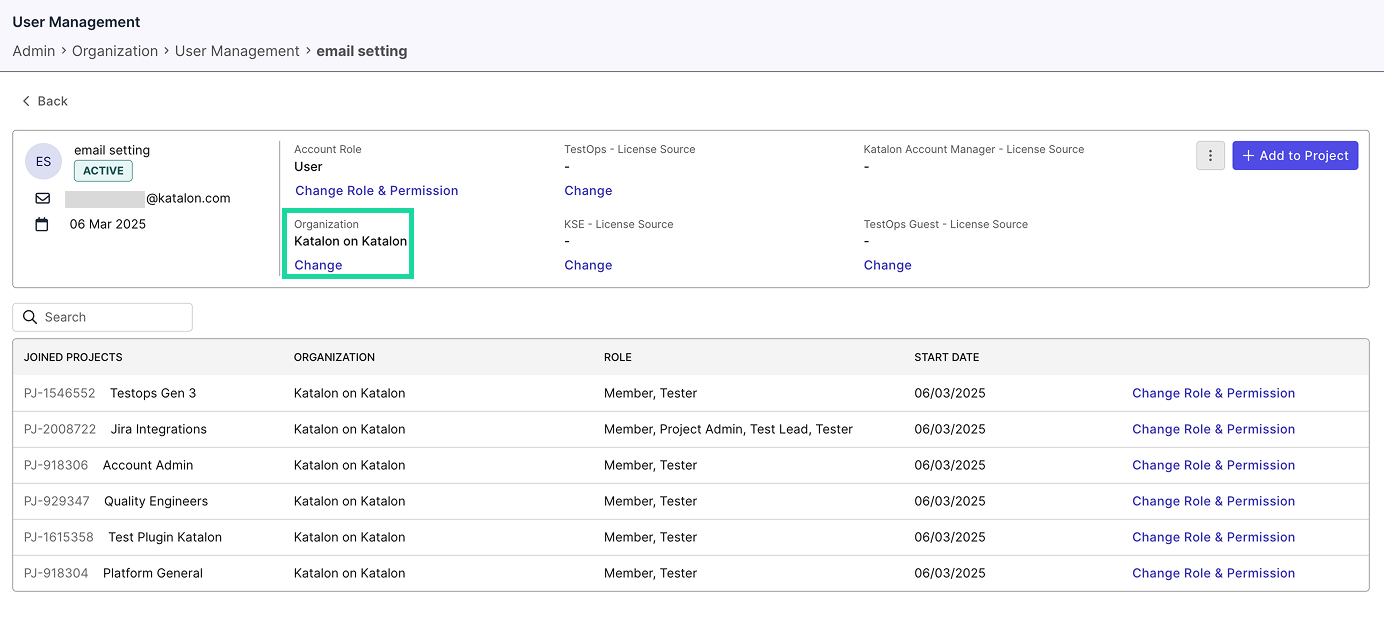
Click on the Change button under the label Organization.
-
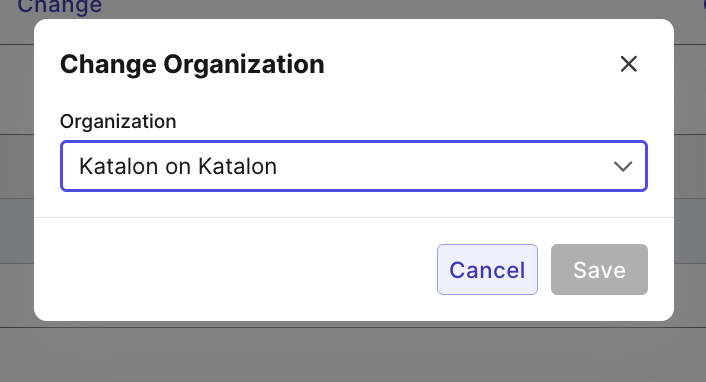
The Change Organization dialog box appears. Select the new Organization from the dropdown menu.
-
Click Save.
Resend invitation to a user
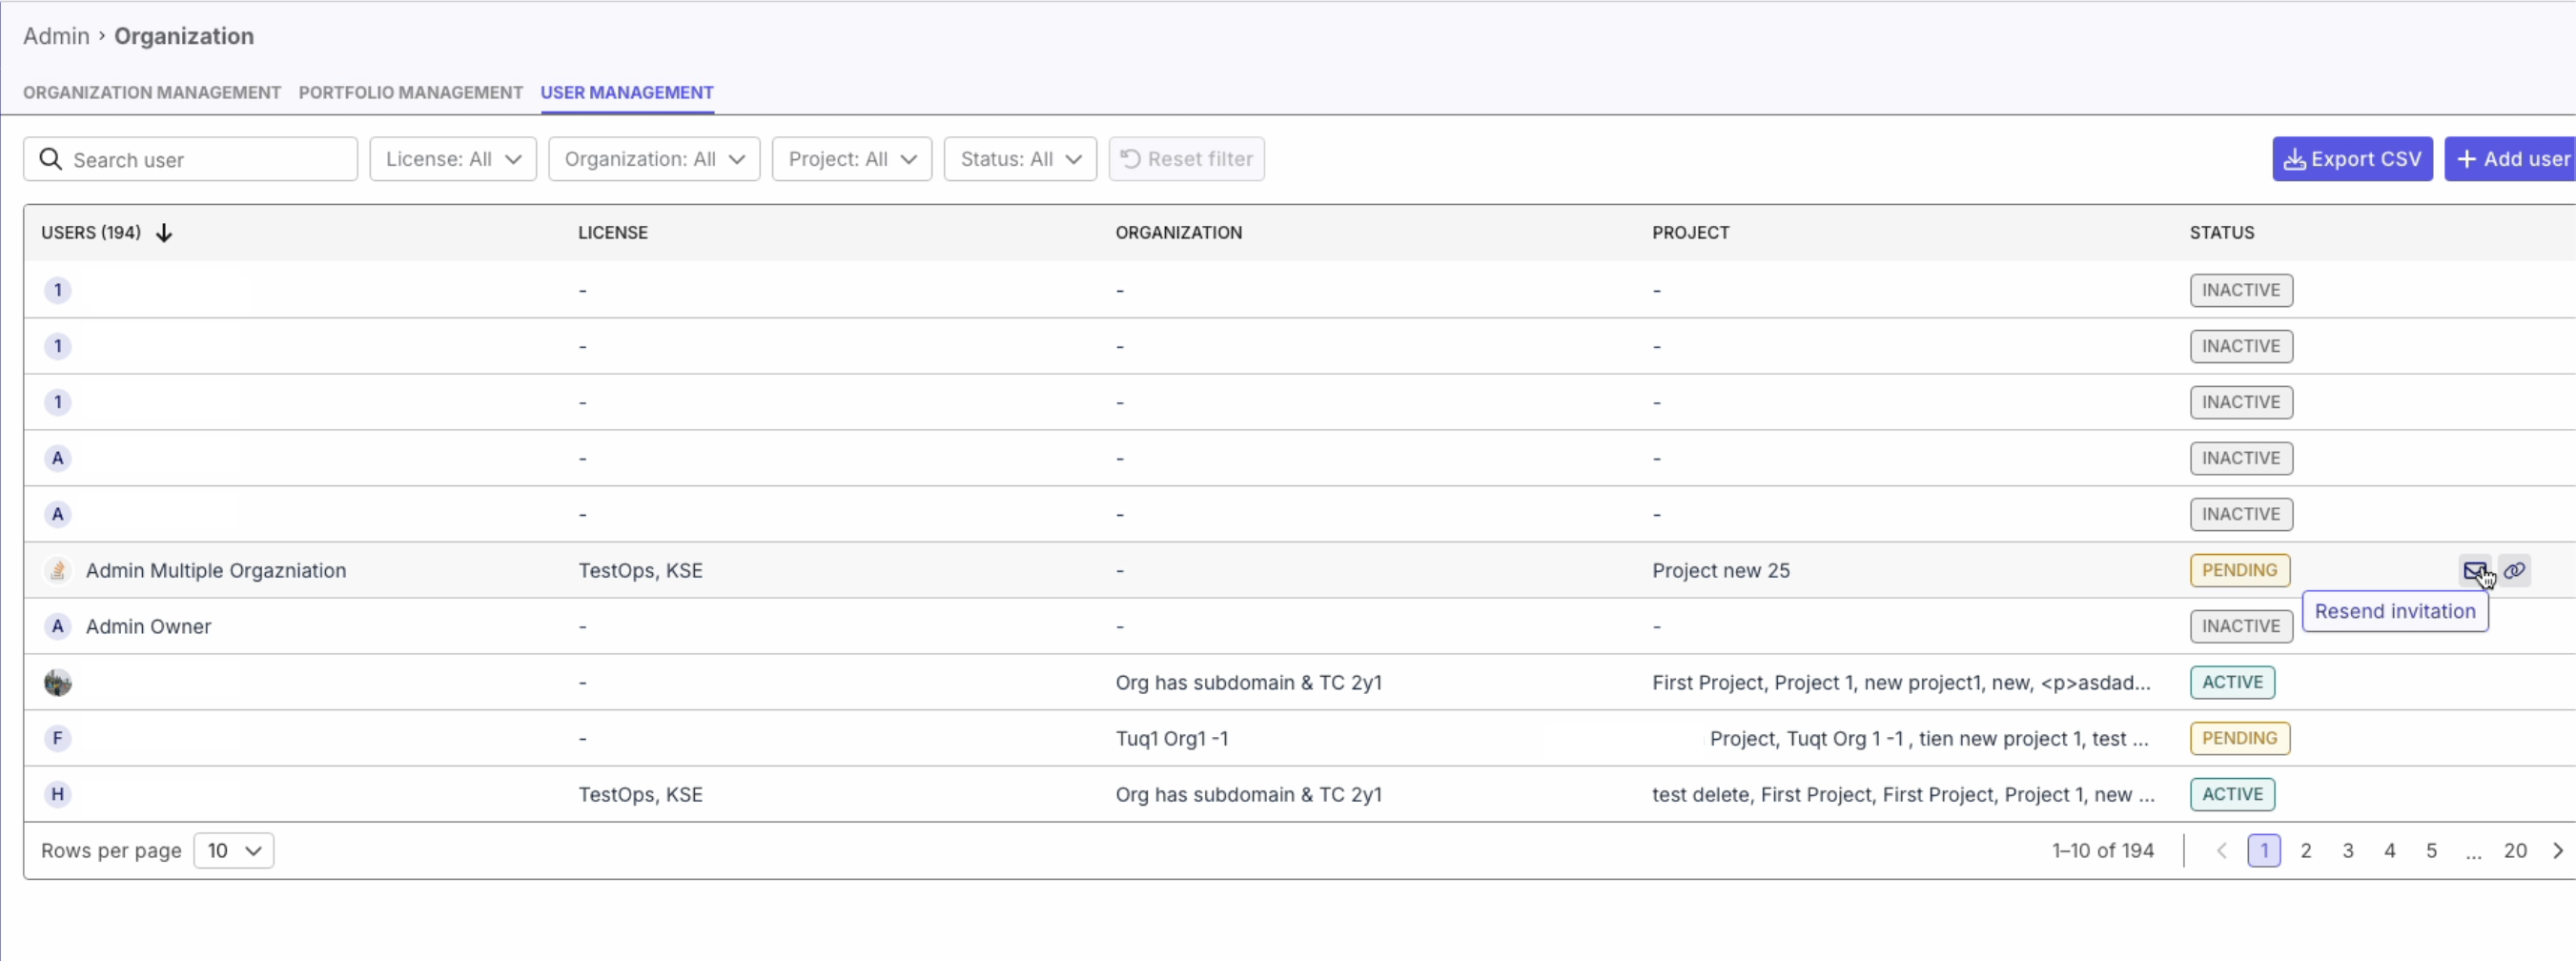
If the invitation link expires and the user hasn't accepted it, you can resend the invitation.
-
Locate the user with the Pending status.
-
Hover at far right end of that user's row. Click Resend invitation or Copy invitation link.
Deactivate a user
This document shows you how to remove/deactivate a user from your Account.
-
Navigate to your chosen user's User Detail page.
-
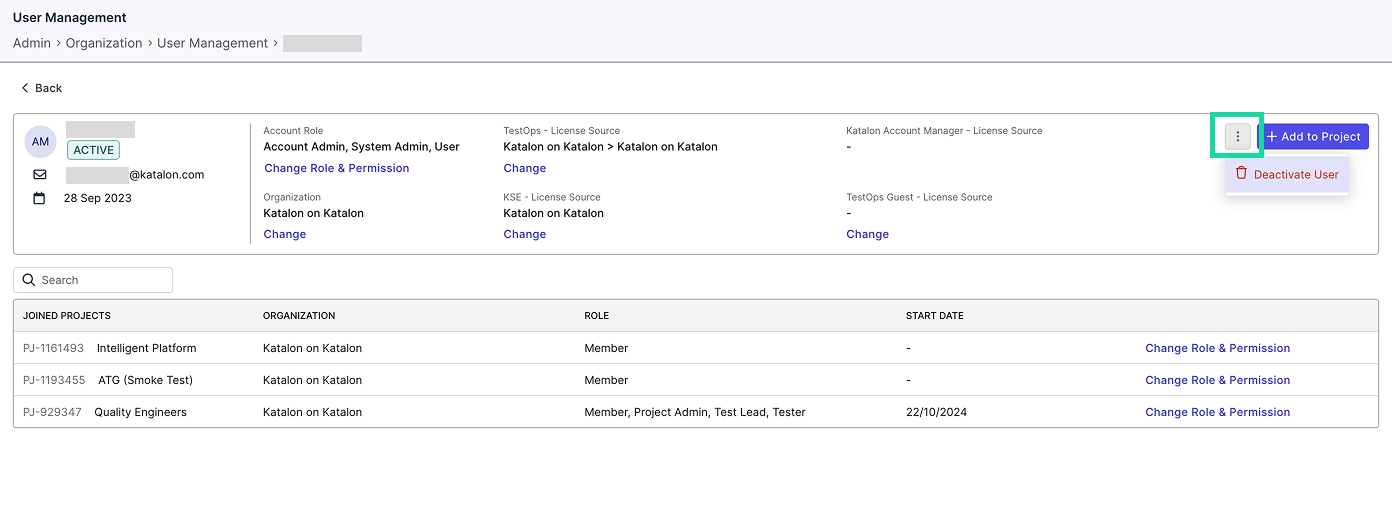
Click the three-dot menu button at the upper right corner of the information box, then select Deactivate User.
-
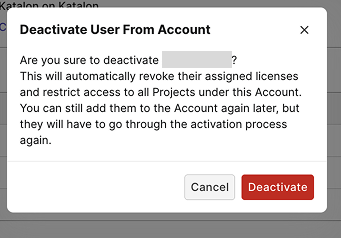
The Deactivate User From Account dialog box appears. Continue by clicking Deactivate.
-
Their Status is now Inactive.
