Mobile testing using Katalon TestCloud
Learn how to create and execute a mobile test using Katalon TestCloud.
Katalon TestCloud is a test automation service that allows you to run tests on a wide range of standard browsers and operating systems in the cloud. By using TestCloud, you can easily configure your mobile testing environments without the need to invest in additional infrastructure.
When following the mobile testing workflow with TestCloud, there are several key steps to complete:
Integrate Katalon Studio with TestCloud: Upload your mobile application to TestCloud to begin the testing process.
Create and record a test case: Create a new mobile test case using the Mobile Recorder. For more information about using Mobile Recorder in Katalon Studio, see: Create a new test case in Katalon Studio.
Create a test suite or test collection: Group related test cases into a suite or collection for organized testing.
Run mobile tests on a TestCloud environment: Execute the tests with different modes to suit your testing needs:
Parallel mode: Run multiple tests simultaneously to save time.
Sequential mode: Execute tests one after the other for thorough examination.
Before you begin recording, ensure your testing environment is properly set up. Refer to the following topics for more information: Supported environments for Katalon TestCloud.
Enable Katalon TestCloud in Katalon Studio
Follow the steps to enable TestCloud in Katalon Studio.
- Via the Katalon TestOps button:
- Launch Katalon Studio and open a new or existing project.
- In the main toolbar, click on the TestCloud button.

- Via project settings:
- In the main toolbar, select . Navigate to the Integration section and ensure the Enable Katalon TestCloud Integration checkbox is selected.
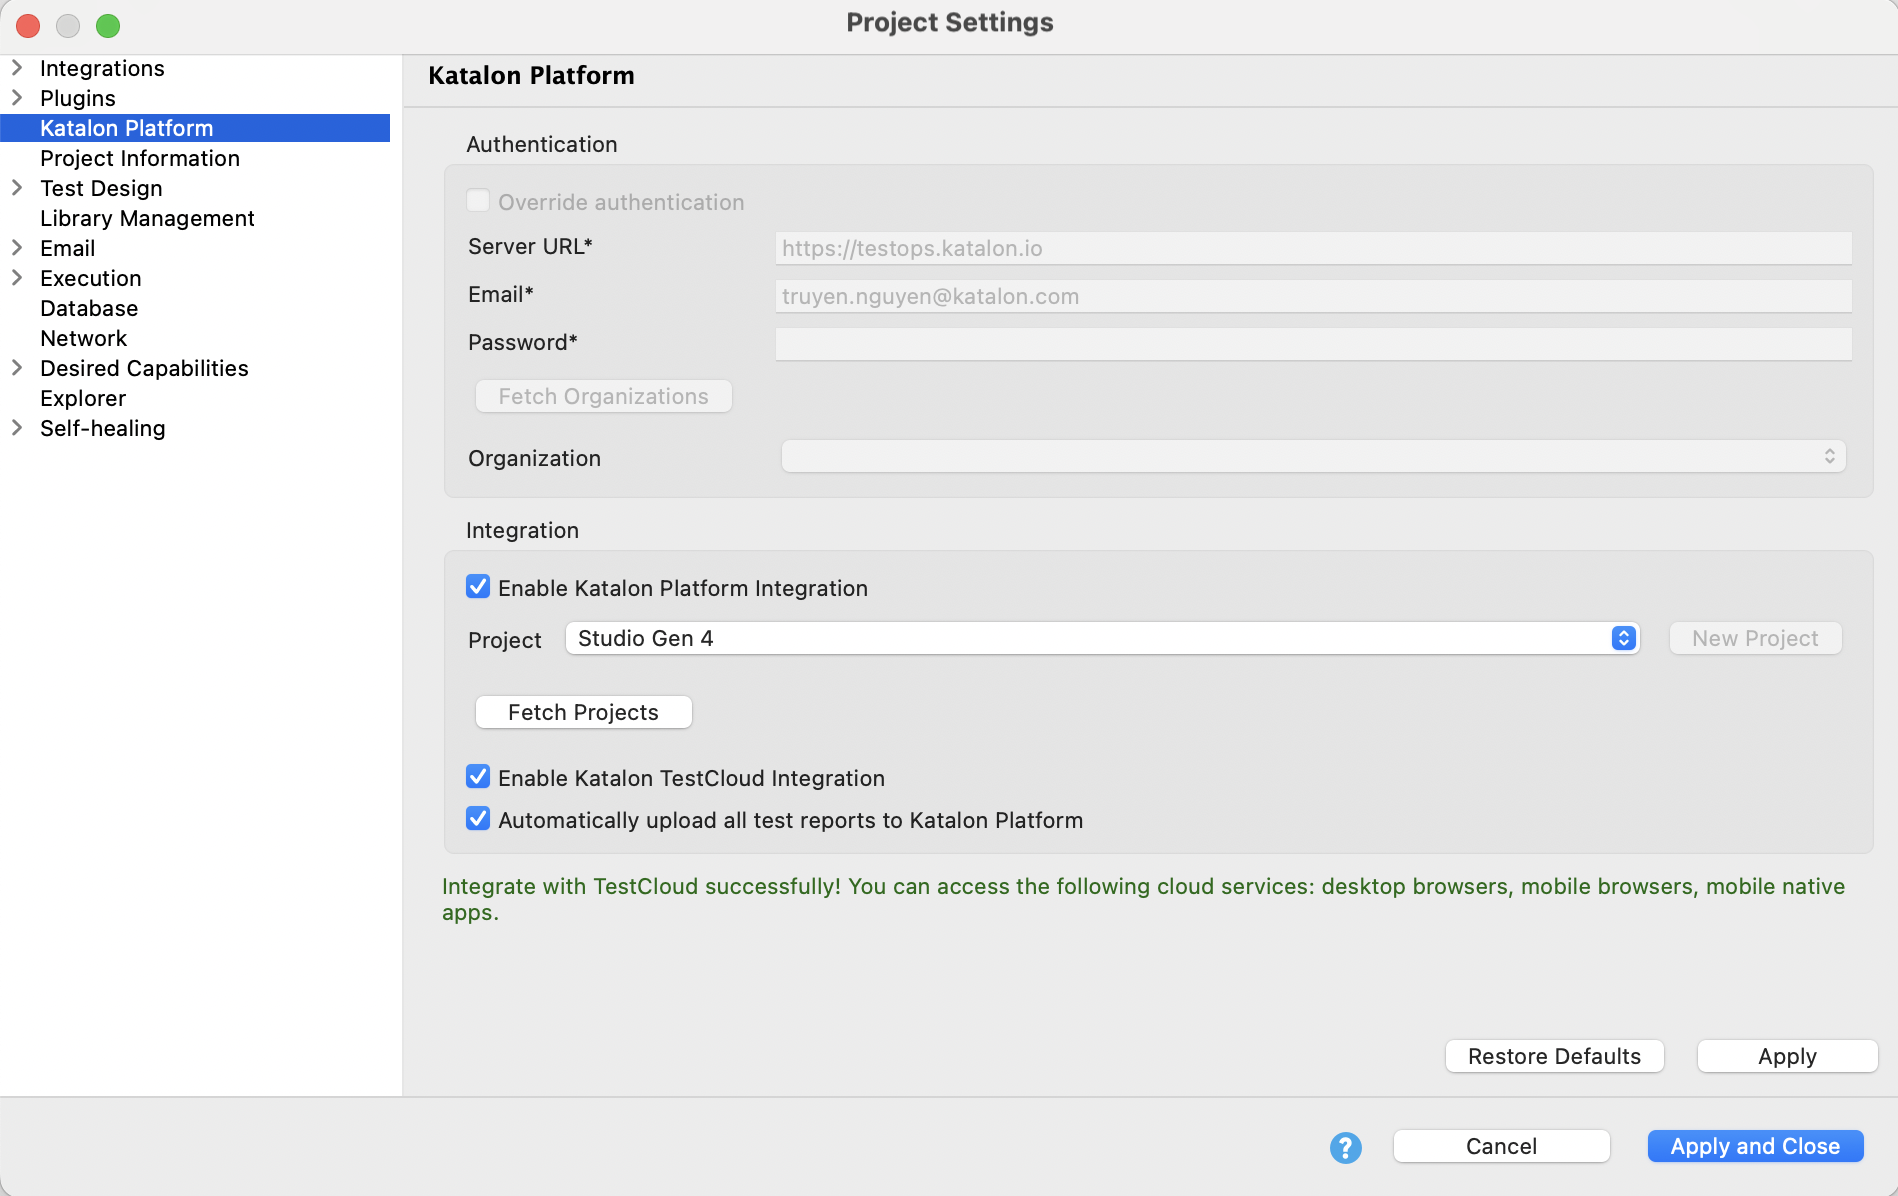
- In the main toolbar, select . Navigate to the Integration section and ensure the Enable Katalon TestCloud Integration checkbox is selected.
Run mobile native application tests on TestCloud
TestCloud allows you to perform automated tests on mobile native applications. You can upload a mobile application and tests developed locally in Katalon Studio to TestOps, and then use TestCloud to orchestrate test executions without having to set up local emulators or simulators.
This guide shows you how to perform mobile native application testing on TestCloud.
Requirements
An active Katalon TestCloud subscription or trial.
A mobile application file in .apk or .aab format (for Android), or in .ipa format (for iOS).
A mobile test project configured in TestOps.
To set up a sample project for iOS application testing, see Sample iOS mobile project in Katalon Studio.
- To set up a sample project for Android application testing, see Sample Android mobile project in Katalon Studio .
For Android hybrid mobile applications, refer to the following topic: Capture elements in hybrid Android apps.
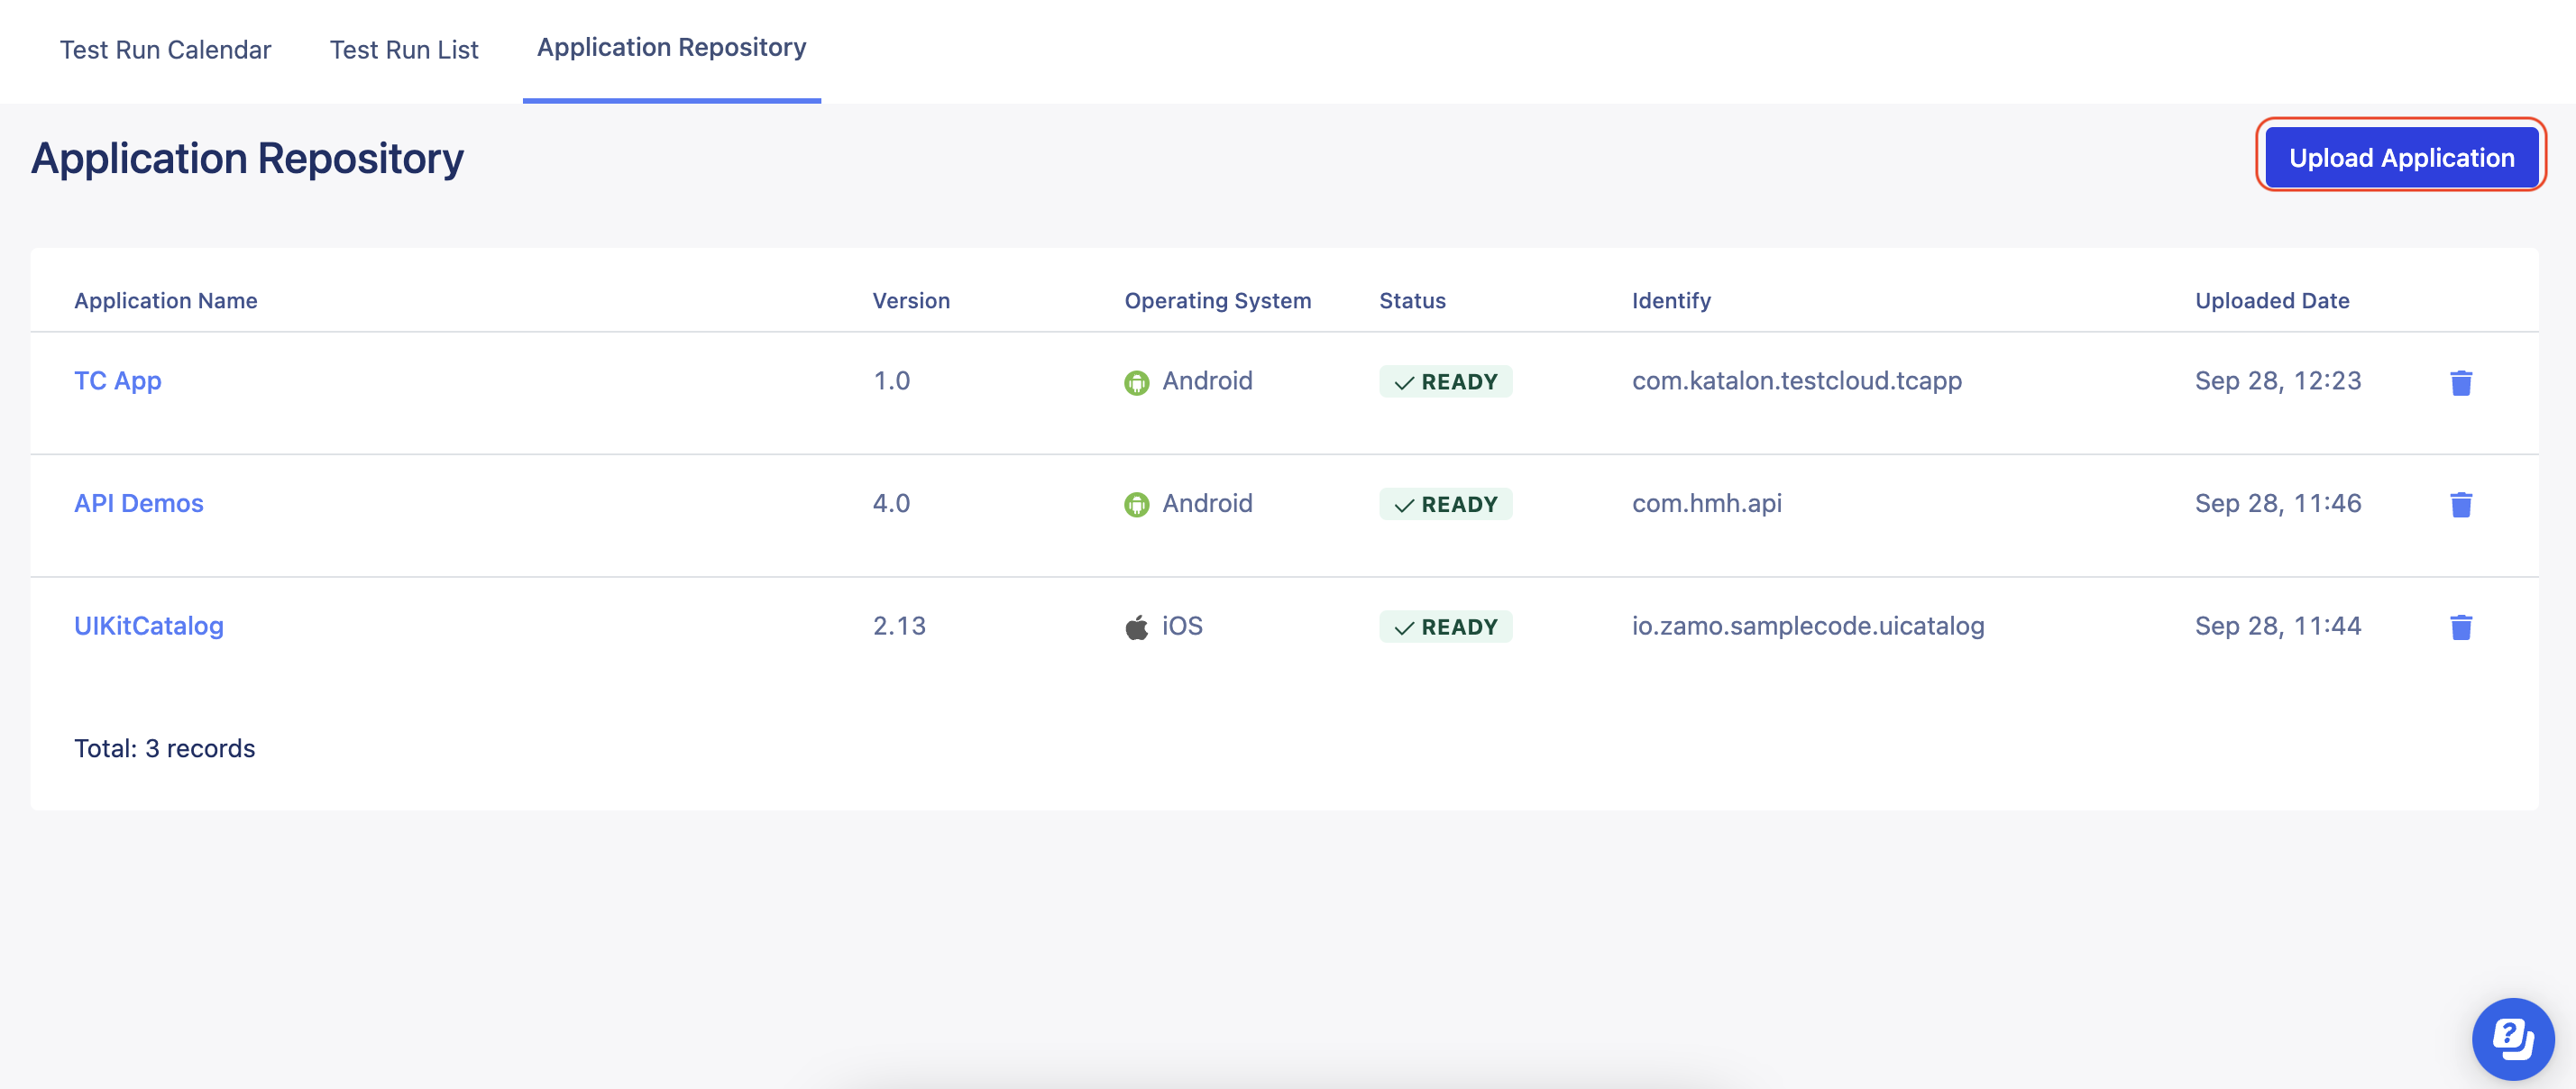
Upload a mobile application to TestOps
The following steps are necessary to perform testing on a mobile native application for the first time. This means that the mobile native application is not yet stored in TestOps.
- In the Application Repository page, click Upload Application.
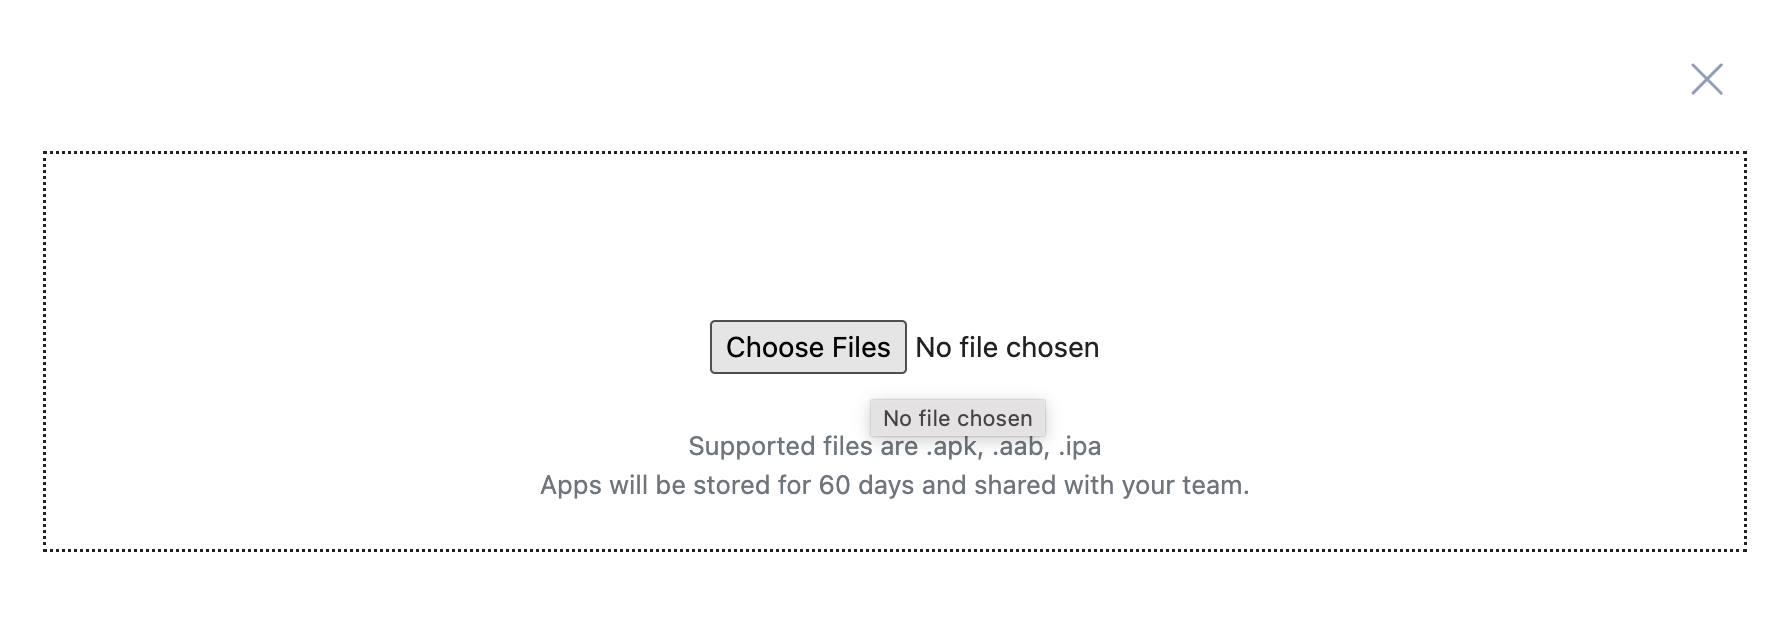
- In the Upload Application dialog box, click Choose Files and select the application you want to upload.
 Note:
Note:- Application Repository supports uploading application files in .apk, .aab, and .ipa.
The size limit for the uploaded application is 500MB.
Record objects on a TestCloud device
To begin capturing objects on a TestCloud device, follow these steps:
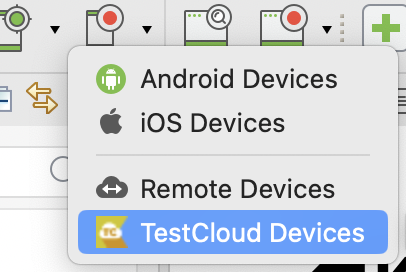
- From the main Toolbar, click the Record Mobile icon and select TestCloud Devices.
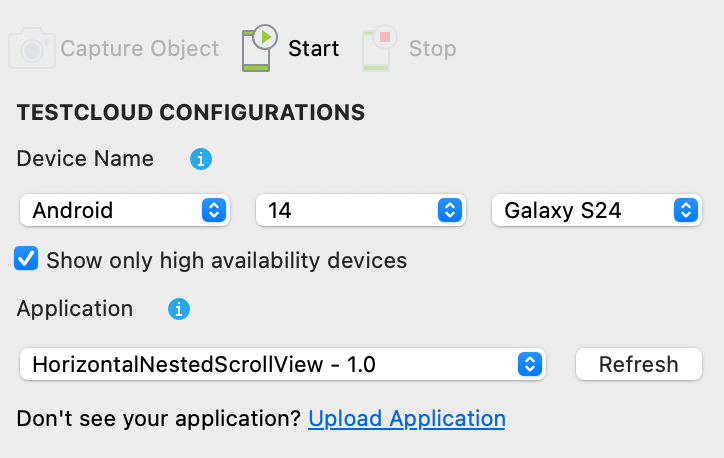
- In the TestCloud Configurations section, do as follows:
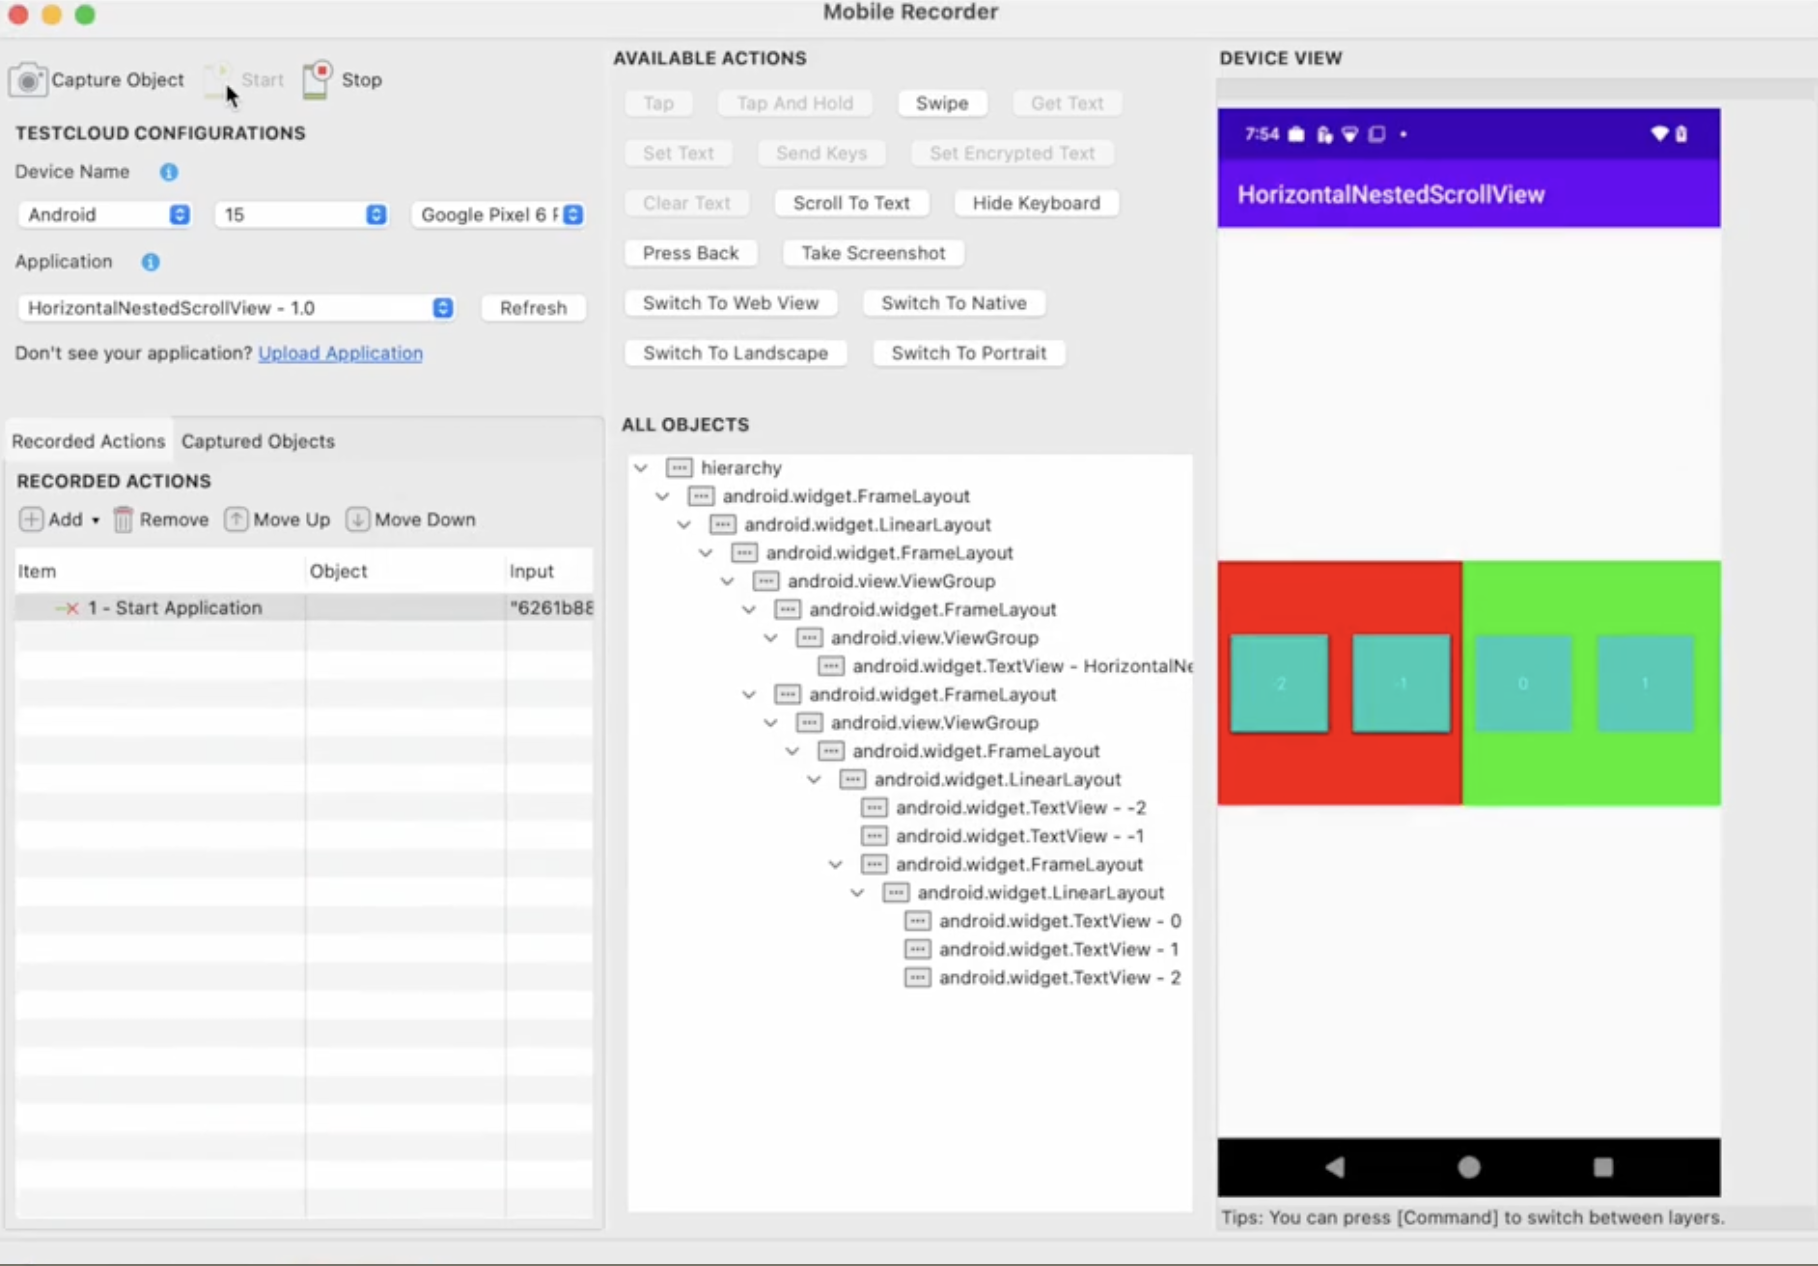
- The Mobile Recorder window is displayed. Follow the steps to record and capture test objects: Record a mobile test case.
Run mobile test suites using TestCloud
Learn how to create and run mobile test suites using Katalon TestCloud.
Running mobile test suites using TestCloud lets you execute tests on cloud-based Android and iOS devices, including real devices and emulators. This simplifies mobile testing by providing access to multiple platforms, supporting both parallel and sequential test execution, and automatically uploading results to Katalon TestOps for centralized reporting.
Create and add test cases to a test suite
Learn how to create and add test cases to a new test suite in Katalon Studio.
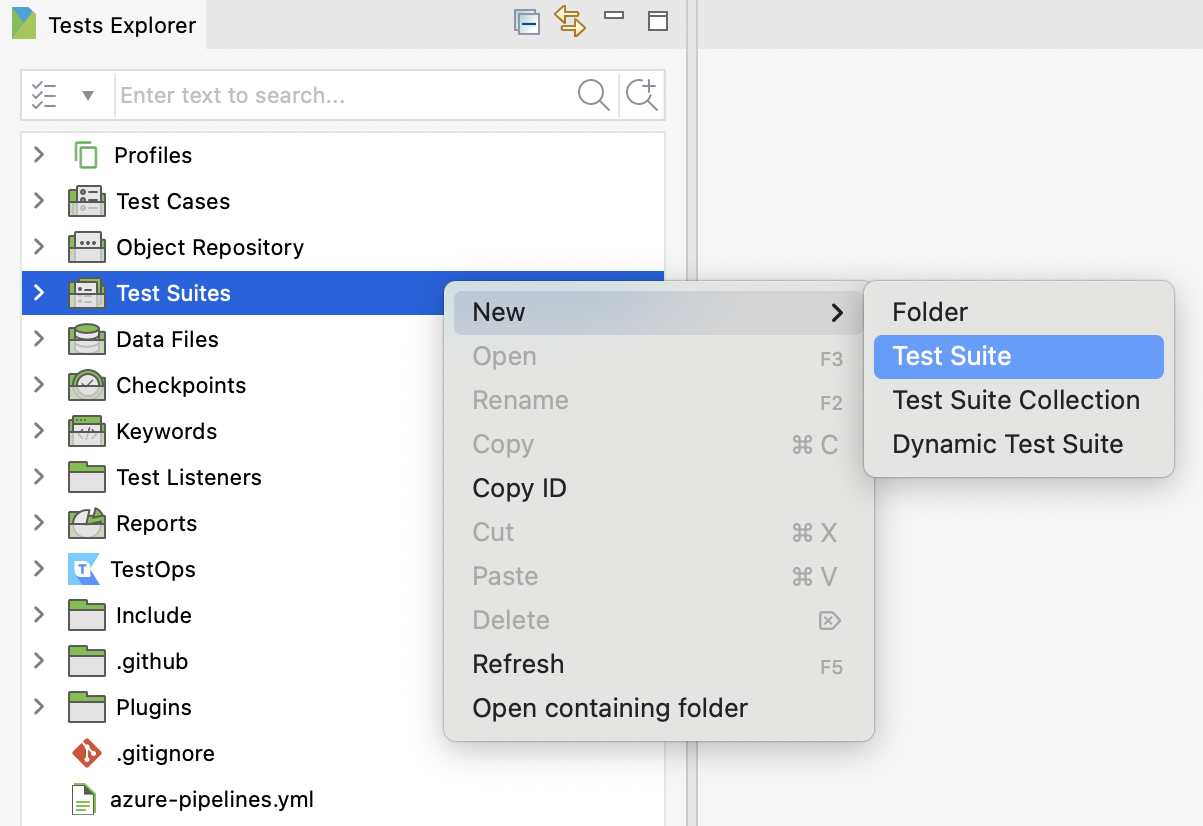
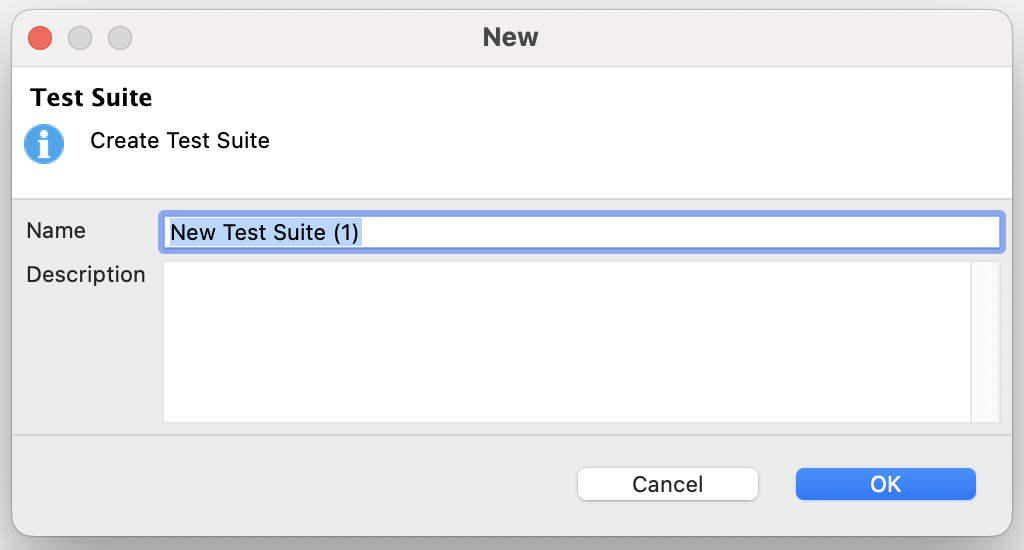
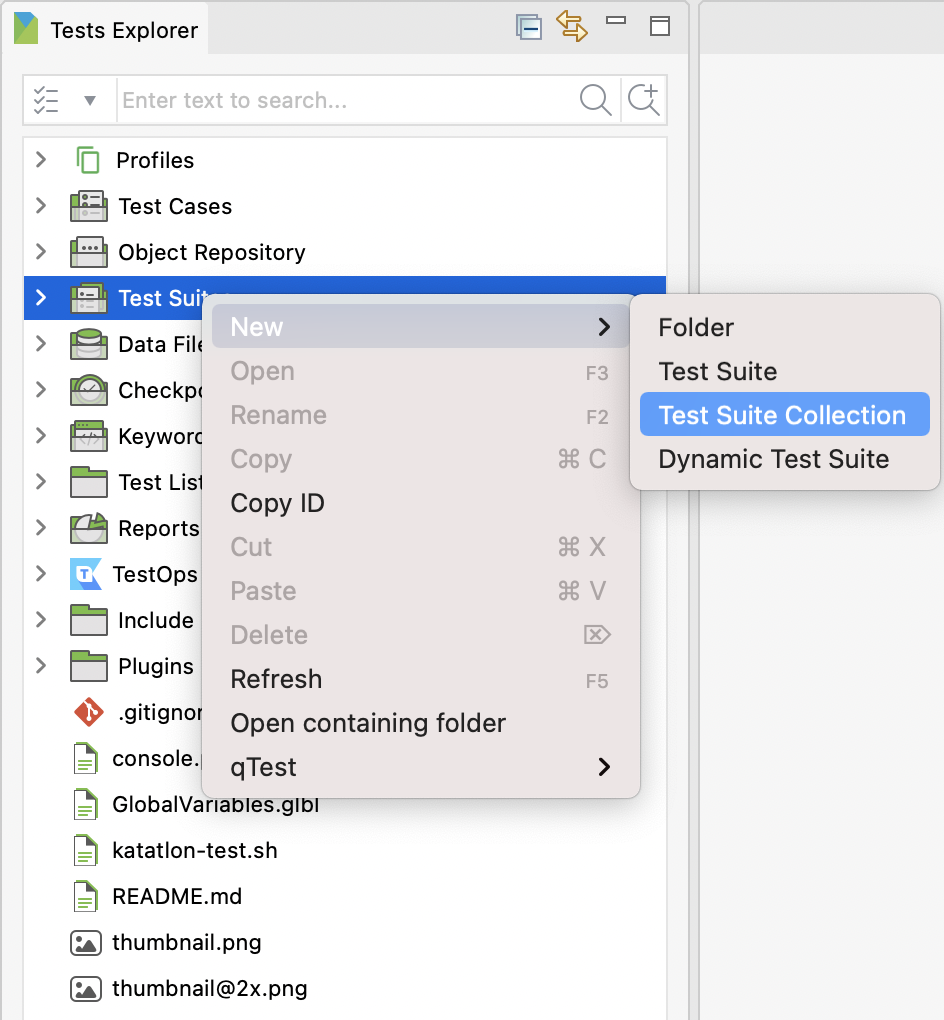
- In the Tests Explorer panel, right-click on the Test Suites folder, then .
 Alternatively, you can also go to from the main menu.
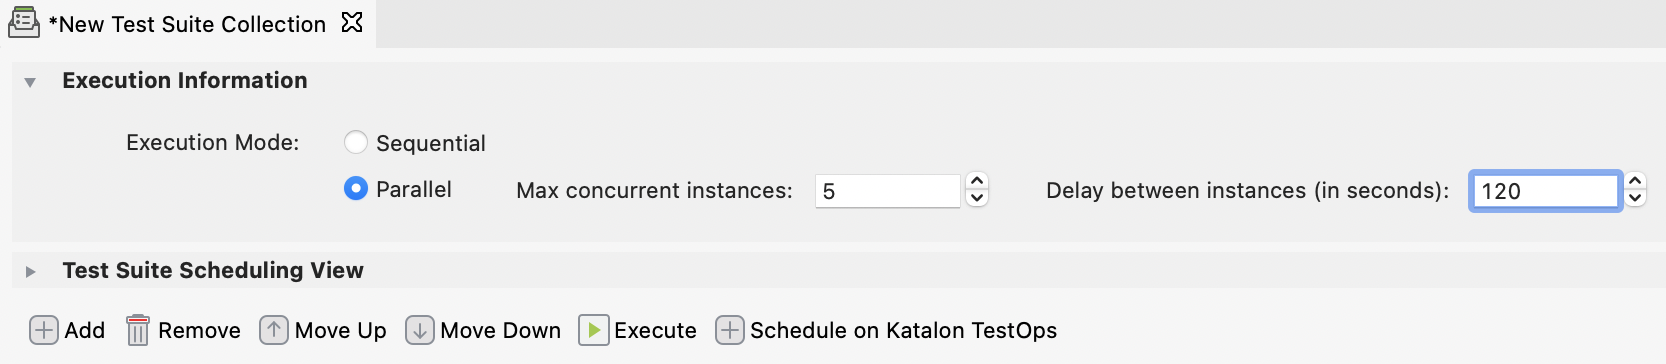
 - A New Test Suite Collection dialog appears. Fill in the name and the description (optional).
- An Execution Information tab opens. Click + Add to add test cases.
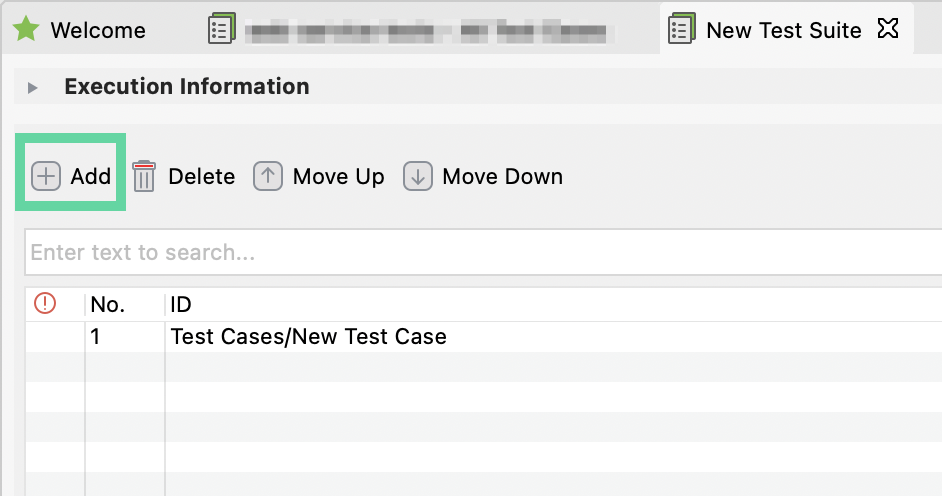
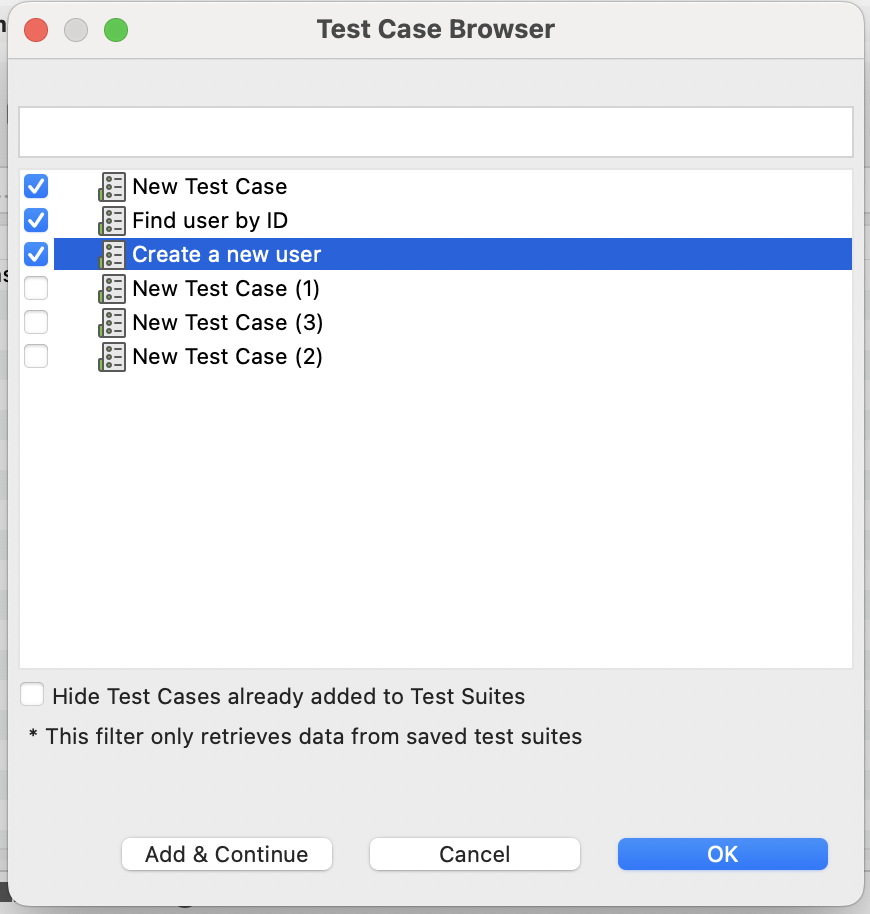
- A Test Case Browser opens. Tick as many test cases you want to add to your test suite and click OK.
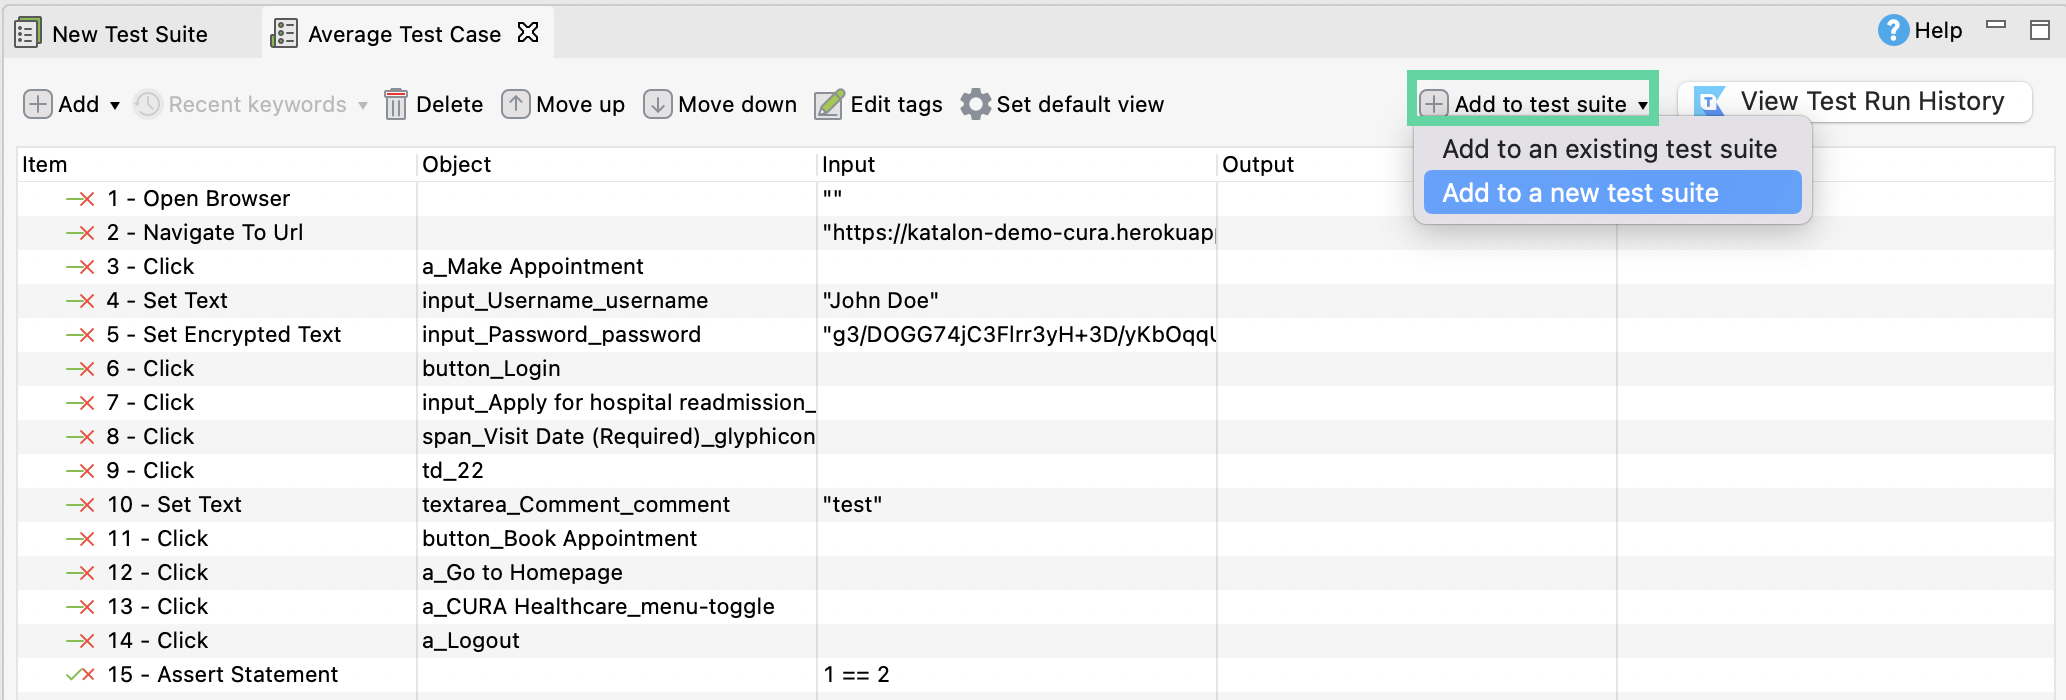
Alternatively, you can open a specific test case and click the Add to test suite or Add to an existing test suite.
Run test suites with TestCloud
Follow these steps to execute a test suite with TestCloud in Katalon Studio:
- Click on the dropdown icon of the Run button and choose to run with TestCloud.
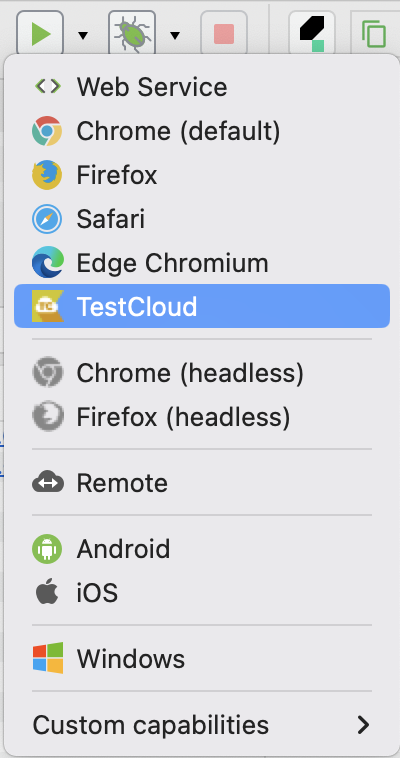
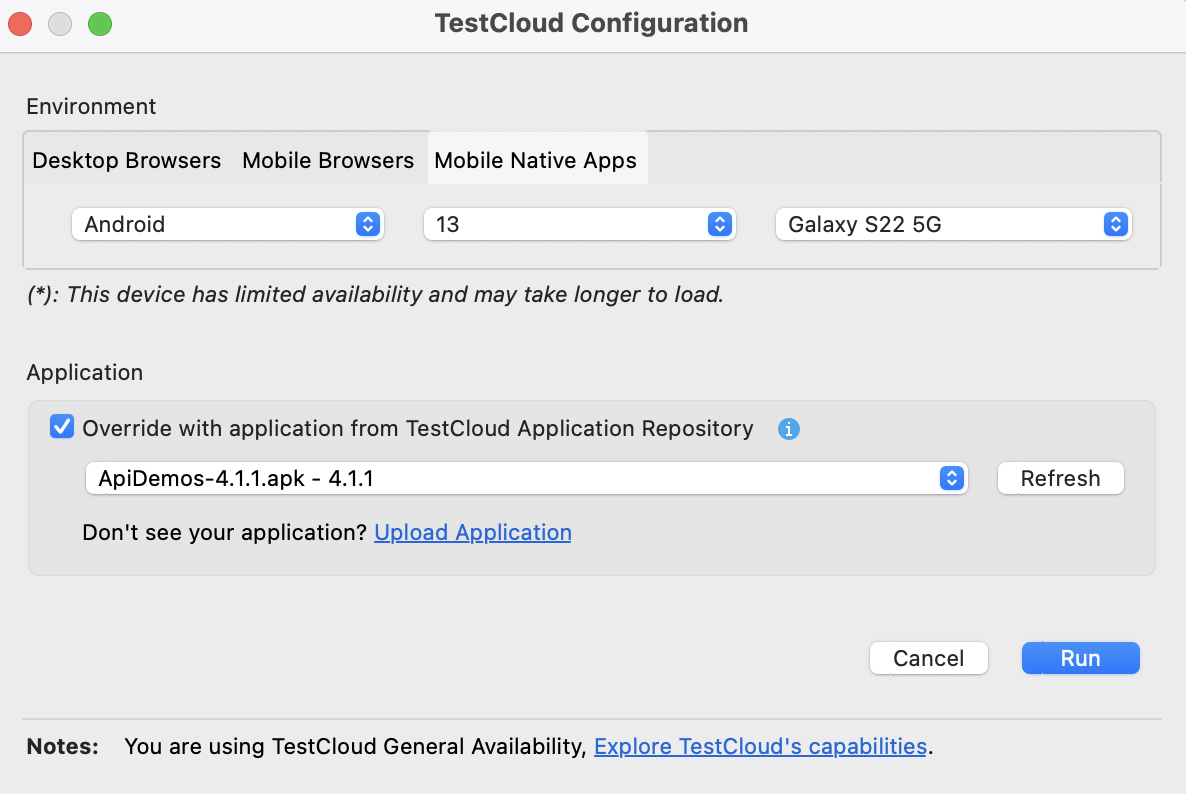
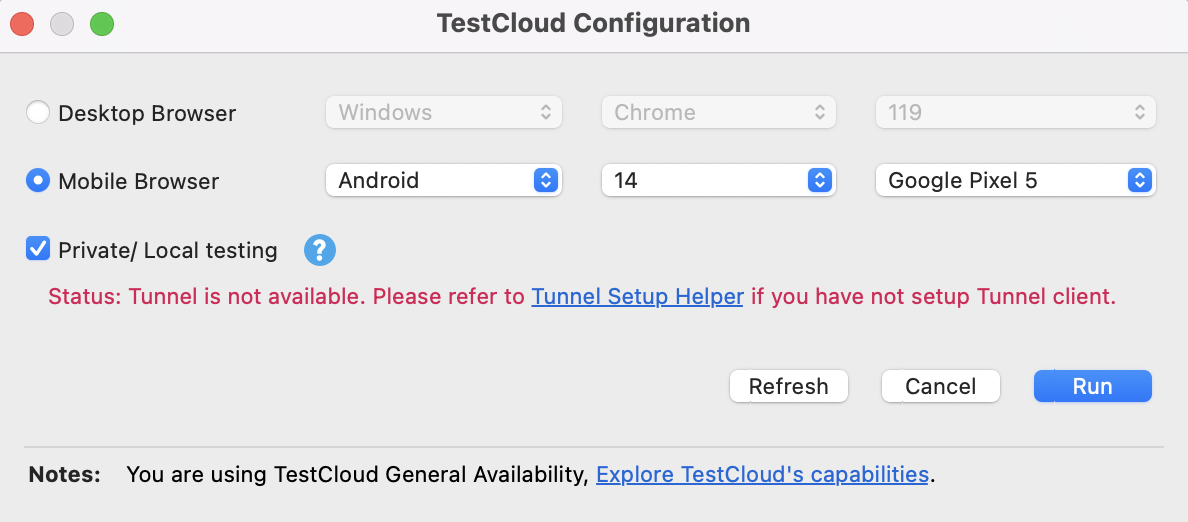
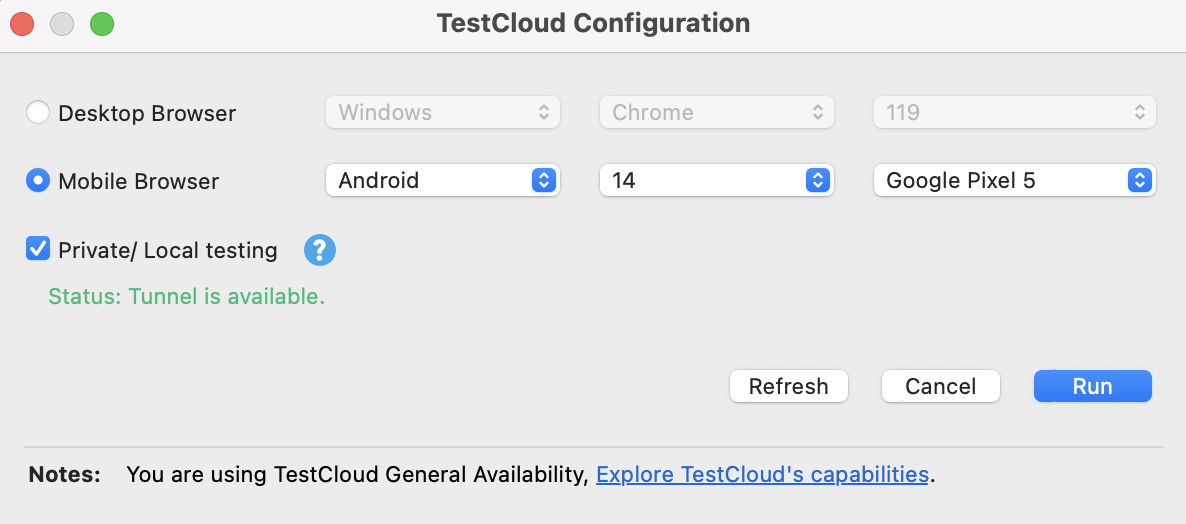
The TestCloud Configuration dialog appears as below.
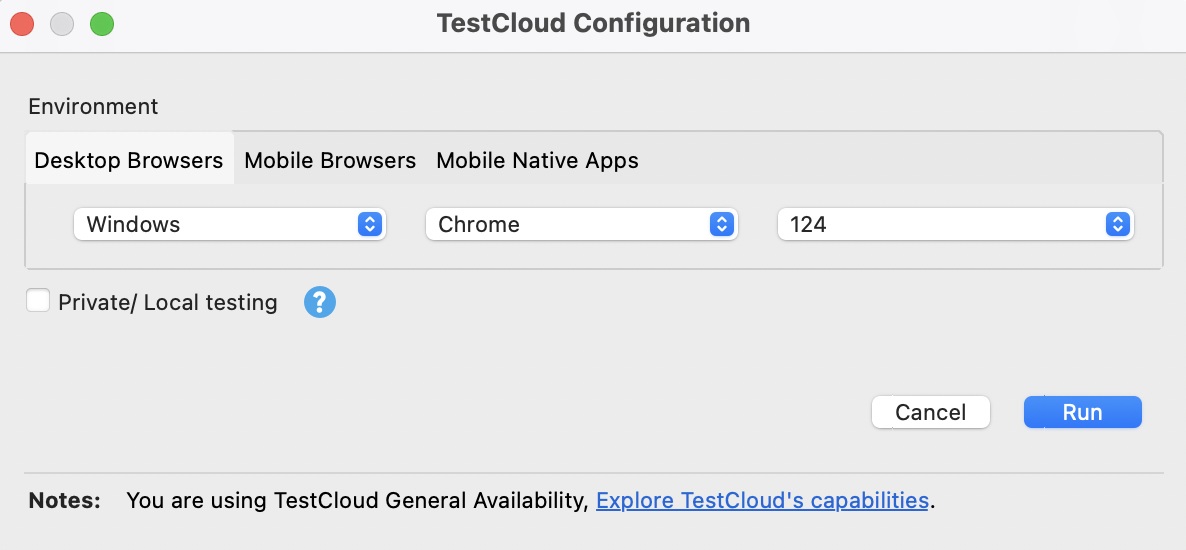
If the application under test is hosted in a private/local environment, you can check the Private/Local Testing option to set up TestCloud tunnel. See: Configure TestCloud Tunnel.
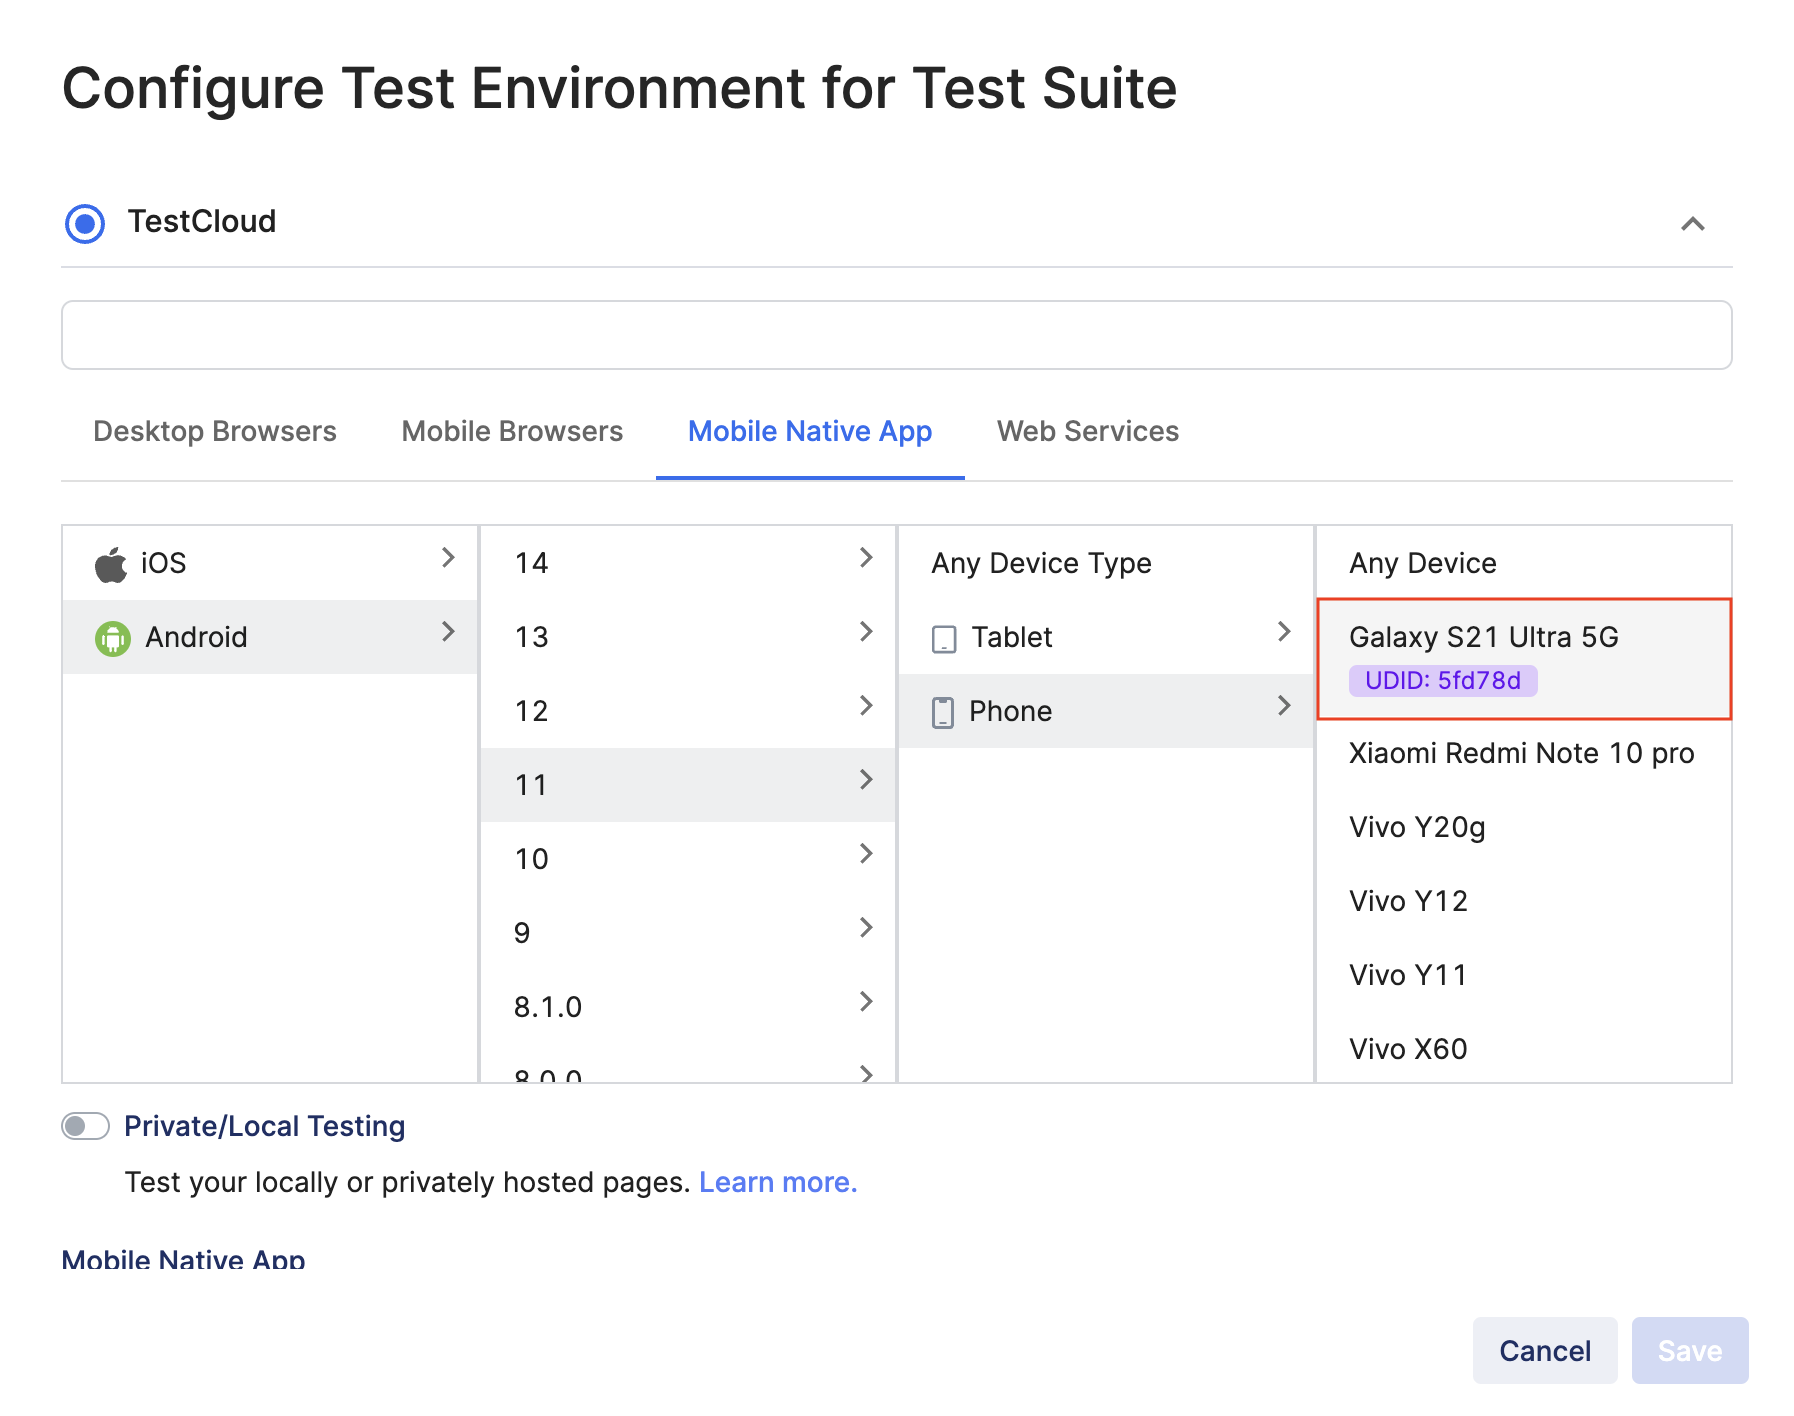
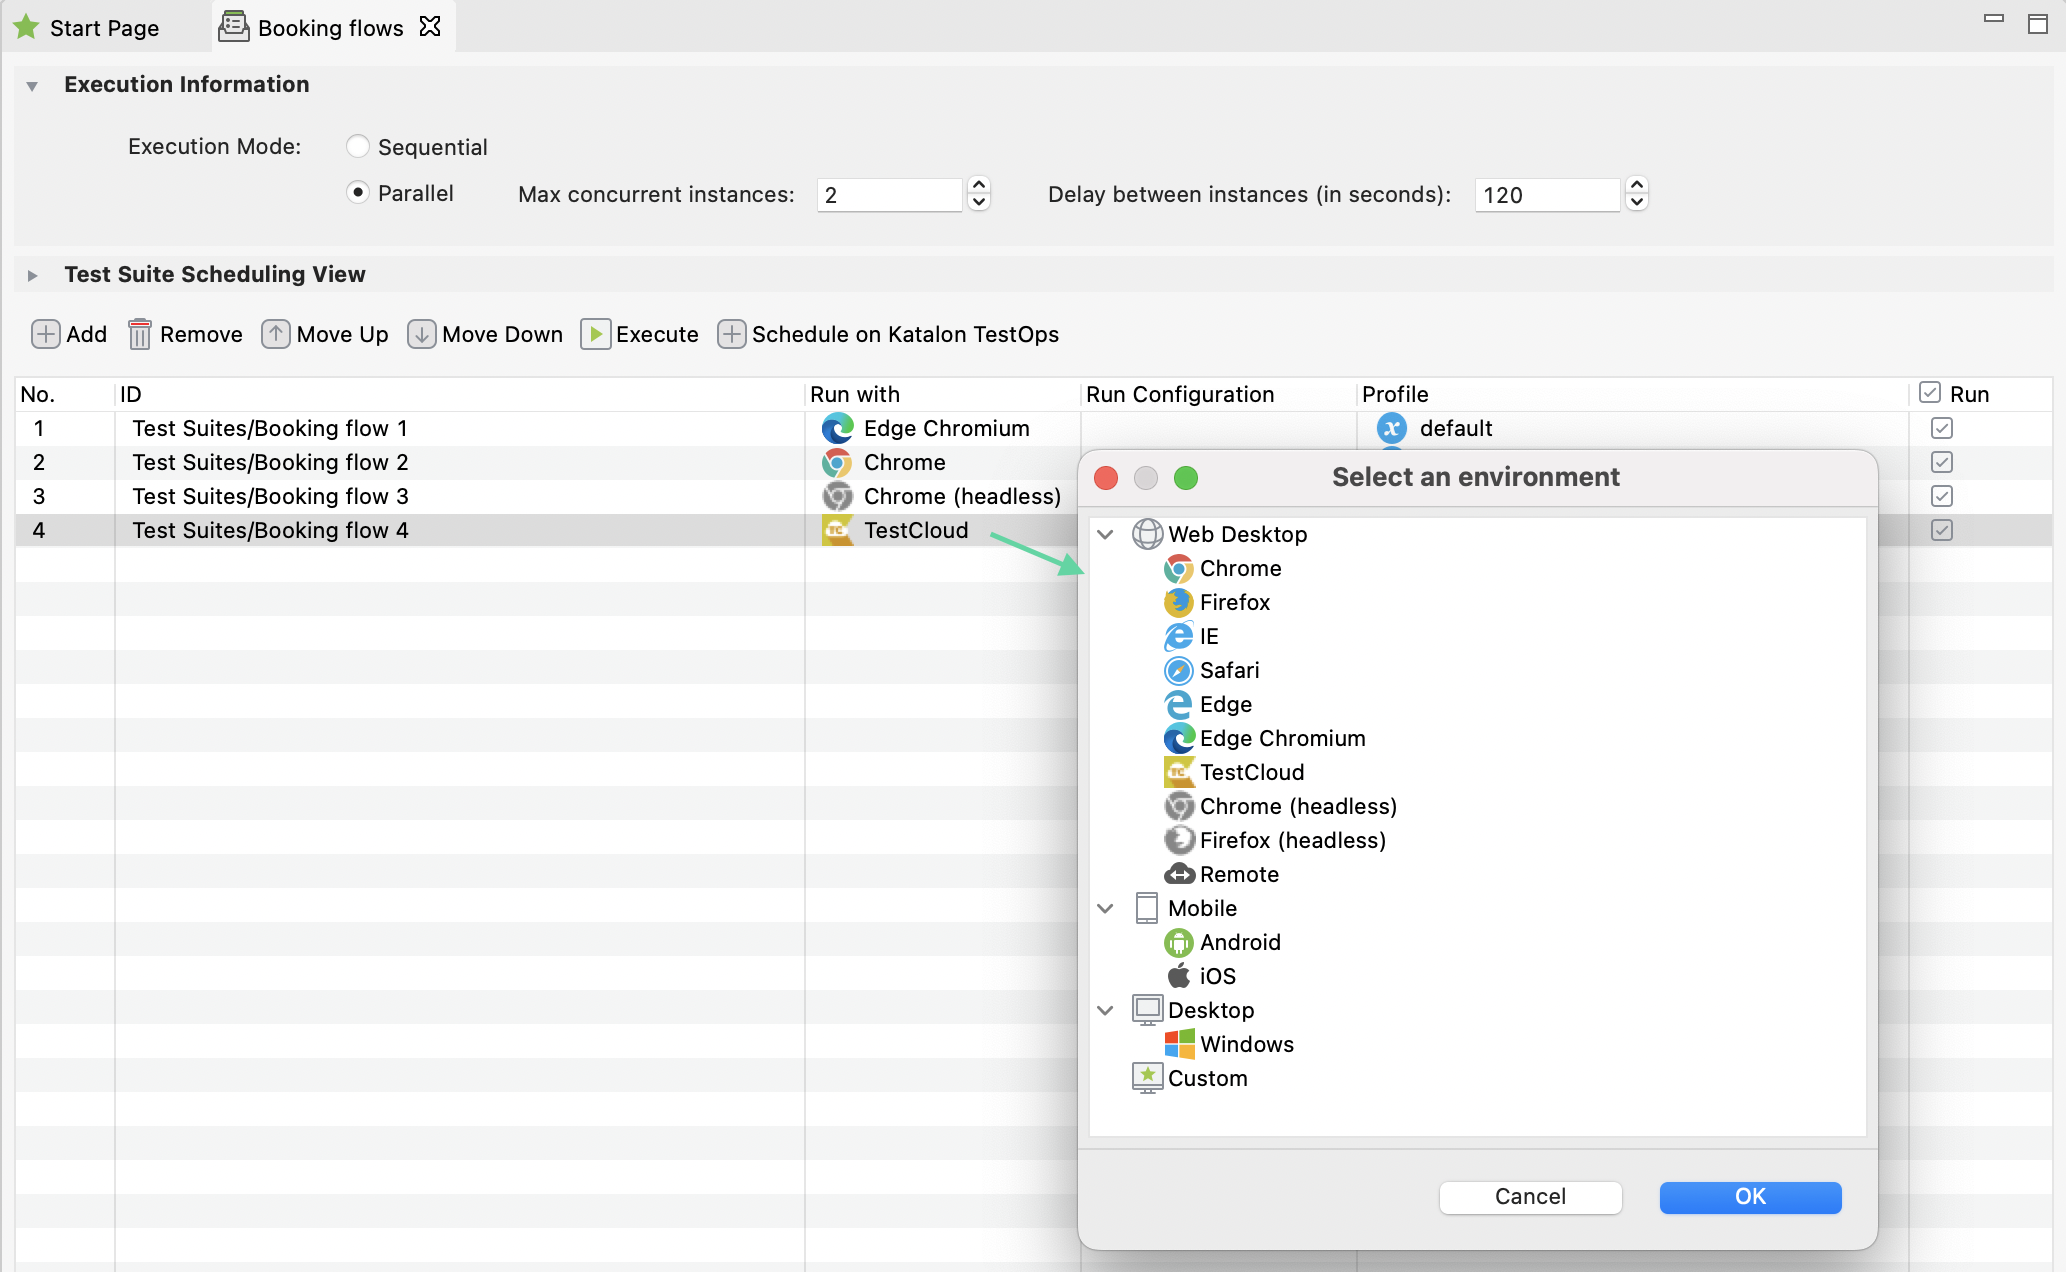
- Select the execution environment for your tests.
Select between Desktop Browser, Mobile Browser, or Mobile Native Apps environments.
- For desktop browsers: Select the desired OS, browser, and browser version.
- For mobile browsers: Select the desired OS, OS version, and device. The default browser is Chrome for Android, and Safari for iOS.
- For mobile native application: Select the desired OS, OS version, and device. By default, the test suite will be executed using the application specified in the script. If you want to override with applications from Application Repository, check the override option and select the available application. See: Upload mobile application.
You can view the execution progress in Log Viewer with detailed information on the status of each test step: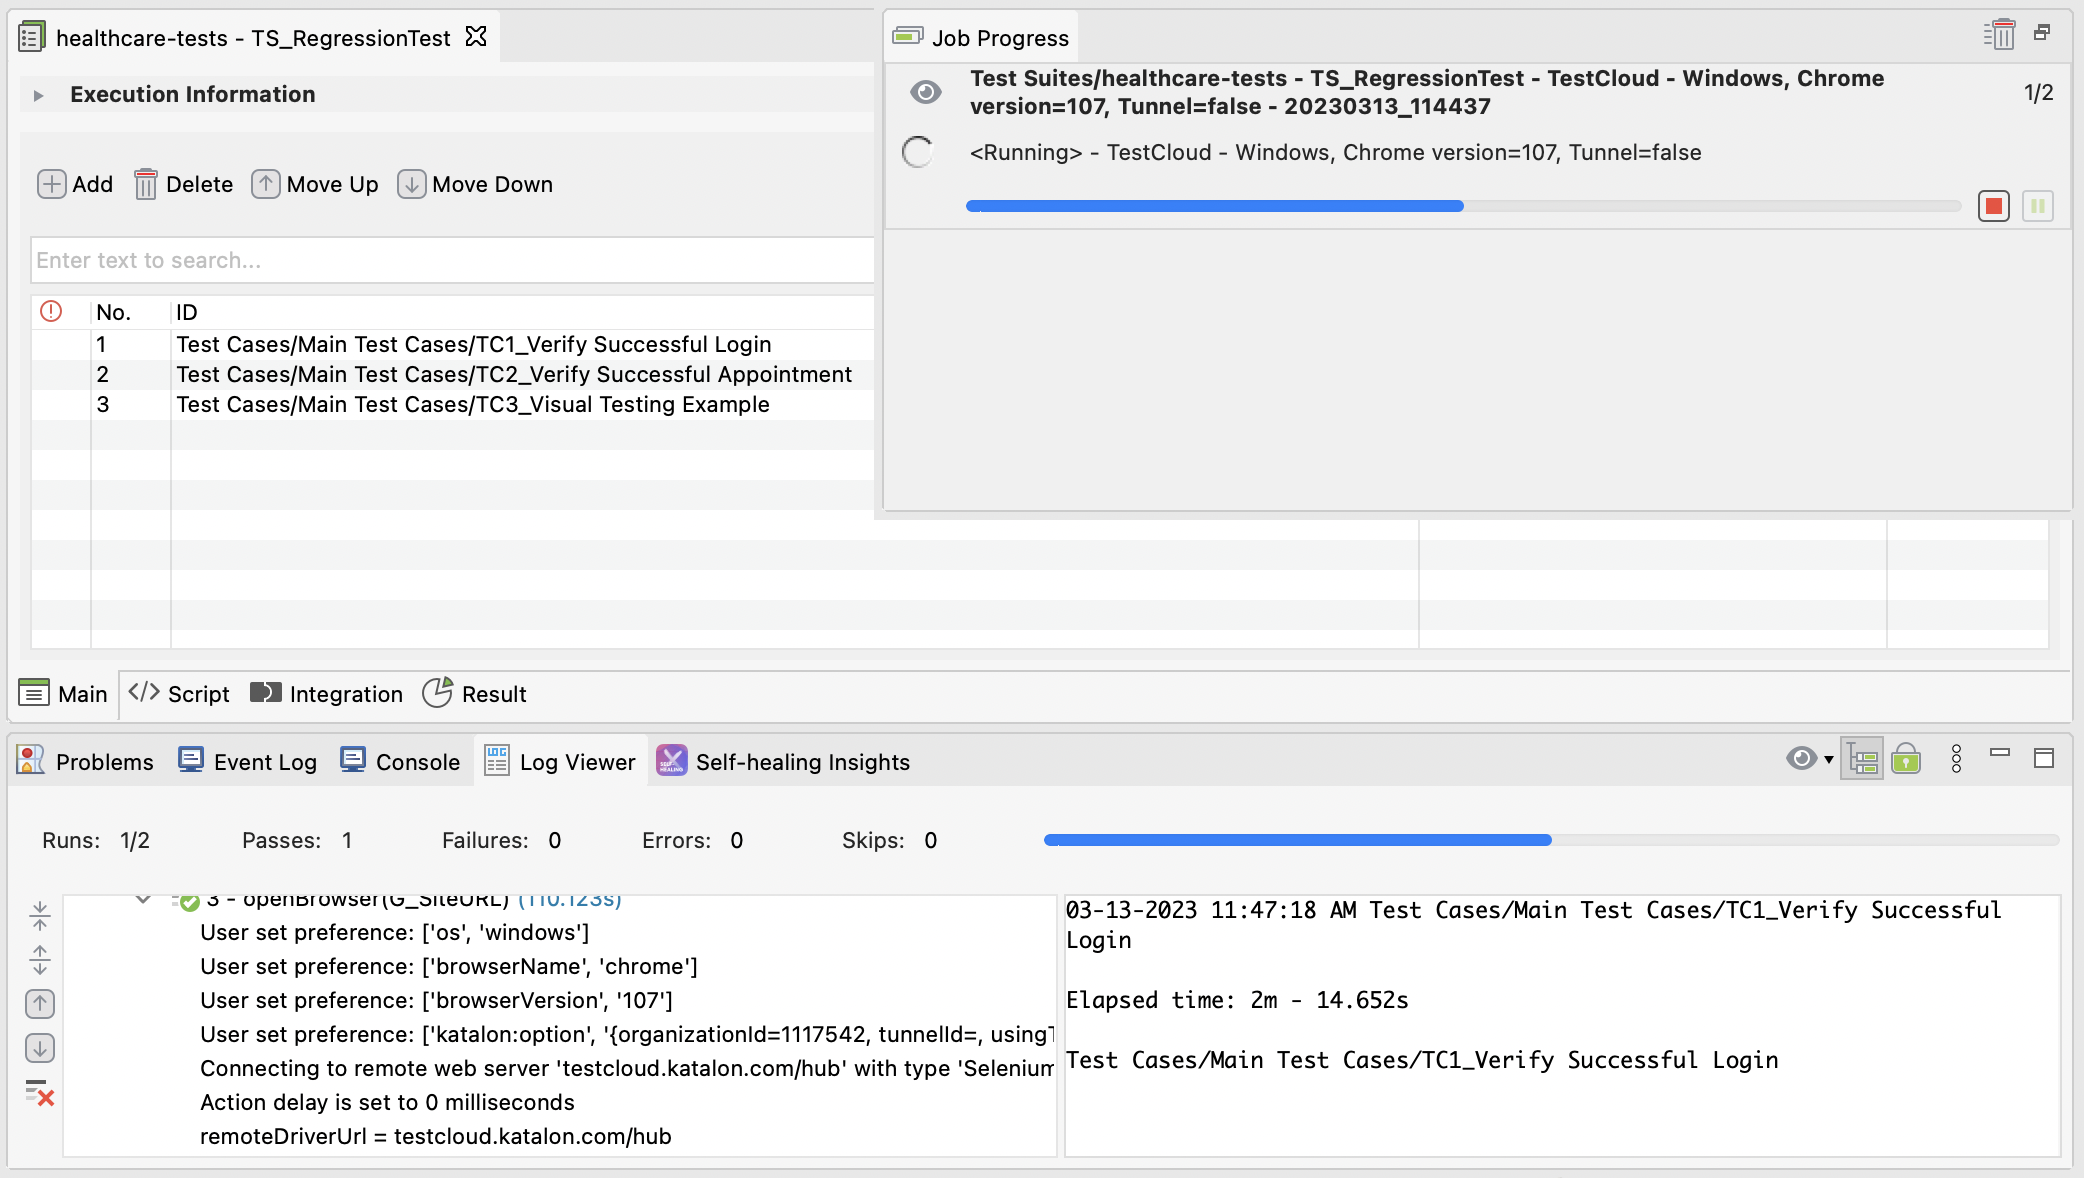
Run test suite collections on TestCloud
Learn how to run test suite collections on TestCloud.
Running test suite collections on TestCloud allows you to execute multiple test suites across a range of cloud-based environments, including various browsers and operating systems. This feature supports both parallel and sequential execution, optimizing test coverage and efficiency. By running test suite collections on TestCloud, you can leverage cloud infrastructure to scale your testing efforts without managing physical resources, with all results automatically uploaded to Katalon TestOps for easy analysis and reporting.
Create a new test suite collection
- In the Tests Explorer panel, right-click on the Test Suites folder > New > Test Suite Collection.
 Alternatively, you can also go to File > New > Test Suite Collection from the main menu.A New Test Suite Collection dialog appears.
Execute a test suite collection
You can execute a test suite collection in sequential or parallel mode. The behaviors of these two modes are described as follows.
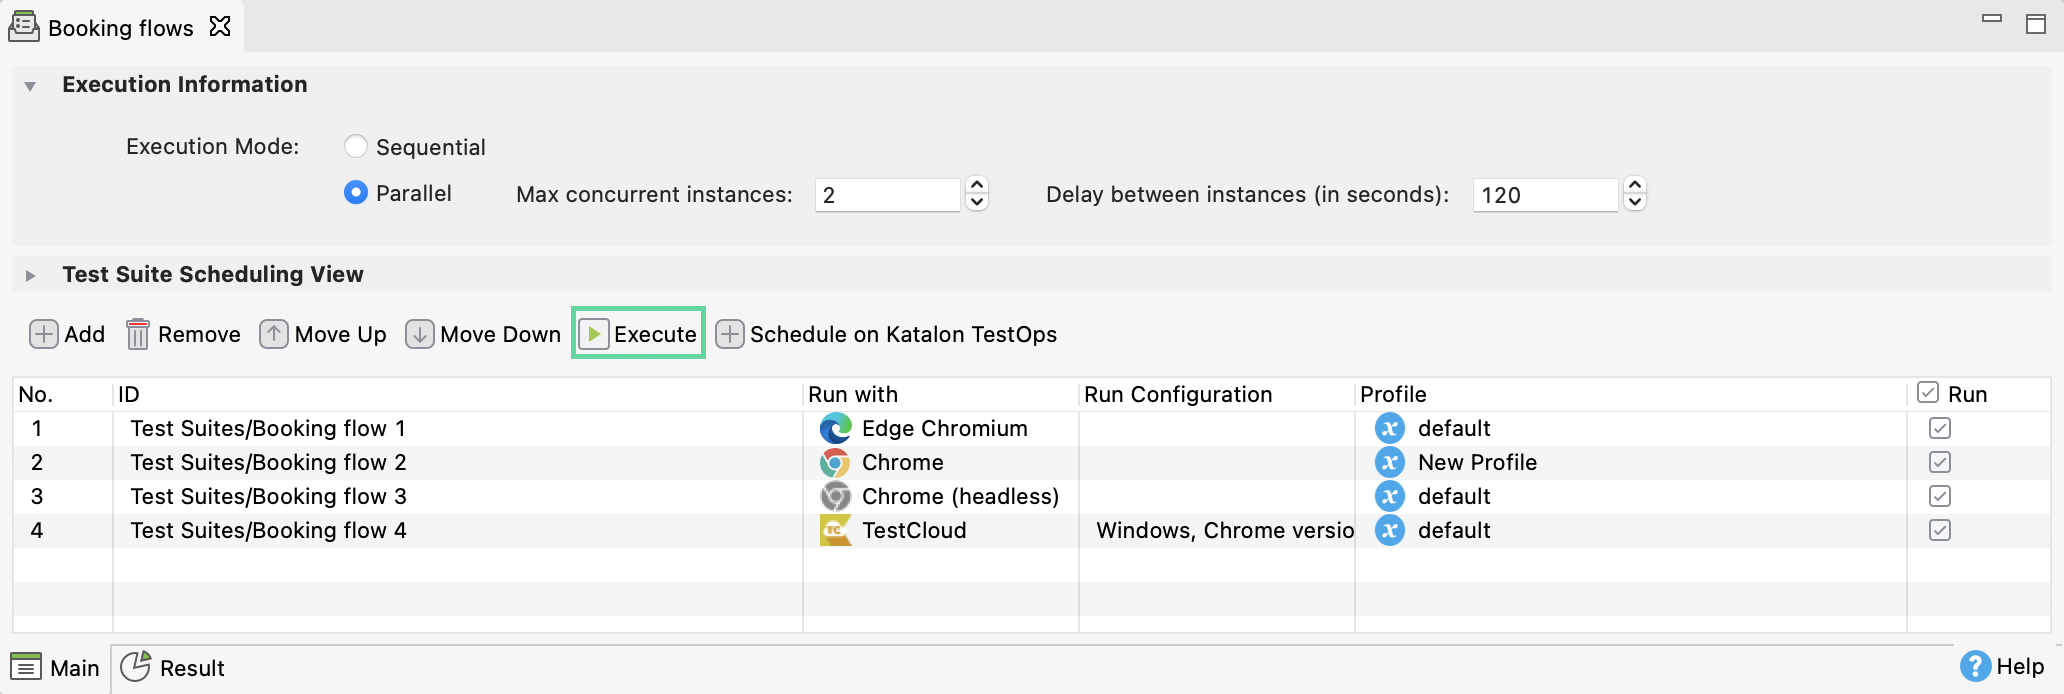
- In a test suite collection, click Execution Information.
- For each test suite, click on Run with to select execution environments.
 If you choose TestCloud or Mobile, you need to click on Run Configuration for further set up.
 - Once you are done, save your test suite collection and click Execute.
The Job Progress is triggered automatically to show the progress while your test suite collection is being executed.

Advanced mobile testing
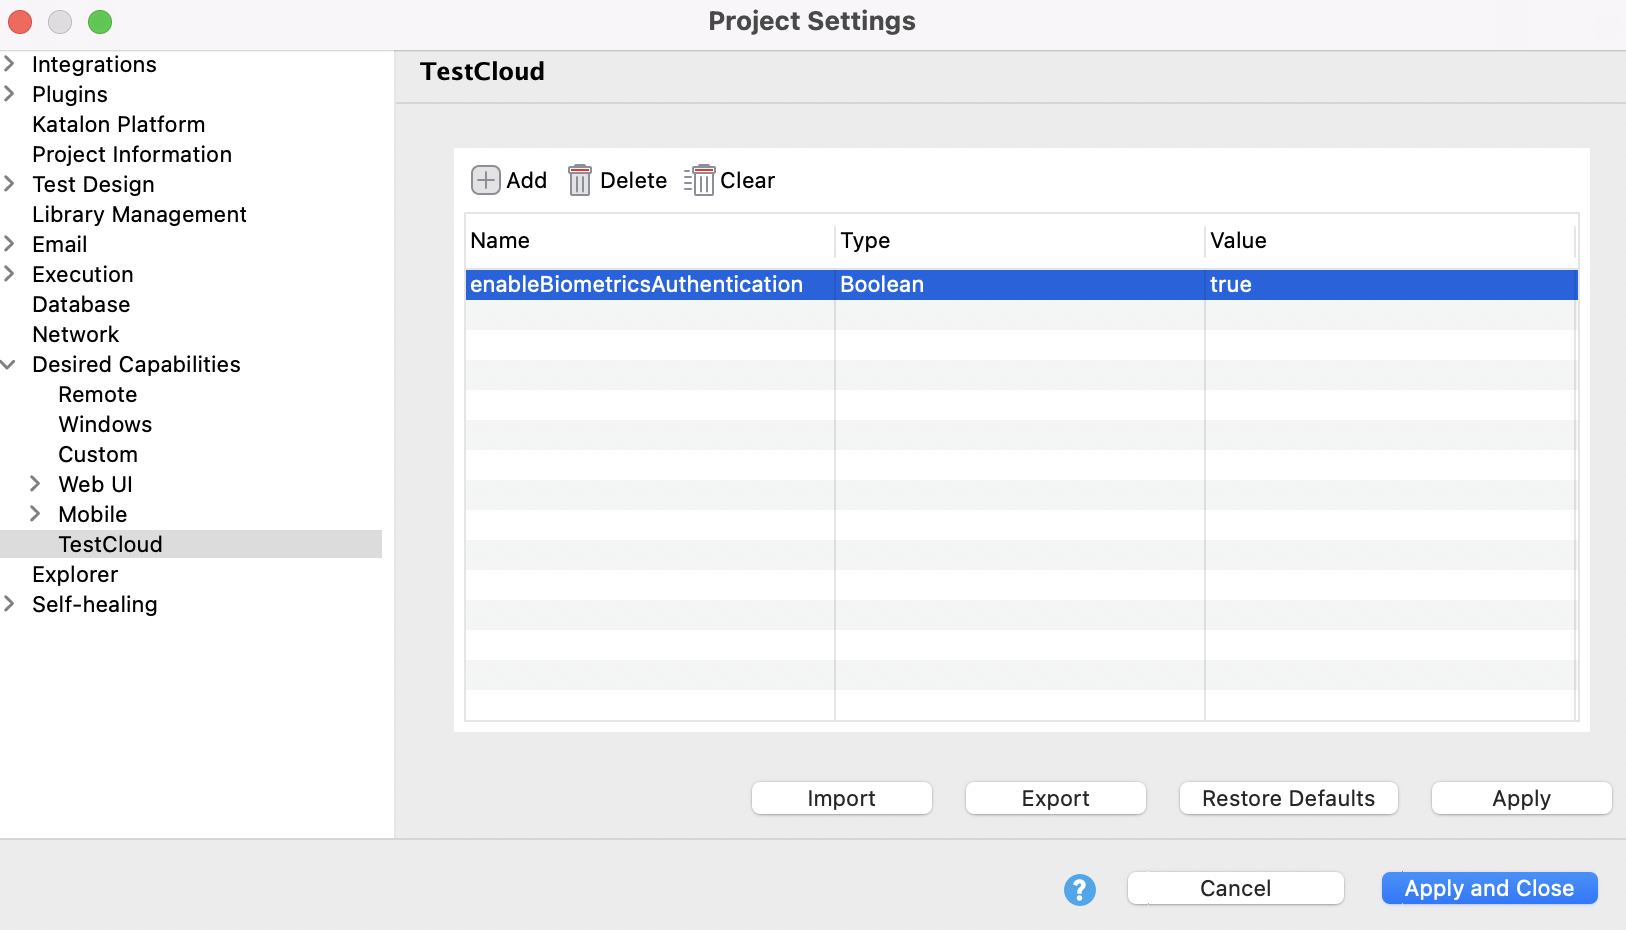
Set TestCloud desired capabilities
Depending on where you trigger the execution, from Katalon Studio or TestOps interface, the settings for TestCloud desired capabilities may differ.
With the exception of TestCloud execution in Linux environments (browsers on Linux), you need to specify desired capabilities in Settings > Desired Capabilities > Web UI.
- Go to .
Local testing with TestCloud Tunnel
This document shows you how to set up TestCloud Tunnel in Katalon Studio and perform local testing.
If your application under test is locally hosted in a private network, you need to set up a tunnel for TestCloud server to access the application.
In Katalon Studio, you can use the Tunnel Setup Helper to download and configure TestCloud Tunnel.
Configure TestCloud Tunnel
- TestCloud integration is enabled in Katalon Studio Enterprise (KSE), see: Integrate Katalon Platform with Katalon Studio.
- TestCloud Tunnel Server hostnames are whitelisted. See: Network configuration for TestCloud.
- To allow User Datagram Protocol (UDP) connections, the proxy must be configured.
- If you use a Man-in-the-Middle (MITM) proxy, it must be configured to allow Transport Layer Security (TLS) connections.
Follow these steps to set up TestCloud Tunnel with Tunnel Setup Helper.
- In the TestCloud Configuration dialog, tick the Private/Local Testing option.You'll see a message in red, as follows:
- Click the Tunnel Setup Helper link.
The Tunnel Setup Helper dialog appears.
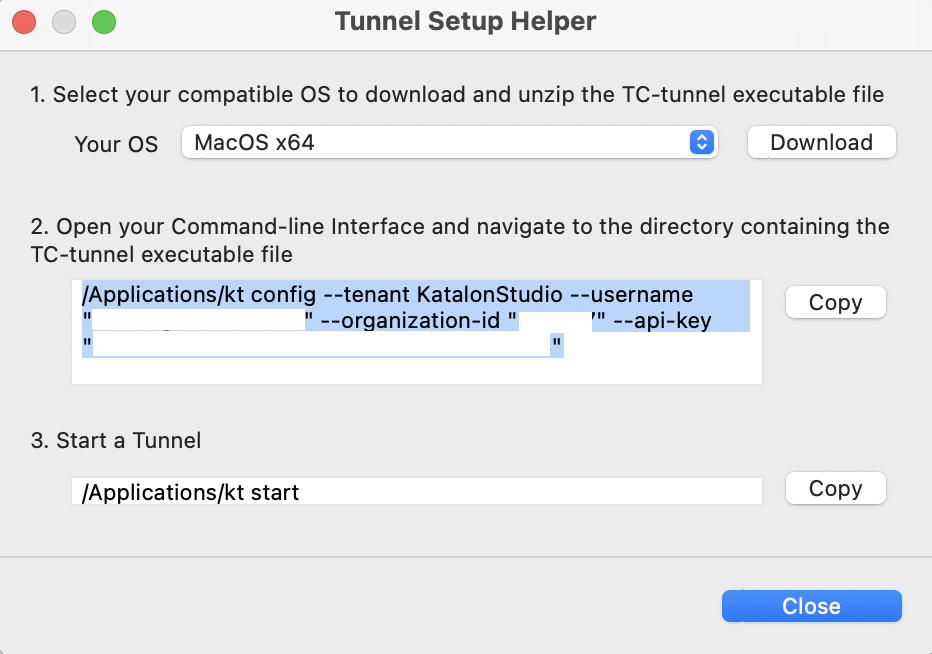
- Follow the step-by-step instructions in the dialog to set up the tunnel client in your local machine:
- Use the
kt startcommand to start the tunnel.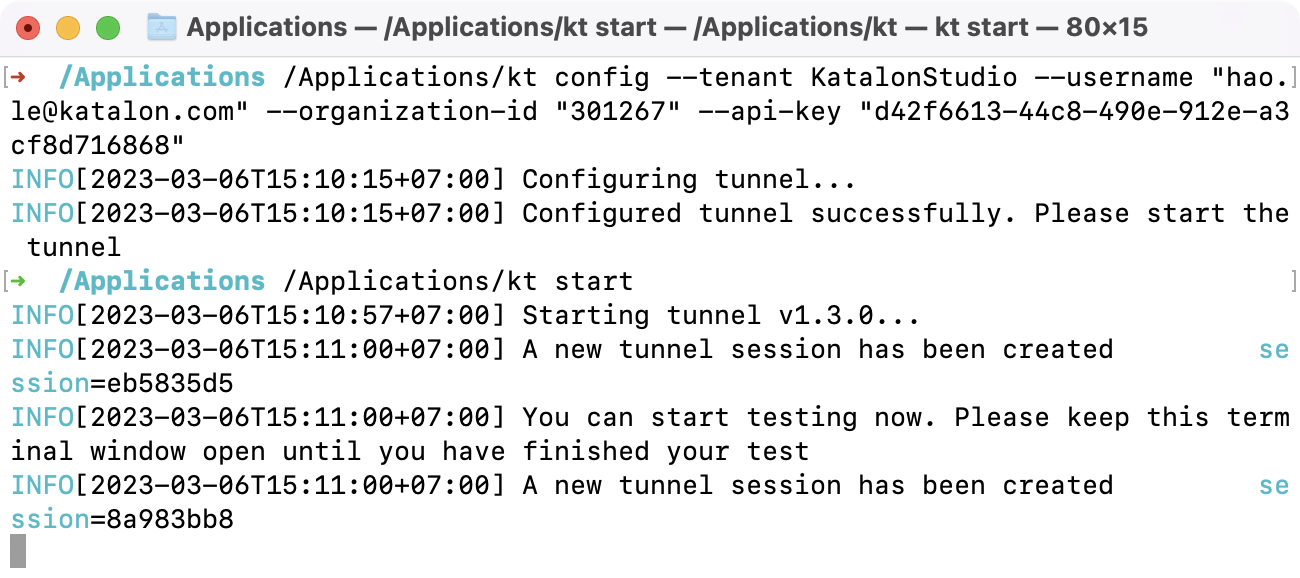 Note:
Note:Keep your CLI open until you have finished running tests.
- Use the
- Switch back to Tunnel Setup Helper and click Close. Click Refresh and you can see the available status.
Use TestCloud private mobile devices
- Non-shared environment: Private devices are dedicated to your organization, ensuring high availability and consistent performance.
- Enhanced data privacy: With complete control over the data stored on the device, you reduce the risk of exposing this data to other users or third parties.
- Session retention: Private devices come with longer session retention, allow you first configure device functionalities and later perform multiple tests without having to reconfigure from scratch.
With a TestCloud private device subscription, you can perform tests on private mobile devices just as you would on shared devices. See: Run mobile native application tests.
When selecting devices in the Configure Test Environment section, you can find your private mobile devices labeled with their UDID.