[Mobile] Install WebDriverAgent for real iOS devices in Katalon Studio
The WebDriverAgent is a WebDriver server used to control iOS devices remotely. It is automatically downloaded with Appium 3 as appium-webdriveragent.
When testing iOS applications with real iOS devices, you need to install WebDriverAgent on your development machine.
In this article, we demonstrate how to install the WebDriverAgent via Katalon built-in tools and manual installation.
Requirements
- You have set up real iOS devices for mobile testing. See [Mobile] Set up iOS real devices.
- You have enrolled in the Apple Developer Program. To learn more about the Apple Developer Program enrollment, you can refer to this Apple document: Enrollment.
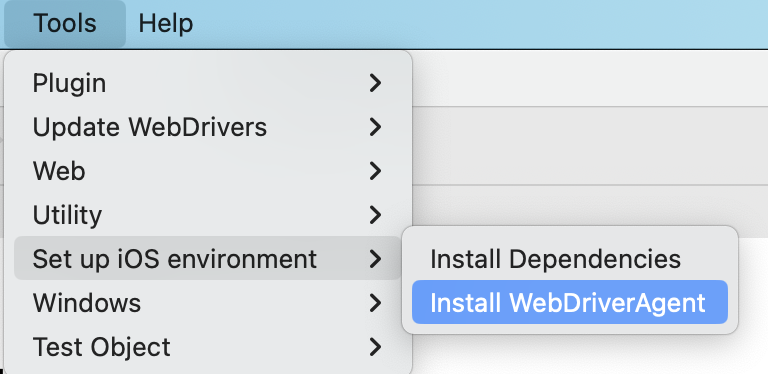
Install the WebDriverAgent with Katalon built-in tools
- Download and install a signing certificate and provisioning profile generated from an Apple Developer Account on your development machine. You can manage your signing assets via Xcode.
Refer to the following Apple documents for further information: Create, export, and delete signing certificates.Download manual provisioning profiles.
- Open Katalon Studio and go to Tools > Set up iOS environment > Install WebDriverAgent.
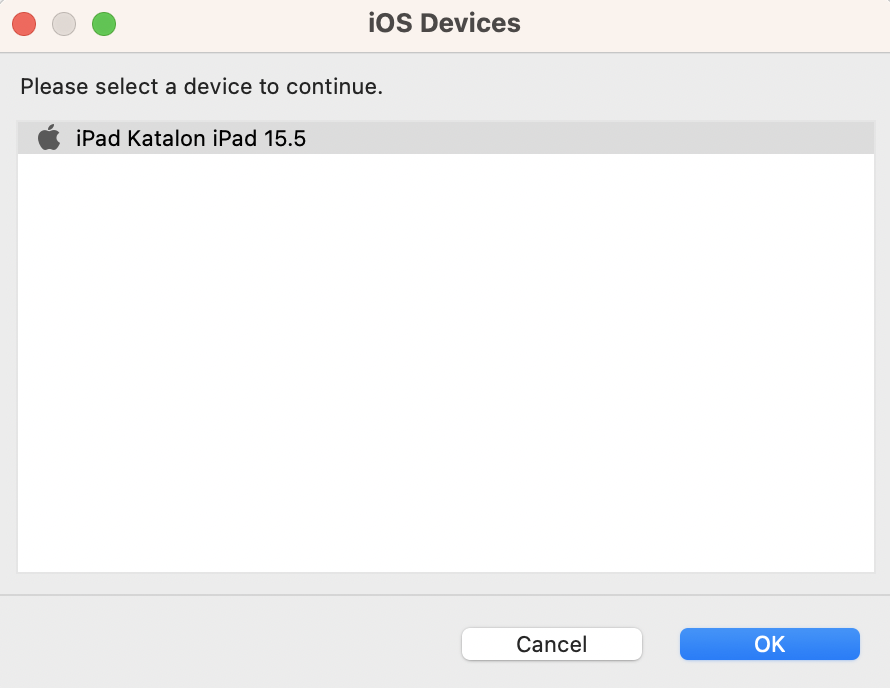
- In the iOS Devices dialog, select the real iOS device you want to test then click OK.
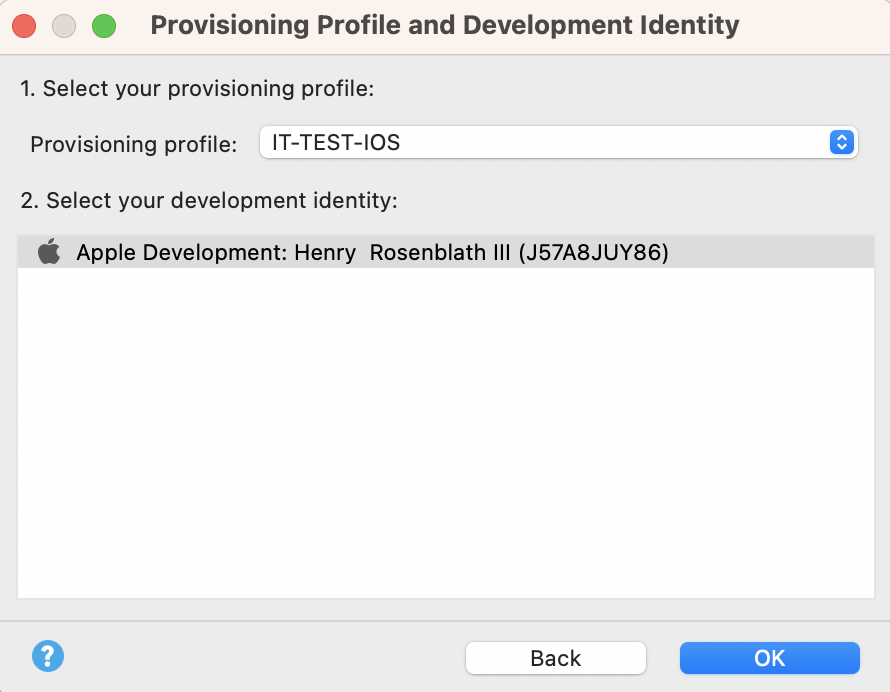
- In the Provisioning Profile and Development Identity, select the desired profile and development identity.
Install the WebDriverAgent manually
- In Xcode > Preferences > Account click Add (+) to enter your Apple Developer Account ID and password.
- To navigate to the location of the WebDriverAgent, open Terminal, copy and paste the command below:
For Appium 3:
cd /Users/**your_username**/.appium/node_modules/appium-xcuitest-driver/node_modules/appium-webdriveragent/WebDriverAgent.xcodeproj
For example:
cd /Users/**john_smith**/.appium/node_modules/appium-xcuitest-driver/node_modules/appium-webdriveragent/WebDriverAgent.xcodeproj
- After going to the WebDriverAgent location, run the following command to initialize the WebDriverAgent project:
mkdir -p Resources/WebDriverAgent.bundle
-
Open Finder and type
appium-webdriveragentto quickly search for the folder. In the opened folder, double-click theWebDriverAgent.xcodeprojfile to open it in Xcode. -
After opening
WebDriverAgent.xcodeprojfile in Xcode, you need to build the IntegrationApp app. To do so, follow these steps:- Select the IntegrationApp target. In the Signing & Capabilities section, check the Automatically manage signing box, then choose a team added in Step 1.

- On the menu bar, select Product > Build.

You have successfully built the IntegrationApp target.
-
Next, build the WebDriverAgentLib target. Follow these steps:
- Select the WebDriverAgentLib target. In the Signing & Capabilities section, check the Automatically manage signing box, then choose a team added in Step 1.

- On the menu bar, select Product > Build.

You have successfully built the WebDriverAgentLib target.
-
Finally, you need to build the WebDriverAgentRunner target. Follow these steps:
- Select the WebDriverAgentRunner target. In the Signing & Capabilities section, check the Automatically manage signing box, then choose a team added in Step 1.

- On the menu bar, select Product > Build.
