Sample API project in Katalon Studio
This sample demonstrates fundamental API testing with RESTful requests. The sample uses the following base URL: https://sample-web-service-aut.herokuapp.com. To learn more about API testing, you can refer to this document: Introduction to API testing.
Open the sample API test project
To open the API sample project, in Katalon Studio, go to File > New Sample Project > Sample API Tests Project.

Alternatively, you can download the sample API test project from our GitHub repository: Web Service tests.
Trust dialog on first open
When you open a sample project for the first time, Katalon Studio will show a "Trust and open this project" dialog. This security prompt ensures you’re aware of the source before opening and potentially executing harmful scripts.
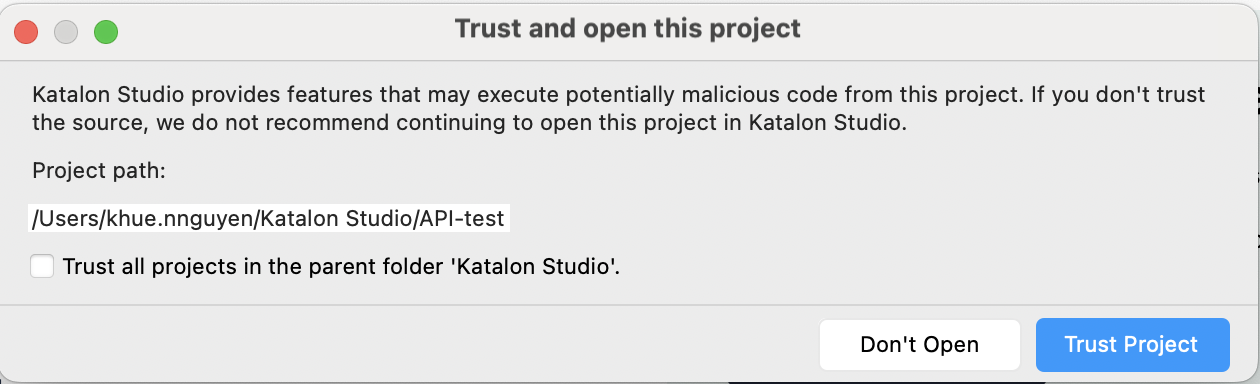
In this dialog, you can:
- Review the project path.
- Decide whether to trust this project or all projects inside the parent folder.
- Trusting a parent folder also trusts all projects directly inside it, including the one you're opening.
- However, if this project contains subfolders with separate project files, those sub-projects won’t be trusted automatically. You'll still see the trust dialog when opening them.
- Click Trust Project to continue, or Don't Open if you’re unsure.
Sample API project components in Katalon Studio
Profiles
To open the execution profile, go to Profiles > default.

You can create and save all global variables in the execution profile. They can be used across test cases in your project. To learn more about execution profile, you can refer to this document: Execution profile.
Katalon creates three global variables in this sample project as follows:
| Name | Value |
|---|---|
| baseURL | https://sample-web-service-aut.herokuapp.com |
| successCode | 200 |
| globalid | 0 |
RESTful requests
We created two sample RESTful requests in this project: a POST request and a GET request. To access the sample RESTful requests, in the Test Explorer panel, go to the Object Repository folder.

-
The POST a new user object
In this sample POST object, we specify the following information:

-
Request method:
Katalon allows you to choose one of the following methods: GET, POST, PUT, DELETE, PATCH, HEAD, CONNECT, OPTIONS, TRACE. The method needs to match the API endpoint to be a valid request. Here, we create a POST request to send the user information to the server to create an account. The server will return us with a new userID as a response.
-
Request URL:
Along with the request method, request URL is to tell the web server which API is utilized under test. Any mismatch between method and URL leads to an invalid request exception at runtime or a wrong data response. For the POST request, we specify the API endpoint as follows:
${GlobalVariable.baseUrl}/api/users/json, where the base URL is listed as a global variable. See above: Profiles.
-
Authorization:
Authorization is an essential part of an API. It is used to get the correct data under permission (unless the data is public). To learn more about authorization, you can refer to this document: Authorization.
We don't specify any authorization for this POST request.
-
HTTP Header:
You can configure the header information needed for sending the RESTful request object. By default, the Content-Type header is automatically generated from the input in the HTTP Body tab. Alternatively, you can select suggested headers from the dropdown list or manually input another header of your interest. To learn more about HTTP headers, you can refer to the Mozilla Developer website here: HTTP headers.
Here, we want the HTTP header to be automatically generated by the HTTP body.

-
HTTP Body:
Katalon Studio supports the following body data types: text, x-www-form-urlencoded, form-data, and file. To learn more about the types of HTTP body, you can refer to this document: Request body.
Here, we want to send the user information with dynamic data, including username, password, age, gender, and avatar to the server to create new accounts. To do so, we call variables in the POST object, using the
${<variable_name>}syntax as a placeholder in the HTTP body as follows:{
"age": ${age},
"avatar": null,
"gender":"${gender}",
"password": "${password}",
"username": "${username}"
}We also check the Auto update Content Type box to automatically generate a HTTP header.

To learn more about setting parameters in a web service object, see Parameterize a web service object.
- Verification:
Katalon Studio allows you to write verification scripts directly in the Verification tab of the web service object. To learn more about the verification snippets, see Verification snippets.

- Variables:
To pass the variables value to the POST request, we specify variables in the Variables tab. Here, we specify the user information, including
age,gender,username, andpasswordvariables.
- Follow redirects:
The Follow redirects allows you to automatically make a new request when the server responds with a 3xx status. Conversely, you can disable this option to prevent automatically redirecting such requests that return a 3xx series response, you can examine and manage the redirection manually.
-
- Starting from Katalon Studio version 9.7.0, the Follow redirects checkbox is located under the Request method dropdown
- The Response tab:
The response is automatically displayed in a neat format: JSON, XML, HTML, and JavaScript. It is helpful for a quick view of the response status.

-
The GET user by id object:
In this sample GET object, we specify the following information:

- Request method:
For the sample GET request, we are to retrieve the user information by the userID.
- Request URL:
To pass the
idvariable to the GET API, we add the${<variable_name>}placeholder at the end of the API endpoint. The API endpoint for the GET request is as follows:${GlobalVariable.baseUrl}/api/users/${id}, with the base URL is listed as a global variable.
- Variables:
We specify the value for the
idvariable in the Variables tab.
- Follow redirects:
The Follow redirects option allows you to automatically make a new request when the server responds with a 3xx status. Conversely, you can disable this option to prevent automatically redirecting such requests that return a 3xx series response, you can examine and manage the redirection manually.
- Authorization & HTTP Header & HTTP Body:
We don't specify any authorization, HTTP header, or HTTP body for this sample GET request.
Custom keywords
You can use custom keywords in the test case. To learn more about custom keywords, you can refer to this document: Introduction to custom keywords.
Katalon creates two custom keywords in this sample project. To see the custom keywords, in the Test Explorer panel, go to Keywords > sample > Common.groovy.

-
sample.Common.createNewUser
Description
This keyword is to:
- Send the POST request to the server to create an account, then return a userID as the response.
- Execute verification snippets in the Verification tab of the POST request.
- Extract the new user ID from the response.
Parameters
Parameter Type Mandatory Description age int Yes The age of the user username String Yes The username for the user account password String Yes The password for the user account gender String Yes The gender of the user expectedStatus int Yes The expected status code of the request -
sample.Common.findUserById
Description
This keyword is to:
- Send the GET request to retrieve user information by the userID.
- Execute verification snippets in the Verification tab of the GET request.
Parameters
Parameter Type Mandatory Description id int Yes The id of the new user age int Yes The age of the user username String Yes The username for the user account password String Yes The password for the user account gender String Yes The gender of the user expectedStatus int Yes The expected status code of the request
Test cases
To access the sample test cases in this project, in the Test Explorer panel, go to the Test Cases folder.

There are two test cases for different purposes:
- The Create a new user test case is to create a new user. In the test case, we use the
sample.Common.createNewUserkeyword to:You can see the test script as follows:-
Send the user information, including username, password, age, gender to the server to create an account. Here, we set the value type of username, password, age, gender as Variable. You can change the username, password, age, gender value in the Variable tab. To learn more about test case variables, you can refer to this document: Test Case Variables.

-
The POST will return a userID as the response.
-
Execute verification snippets in the Verification tab of the POST request.
-
Extract the new user ID from the response.
-
-
If you change the user information in the Variables tab of the test case, make sure to change the verification snippets in the Verification tab of the POST request accordingly for successful verification. For example, if you change the user's age to
10, then make sure to change the verification of theageelement to10.
You can see the test script as follows:
import static com.kms.katalon.core.checkpoint.CheckpointFactory.findCheckpoint
import static com.kms.katalon.core.testcase.TestCaseFactory.findTestCase
import static com.kms.katalon.core.testdata.TestDataFactory.findTestData
import static com.kms.katalon.core.testobject.ObjectRepository.findTestObject
import com.kms.katalon.core.checkpoint.Checkpoint as Checkpoint
import com.kms.katalon.core.cucumber.keyword.CucumberBuiltinKeywords as CucumberKW
import com.kms.katalon.core.mobile.keyword.MobileBuiltInKeywords as Mobile
import com.kms.katalon.core.model.FailureHandling as FailureHandling
import com.kms.katalon.core.testcase.TestCase as TestCase
import com.kms.katalon.core.testdata.TestData as TestData
import com.kms.katalon.core.testobject.TestObject as TestObject
import com.kms.katalon.core.webservice.keyword.WSBuiltInKeywords as WS
import com.kms.katalon.core.webui.keyword.WebUiBuiltInKeywords as WebUI
import internal.GlobalVariable as GlobalVariable

CustomKeywords.'sample.Common.createNewUser'(age as Integer, username, password, gender, 200)
- The Find user by ID test case retrieves user information via an userID. The flow is as follows:
- First, we use the
sample.Common.createNewUserkeyword to:- Send the user information, including username, password, age, gender to the server to create a new account. Here, we set the value type of username, password, age, gender as Variable. You can change the username, password, age, gender value in the Variable tab.
- The POST request returns a userID as the response.
- Execute verification snippets in the Verification tab of the POST request.
- Extract the new userID from the response.
- Then, we use the
sample.Common.findUserByIdkeyword to:You can see the test script as follows:- Send the GET request to retrieve the user information via the newly created userID.
- Execute verification snippets in the Verification tab of the GET request.
- First, we use the
If you change the user information in the Variables tab of the test case, make sure to change the verification snippets in the Verification tab of the POST and GET requests accordingly for successful verification. For example, if you change the user's age to 10, then make sure to change the verification of the age element to 10.
You can see the test script as follows:
import static com.kms.katalon.core.checkpoint.CheckpointFactory.findCheckpoint
import static com.kms.katalon.core.testcase.TestCaseFactory.findTestCase
import static com.kms.katalon.core.testdata.TestDataFactory.findTestData
import static com.kms.katalon.core.testobject.ObjectRepository.findTestObject
import com.kms.katalon.core.checkpoint.Checkpoint as Checkpoint
import com.kms.katalon.core.cucumber.keyword.CucumberBuiltinKeywords as CucumberKW
import com.kms.katalon.core.mobile.keyword.MobileBuiltInKeywords as Mobile
import com.kms.katalon.core.model.FailureHandling as FailureHandling
import com.kms.katalon.core.testcase.TestCase as TestCase
import com.kms.katalon.core.testdata.TestData as TestData
import com.kms.katalon.core.testobject.TestObject as TestObject
import com.kms.katalon.core.webservice.keyword.WSBuiltInKeywords as WS
import com.kms.katalon.core.webui.keyword.WebUiBuiltInKeywords as WebUI
import internal.GlobalVariable as GlobalVariable
import groovy.json.JsonSlurper as JsonSlurper
import com.kms.katalon.core.testobject.RequestObject as RequestObject
import static org.assertj.core.api.Assertions.*

int id = CustomKeywords.'sample.Common.createNewUser'(age as Integer, username, password, gender, 200)

CustomKeywords.'sample.Common.findUserById'(id, age as Integer, username, password, gender, 200)
Data Files
To view the data files in this sample project, in the Test Explorer panel, go to Data Files > ListUser.

Alternatively, you can go to <your-project-folder>\Data Files and choose the file you want to open:
ListUser.datis the .dat file of theListUser.xlsxfile.ListUser.xlsxis an excel file that contains the user information.
Test suites
The sample test suite demonstrates the web service testing with data-driven testing. To view sample test suite, in the Test Explorer panel, go to Test Suite > web-service-tests - All Test Cases.
This test suite includes the Create a new user and Find user by ID test case. We bind the Create a new user test case with the ListUser data file. To view the data binding section, select the Create a new user test case, then click Show Data Binding. To learn more about binding data, you can refer to the following document: Data Binding.

Execute selected test cases or test suites
To execute a test case or a test suite in the sample project:
-
Select the test case/test suite you want to execute.
-
Click Run or press Ctrl + Shift + A (macOS: Cmd+Shift+A).
You can choose different browsers to execute your test in the dropdown list next to Run.

-
Observe the test result in the Log Viewer tab.See also:

- You can view test results of the test suite in the Result tab. The test results can be Passed, Failed, Error, or Incomplete.
- After executing test suites or test suite collections, you can view your reports and details in
<your-project-folder>/Reports. Katalon Studio also supports exporting test reports into different formats, such as HTML, CSV, PDF, and JUnit. - For real-time monitoring and better reporting capabilities, consider integrating your project with Katalon True Platform. Learn more about test result reports here: Upload Test Results to Katalon True Platform from Katalon Studio.
See also