Smart Mobile Recorder
This document introduces the features of Smart Mobile Recorder in Katalon Studio.
Overview
The Smart Mobile Recorder is an upgraded version of the Mobile Recorder in Katalon Studio. It brings an enchanced UI with a new Interactive Mode, providing enhanced experience for recording mobile app interactions.
Key features
- Modern UI: Supports dynamic resizing, and object outlining on hover.
- Interactive Mode: Supports real-time test step capturing on Android and iOS.
- Playback: Verifies newly captured steps within the recording session to ensure they work as expected.
- Heartbeat mechanism: Prevents Appium session timeouts during long recordings.
- Pause and Resume: Controls recording flow better.
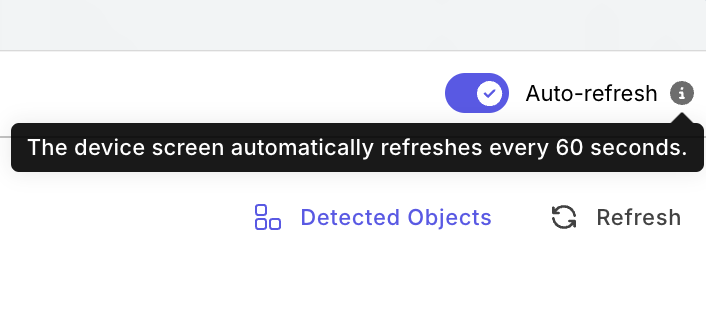
- Auto refresh: Auto-captures the latest app state (new screens, updated elements, or layout changes) every 60 seconds alongside manual refresh option.
Requirements
Install KS Recording Engine Extension
Starting Katalon Studio 11.1.0, Smart Mobile Recorder requires independent installation of the KS Recording Engine extension to avoid session conflicts. If you have not manually installed this extension on your browser's profile, see Katalon Studio Recording Engine extension for details.
Enable Smart Mobile Recorder
Follow these steps to switch to Smart Mobile Recorder:
- Go to Preferences → Recorder.
- Tick the Smart Mobile Recorder checkbox.
- Click Apply and Close.
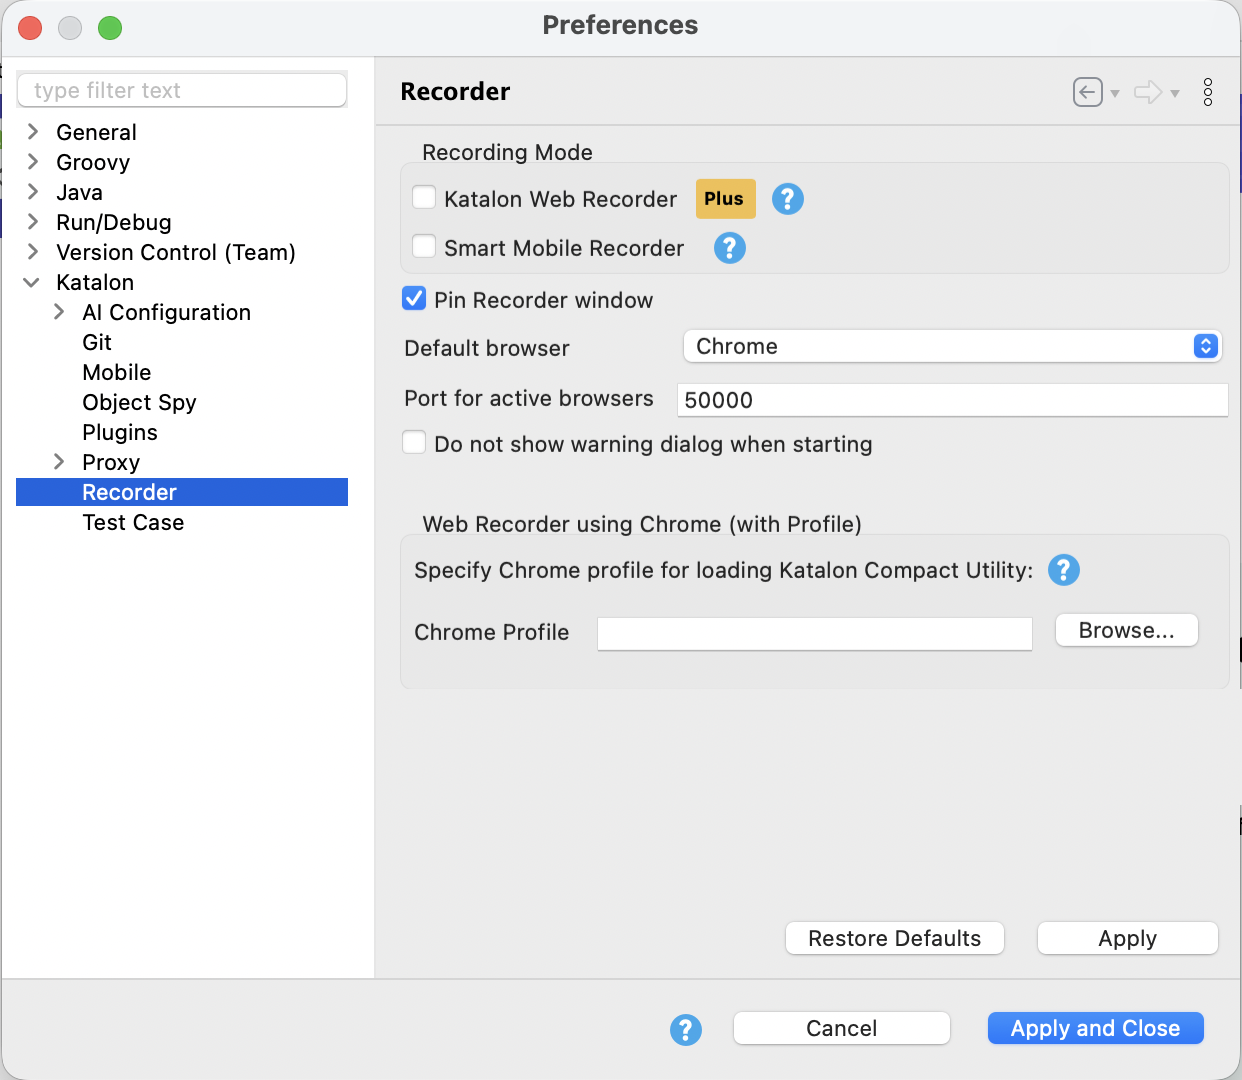
- Once enabled, launching Mobile Recorder opens the Smart Mobile Recorder UI instead of the usual Mobile Recorder.
- If you want to use Mobile Recorder, deselect Smart Mobile Recorder to opt-out, and opt back in any time.
Configure mobile device to record
Smart Mobile Recorder has four recording modes, each requires separate settings:
- Local Device requires a configured mobile device connected to your machine. See instructions at Mobile Recorder - Device Type.
- Remote Device requires a pre-configured remote device. See instructions at Mobile app testing with Remote Devies
- Custom Desired Capabilities requires a pre-configured device in Desired Capabilities. See configuration details at Desired Capabilities in Mobile Testing
- Cloud Provider requires at least one integration with a cloud provider (view all possible intergration options at Cloud device integrations).
- For Katalon Test Execution Cloud: you can select available apps that have been uploaded on your organization's domain (see more details at Upload a mobile app to TestOps)
Get started with Smart Mobile Recorder
Follow these steps:
- Open Mobile Recorder from the main toolbar.
- Select a record mode: Local Device, Remote Device, Custom Desired Capabilities, or Cloud Provider to select supported devices from Katalon Test Execution Cloud.
- Pick your app source (upload an Application file or specify the Application ID). Application ID is the package name for Android apps, or the bundle identifier for iOS apps.

- Click Start Record.
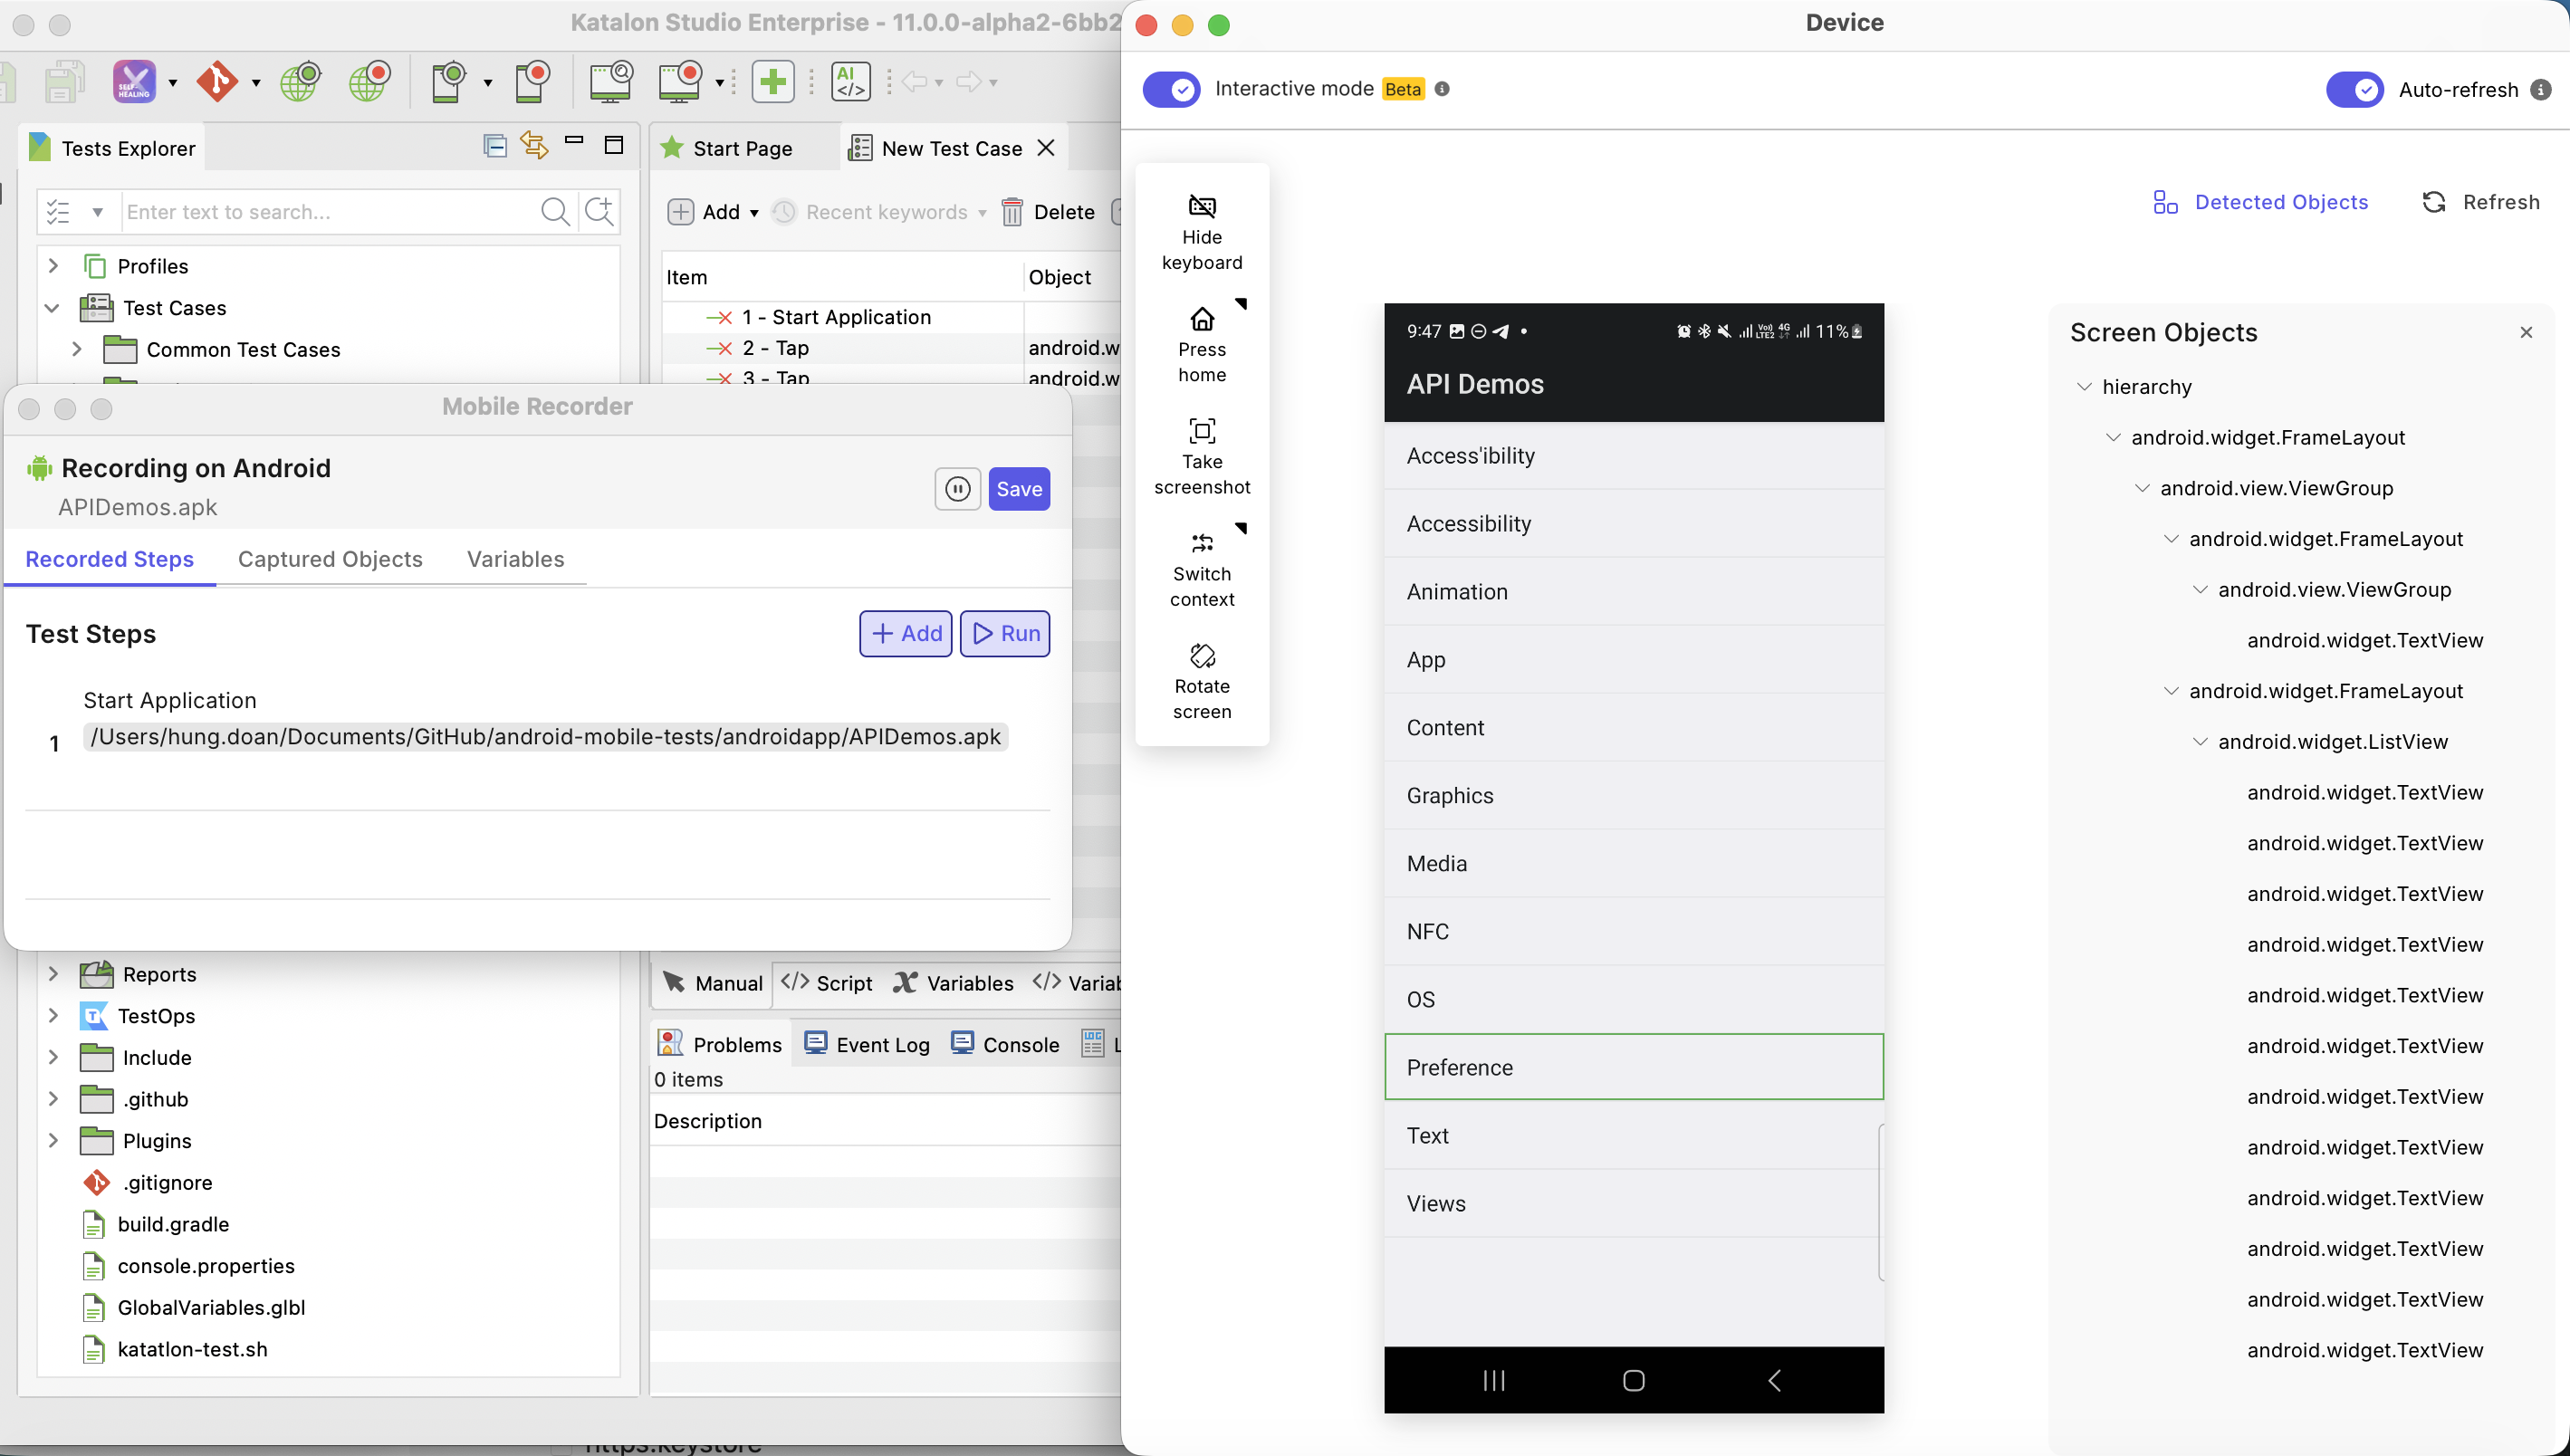
- By default, you enter Manual Mode - this mode functions like the legacy Mobile Recorder, with a modern, revamped UI. Turn on Interactive Mode to record actions directly from the live device view.
- Throughout the session, you can:
- Interact with the app via the Live Device view to record steps in real time.
- New Test Objects are auto captured and created with each interaction.
- Enable auto-refresh to update the device view every 60s.
- Verify and highlight objects to verify objects via different locators.
- Open Advanced Configuration to review and edit captured object attributes, locator strategies, and object hierarchy before saving recorded steps.
- Capture elements via screenshots, for image locator (see more details at Mobile object locator strategies - Image).
- Pause session to Add/Edit/Remove test steps in the Recorded Steps panel.
- Run test steps, all or selectively, for troubleshooting and see the Live Device view updates live.
- When done, click Save to save the test script, test steps, test objects, and variables (if any). If you rename captured test objects before saving, Katalon Studio saves the renamed objects consistently and synchronizes the generated script references with the new object names.
Feature details
Interactive mode (beta)
- Interactive mode is currently available as a beta feature in Katalon Studio version 11.0.0. In the beta phase, it is for evaluation purposes only and not recommended for production use.
Interactive Mode lets you capture actions directly on the live mobile preview. It’s fast and visual, ideal for exploratory testing phase.
Supported actions are:
| Action | Keywords | How to perform |
|---|---|---|
| Tap | Mobile.tap() | Click any point on the Device View. |
| SetText | Mobile.tap() and Mobile.sendKeys | Click a text box on the Device View, and input text from the testing device's keyboards. |
| Swipe | Mobile.swipe() | Swipe upwards/downwards on the Device View. |
| Swipe with Duration | Mobile.swipeWithDuration(), with a parameter for duration. | Swipe upwards/downwards on the Device View. |
| Double Tap | Mobile.doubleTap() | Click any point on the Device View. |
| Tap-and-hold | Mobile.tapAndHold() | Click and hold at any point on the Device View, until the recorder prompts "performing TAP AND HOLD Action". |
| Zoom In/Out | Mobile.pinchToZoomInAtPosition() and Mobile.pinchToZoomOutAtPosition() (with default/customizable offset) | 1. Press and hold Alt (Windows) or Option (Mac) to enable the zoom widget.2. The widget appears with an anchor in the middle. Drag the anchor to your desired location, and drag the outer dots inwards/outwards. |
See below a demonstration of the supported actions:
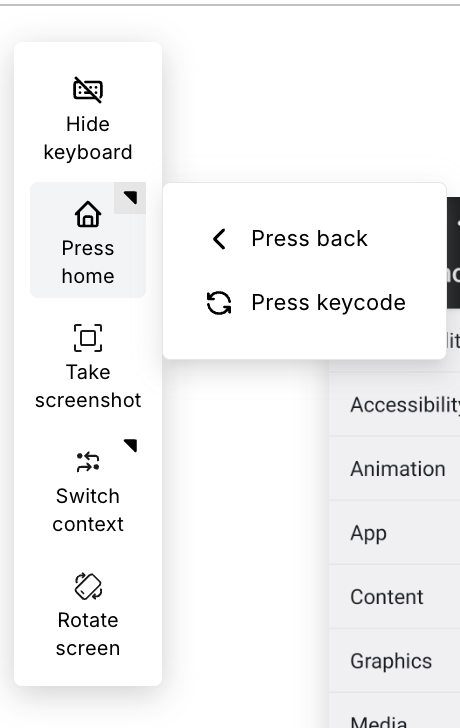
Global actions
Global actions are available on the left panel in both modes:
| Action | Description |
|---|---|
| Hide Keyboard | Hides the on-screen keyboard if it is blocking elements. |
| Press | Provides quick-access buttons to perform Press Home, Press Back (Android only), or Press Key Code on the device. |
| Take Screenshot | Captures the current device screen. Screenshots can be used for future reference or for creating image-based locators (see more details at Mobile object locator strategies - Image). |
| Switch Context | Switch between Native, WebView, or other available contexts when testing hybrid apps. |
| Rotate Screen | Rotates the device orientation (portrait/landscape) and updates the device preview accordingly. |
| Scroll to Text | Scrolls to a specific text in the app (if found). |
Device View vs Screen Objects panel
Smart Mobile Recorder provides two synchronized views of your application under test (AUT): the Device View and the Screen Objects panel.
The Device View updates live as the mobile app state changes. Use this view to:
- Interact with the AUT in interactive mode.
- Confirm that UI updates correctly.
- Validate AUT state during playback.
- Select an object and automatically scroll to its matching node in the Screen Objects panel.
The Screen Objects panel can be accessed by clicking Detected Objects. This panel displays the underlying object hierarchy of the current AUT's UI. Use this view to:
- Verify that an element exists in the structure.
- Verify overlapping/repeated elements.
- Inspect parent containers and grouping logic.
- Determine whether multiple similar-looking elements are actually different nodes in the hierarchy.
- Understand how deeply nested components are built behind the scenes.
Both views work together to provide a full understanding of your app's UI, ensuring both visual and structural accuracy.
Heartbeat Mechanism
This mechanism sends periodic commands to keep the Appium session alive, preventing session timeouts during idle periods and improve stability for long recordings.
The heartbeat stops automatically when you close the recorder.
Auto-Refresh Mechanism
Auto-refresh mechanism is on by default, alongside the Refresh button. Use it to auto-update UI changes.
Manage Test Steps, Objects, and Variables while you record
While you record, you can switch between Recorded Steps, Captured Objects, and Variables panels.
Recorded Steps panel
All recorded steps automatically appear in the Recorded Steps panel. In this panel, you can:
- Edit, remove, or arrange recorded steps by dragging.
- Manually add new steps.
- Run all steps or selectively. Run all steps auto restarts the session to its origin state.
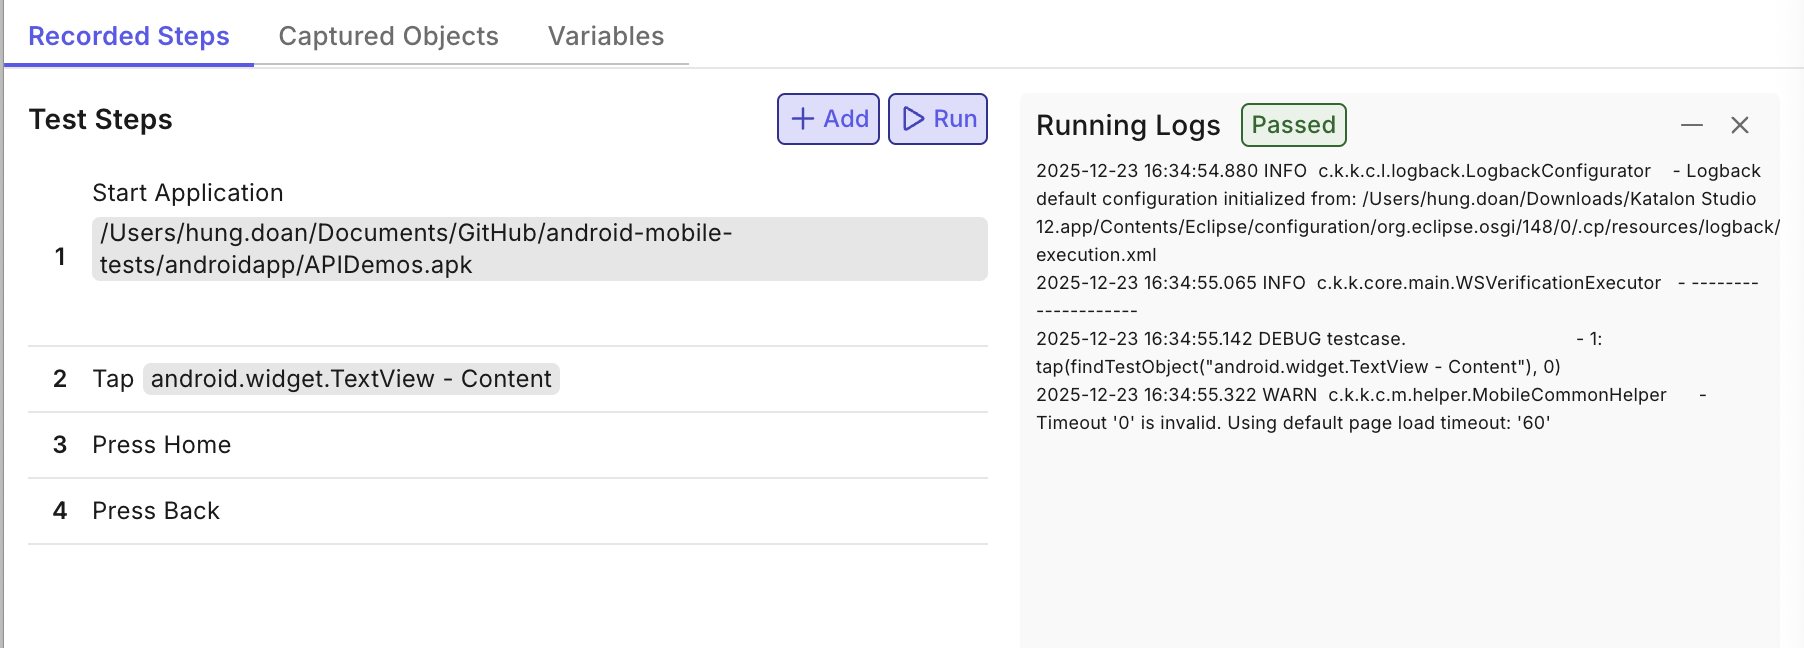
During Playback, you can see the execution process live in the Device View, with execution details listed in the dedicated Running Logs panel.
Configure Locator Verification to detect invalid locators automatically.
Captured Objects panel and Advanced Configuration
The Captured Objects panel lists all mobile UI elements detected during recording. Select a captured object and open Advanced Configuration to review and refine the object before saving the recorded script.
Advanced Configuration is available from 11.2.0. This settings allows you review and edit test object's attributes during the recording session, reducing manual correction work afterward. You can:
- Review the captured object hierarchy and locator values.
- Rename captured objects. Renamed objects are saved consistently, and generated script references are synchronized with the new object names.
- Add, remove, or update the object's attributes.
- Add custom attributes by entering an attribute name and value.
- Generate an image locator by selecting Image and taking a screenshot with the supported screenshot flow.
Attribute names must be unique for each captured object. Duplicate attributes are rejected or flagged before save.
- Deleting or clearing attributes does not create duplicate test objects and does not prevent you from adding new attributes afterward.
- For the Image locator type, Verify and Highlight are disabled. Save and use image locators through the supported screenshot flow.
- Removing an attribute does not automatically add the image screenshot back into the attribute locator.
Locator Verification
Locator Verification is officially available as a feature of Smart Mobile Recorder on Katalon Studio v11.1.2+.
In Katalon Studio recording sessions, a locator is considered "invalid" when it points to more than one test object. Configuring Locator Verification helps detect invalid locators quickly during recording sessions. When you edit attributes in Advanced Configuration, duplicate attributes or locator values that match multiple objects are surfaced as warnings before you save.
To configure, go to Project Settings > Test Design > Mobile, and choose one of these options:
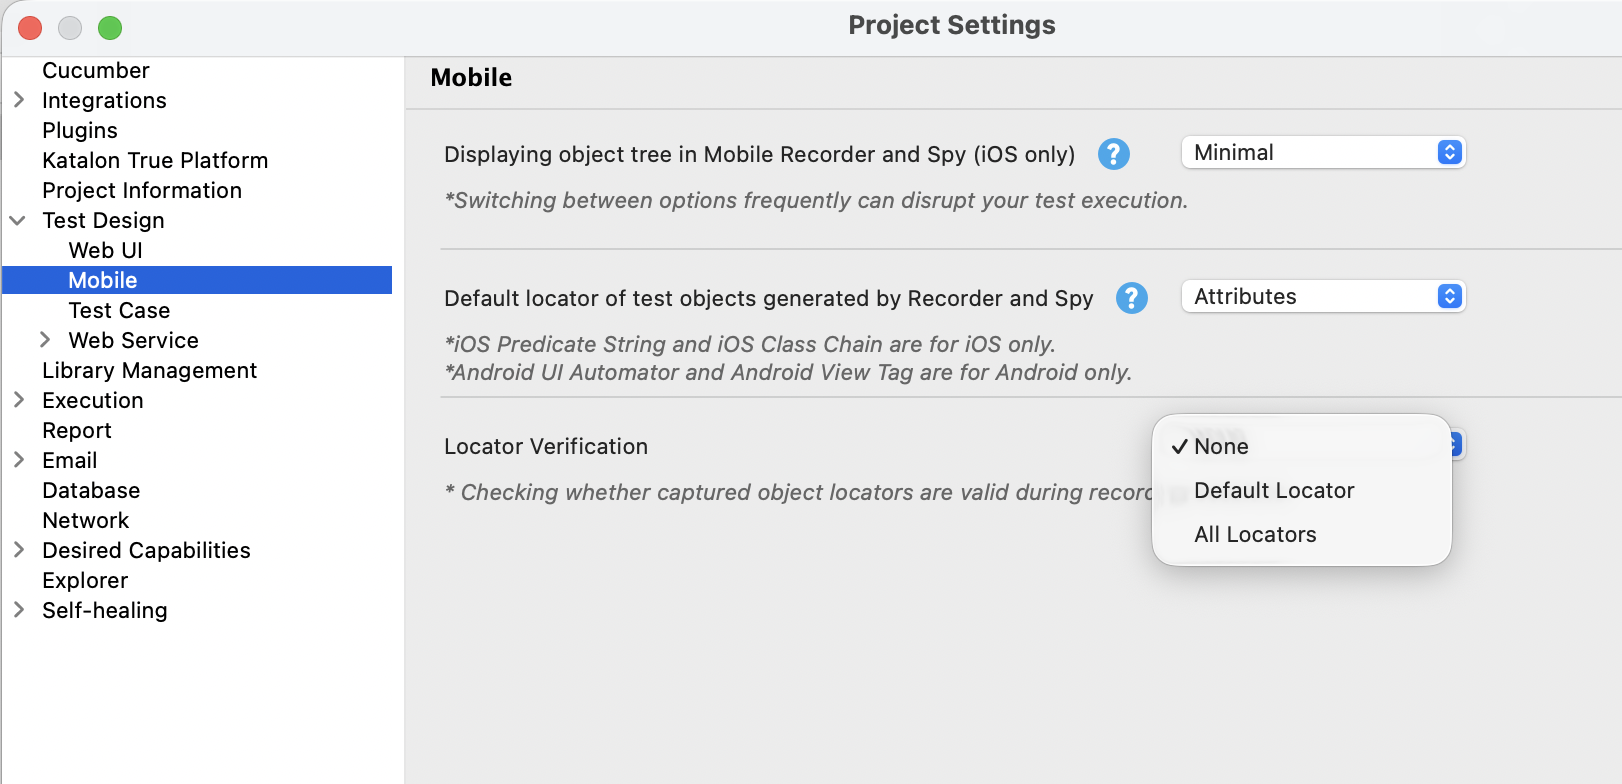
| Option | Affected locators | Impact on recorder performance/speed |
|---|---|---|
| None (default) | None | No |
| Default Locator | Default locator Configured in Default locator of test objects generated by Recorder and Spy. | Minor |
| All Locators | All non-empty locators | Significant (the recorder may be slower than usual) |
Once configured, when you record with Smart Mobile Recorder, test steps with invalid locators are marked with warning icons:
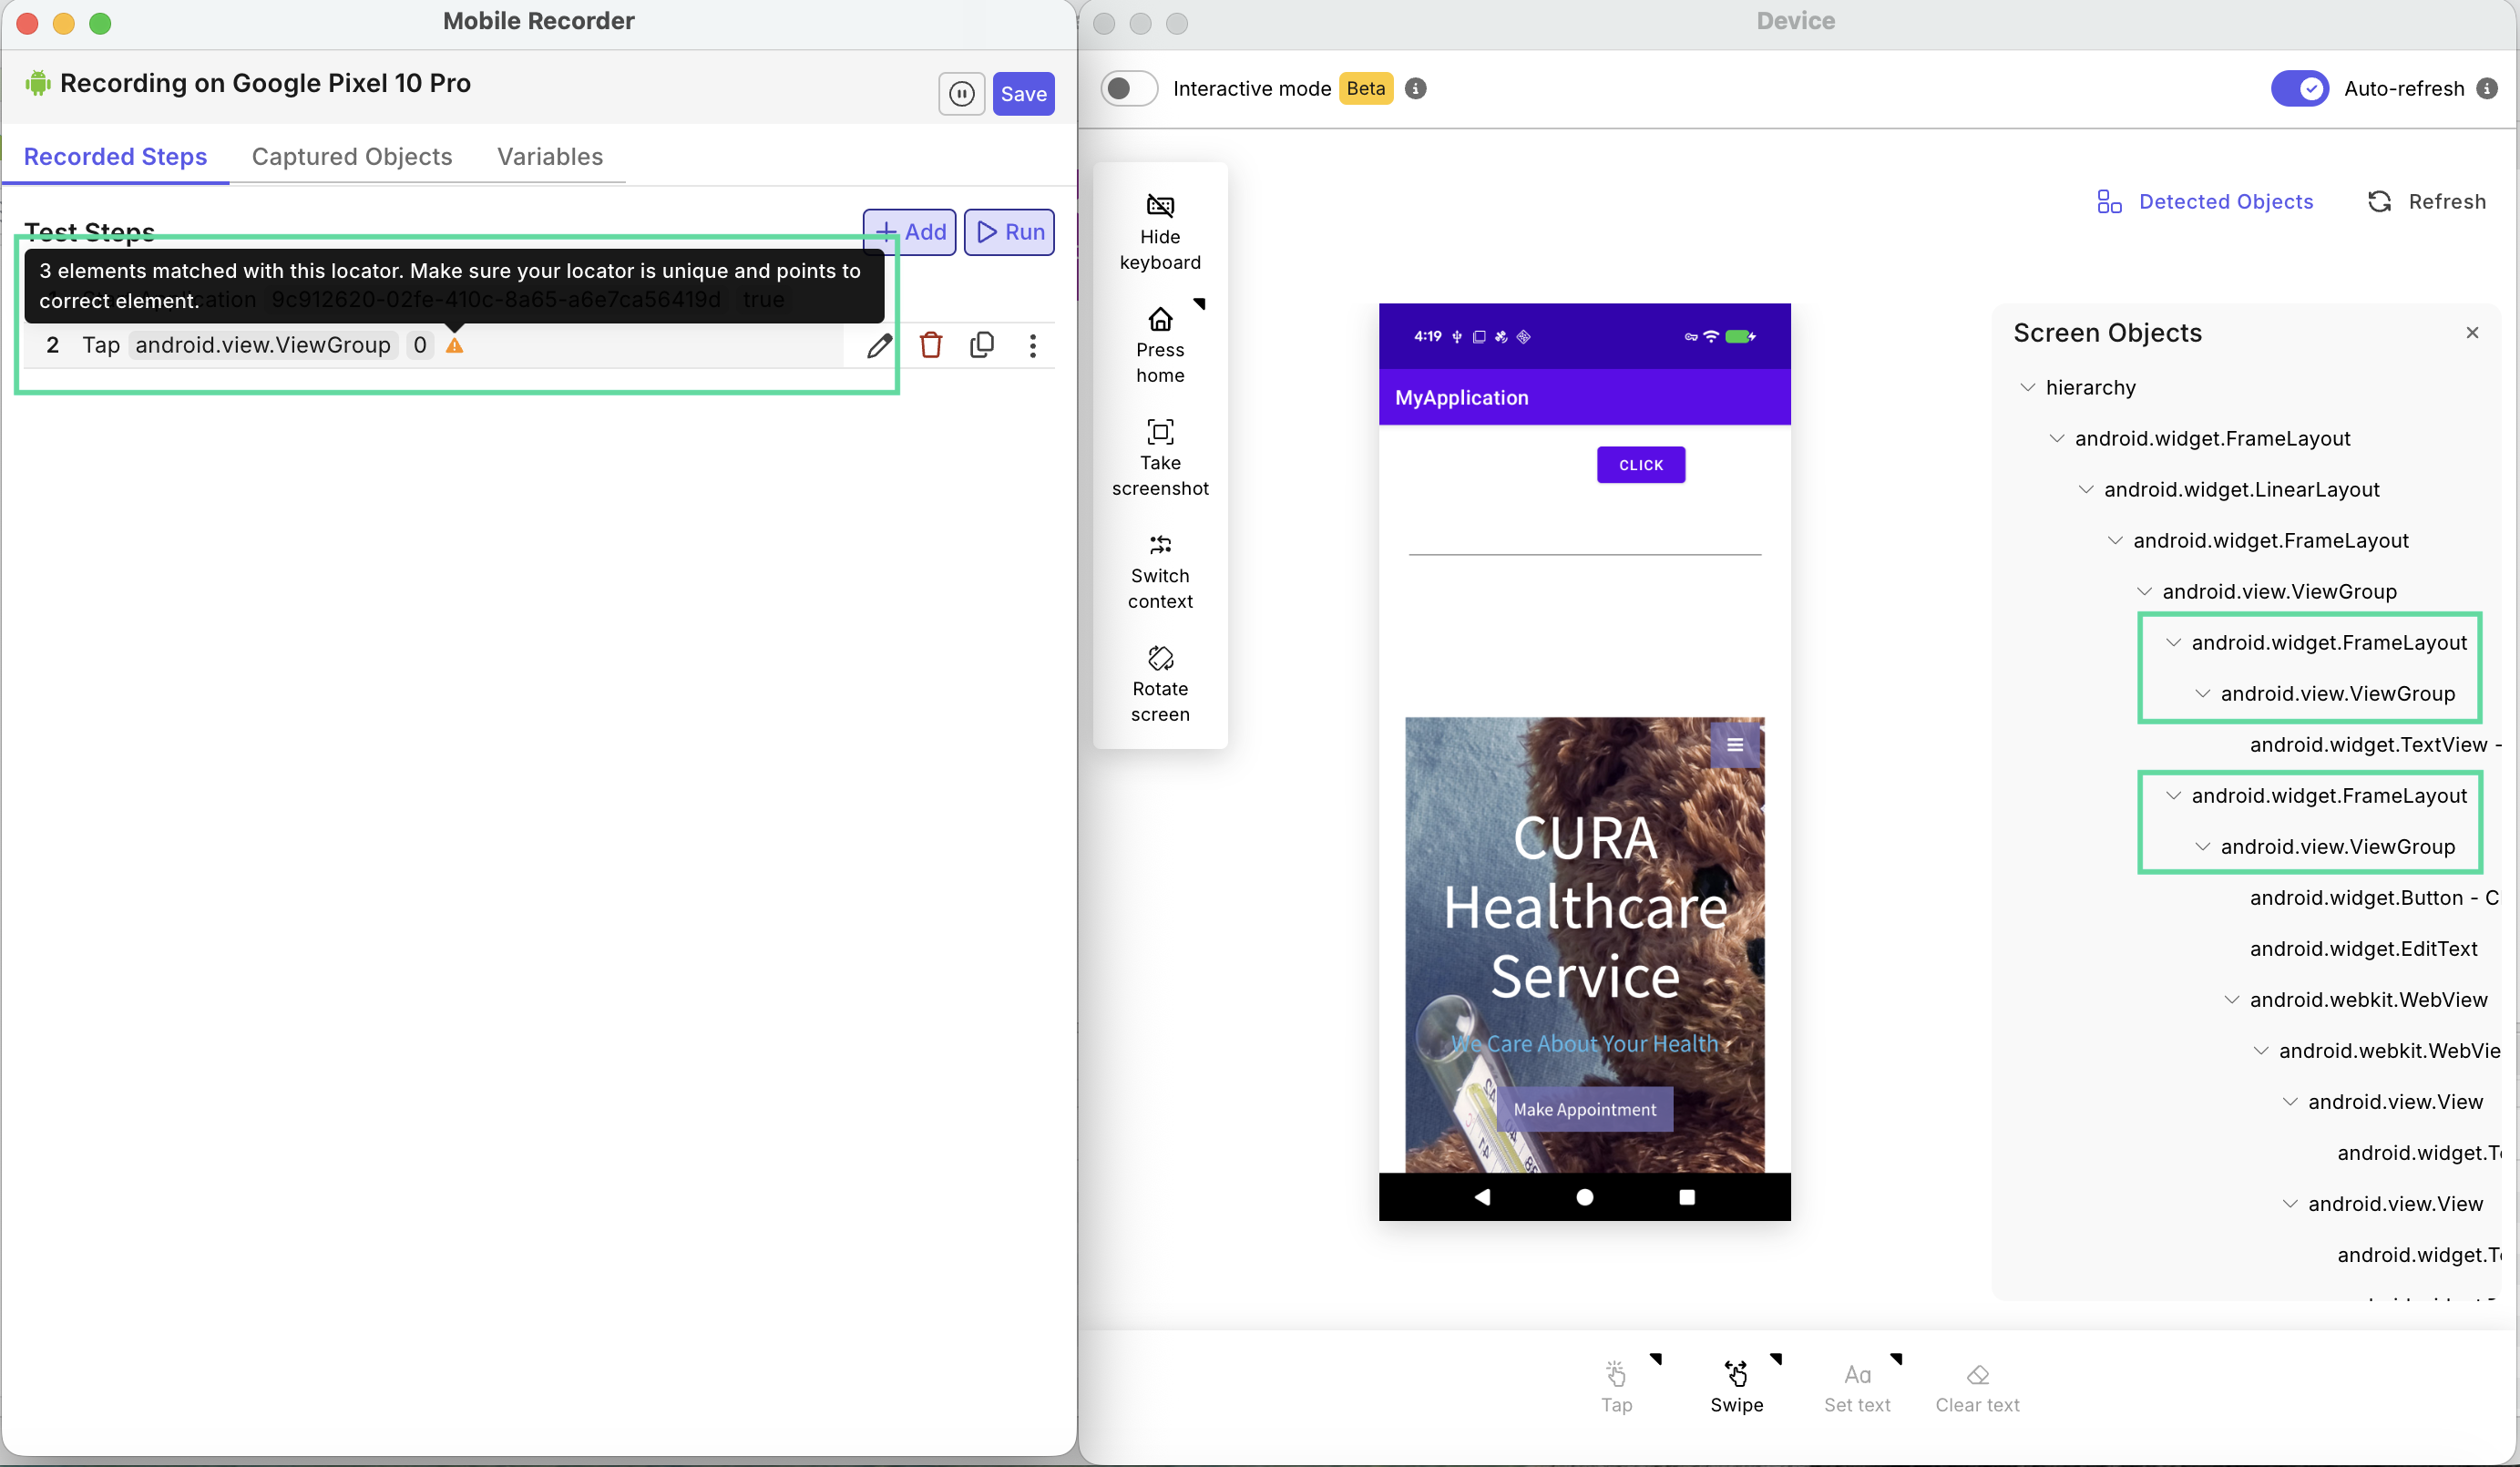
To resolve the warnings, open the Captured Objects panel and Advanced Configuration to check and resolve invalid selectors:
- For Default Locator: Resolve the default locator type.
- For All Locators: Resolve all existing invalid locators.
If not resolved, the step still runs with the first matched element on the matched list, ignoring others.
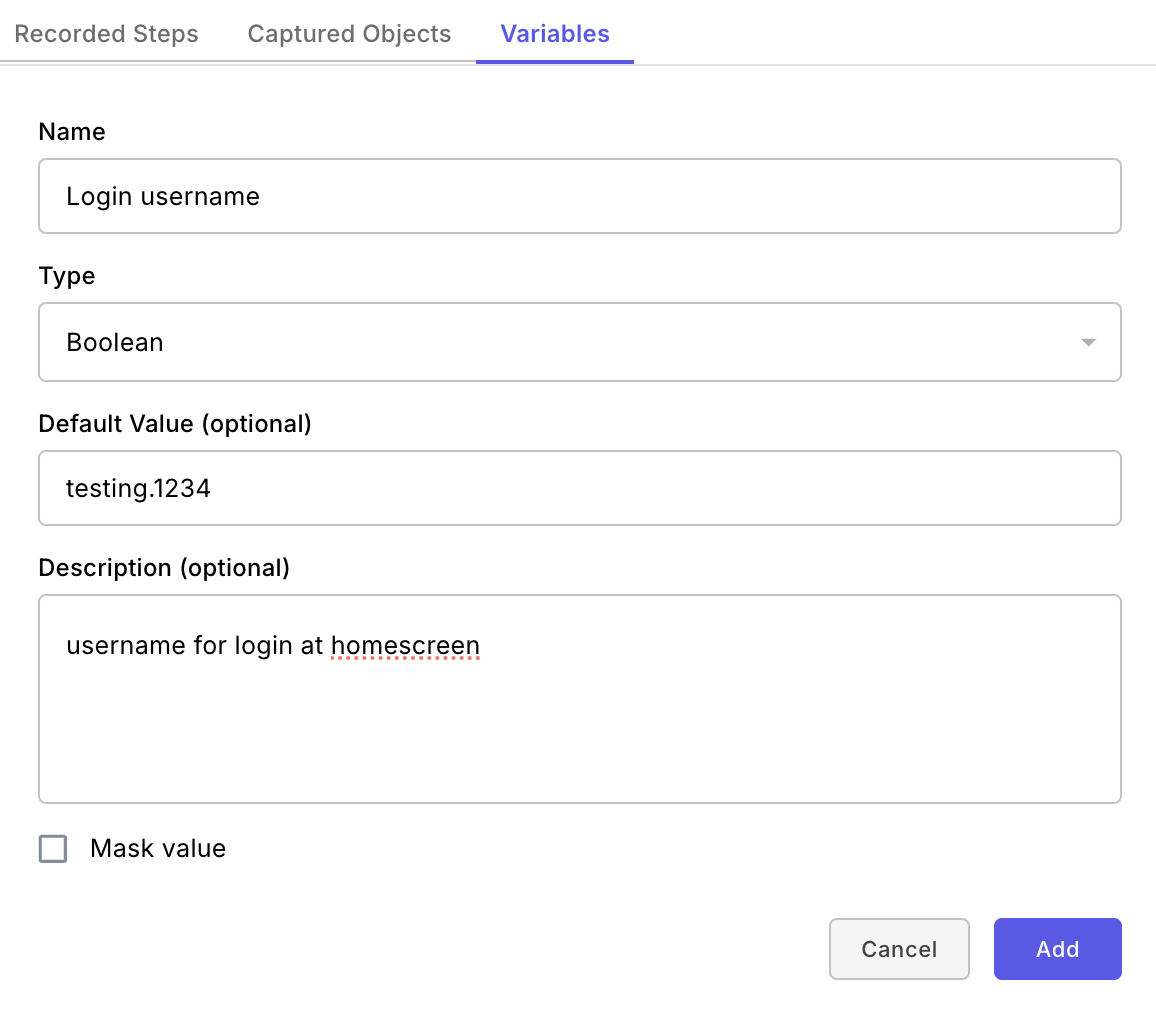
Variables panel
Manage temporary variables (such as credentials or config values) directly within your recording session.
You can:
- Add, edit, or delete variables during the session.
- Define attributes like type, default value, and description.
- Mask sensitive fields to hide passwords or tokens.
- Link variables to existing project data tables for data-driven testing.
Supported variable types:
- Basic types: string, number, boolean, null
- Global variables:
- Test Object (directory)
- Test data
- Test data value
- Property
- List
- Map
Known limitations
- On iOS (UIKitCatalog), recorded tap steps on list items (
XCUIElementTypeStaticText) show as recorded but no actual tap occurs on the simulator. - In iOS (UIKitCatalog), Interactive Mode taps sometimes hit the wrong element. For example, tapping Slider triggers ProgressView. This can also cause the same object to be captured multiple times.
- In iOS (UIKitCatalog 2.13), the highlight rectangle is drawn in the wrong position when hovering or moving the cursor over test objects.
- When starting with Katalon Test Execution Cloud, if the Appium-device connection is slow or times out, the recorder dialog appears but the Device View never shows. No clear timeout error is presented.
- In Interactive Mode, when an in-app dialog is shown, tapping outside it times out and no step is recorded.
- If you edit the app path in the recorded
Start Applicationstep, playback still launches the original app path specified at the start of recording. - For Tap and Hold duration input, the dialog allows choosing complex types such as Global Variable or Variable, but the recorder does not support them, resulting in recorded steps always having zero duration.