
Kobiton Integration with Katalon Studio

Kobiton is a mobile device platform that offers real mobile devices for testers and developers. With Kobiton and Katalon Studio integration, you can easily execute automated tests on real mobile devices.

This article will guide you on how to integrate Kobiton with Katalon Studio and how to run Katalon automation scripts on Kobiton devices using Kobiton's desired capabilities.

Note:

Enable Kobiton Integration

  • You have a Kobiton account.

  • You have installed Katalon Studio.

  1. Install the Kobiton Integration plugin from Katalon Store. After installing the plugin, open Katalon Studio, then select Your Account > Reload Plugins. You can refer to the section Reload Plugins for detailed instructions.
  2. Open Kobiton integration settings from the main menu:
    • Windows: Windows > Katalon Studio Preferences, Katalon > Kobiton

    • macOS: Katalon Studio > Preferences, Katalon > Kobiton

  3. Select Enable Kobiton Integration and authenticate your access to the Kobiton Server.
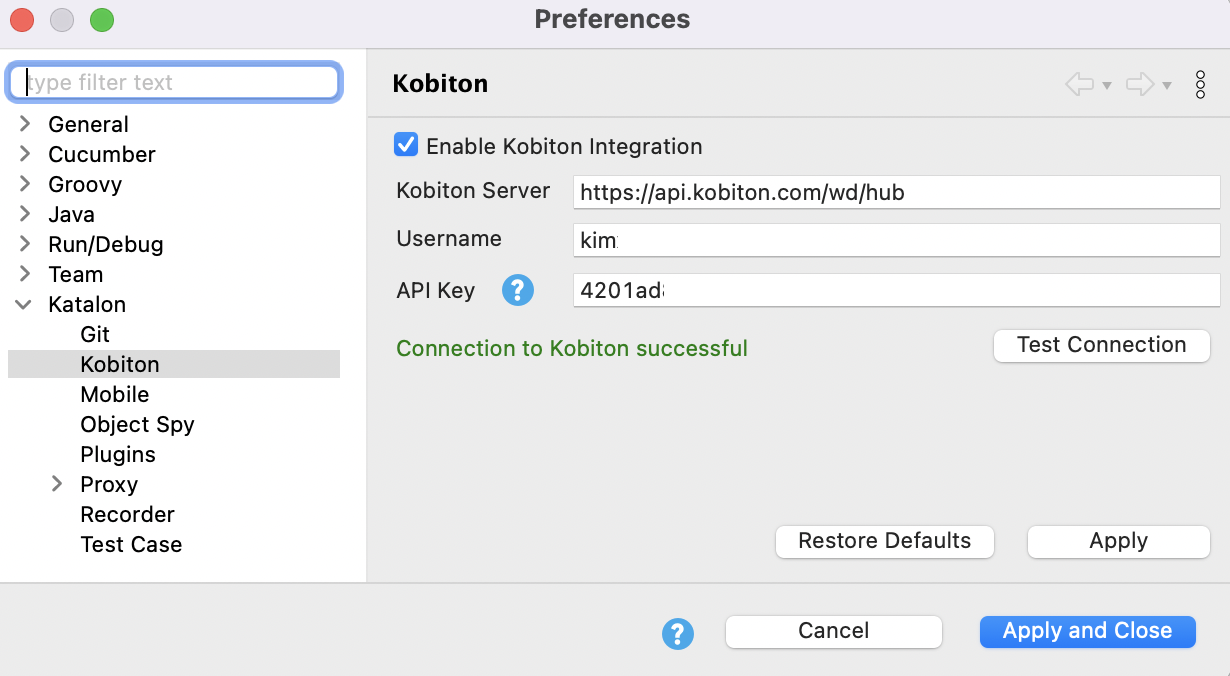
    Enable Kobiton integration
    • From version 7.8.0 onwards: enter your Kobiton username or email, and Kobiton API Key, then select Test Connection.
      • Kobiton Server: The Kobiton server to be integrated with Katalon Studio.
        Note:
        • From version 8.1.0 onwards, you can customize the remote server protocol and path name. Katalon Studio uses HTTP protocol by default. If your environment prevents sending basic authentication credentials through HTTP, you can input a remote URL with HTTPS instead.

      • API Key: The token to be used by Katalon Studio when exchanging API messages with Kobiton server. You can generate more keys in Kobiton API Settings.

    • Prior to version 7.8.0, enter your Kobiton account in the Authentication form and click Connect. Katalon Studio retrieves the information for Kobiton integration automatically.

  4. When you are done with the configuration, select Apply and Close.
The Kobiton - Katalon Integration is enabled successfully.

Desired capabilities for Kobiton devices

In order to run Katalon automation scripts on Kobiton devices, you need to specify Kobiton devices desired capabilities in the script.
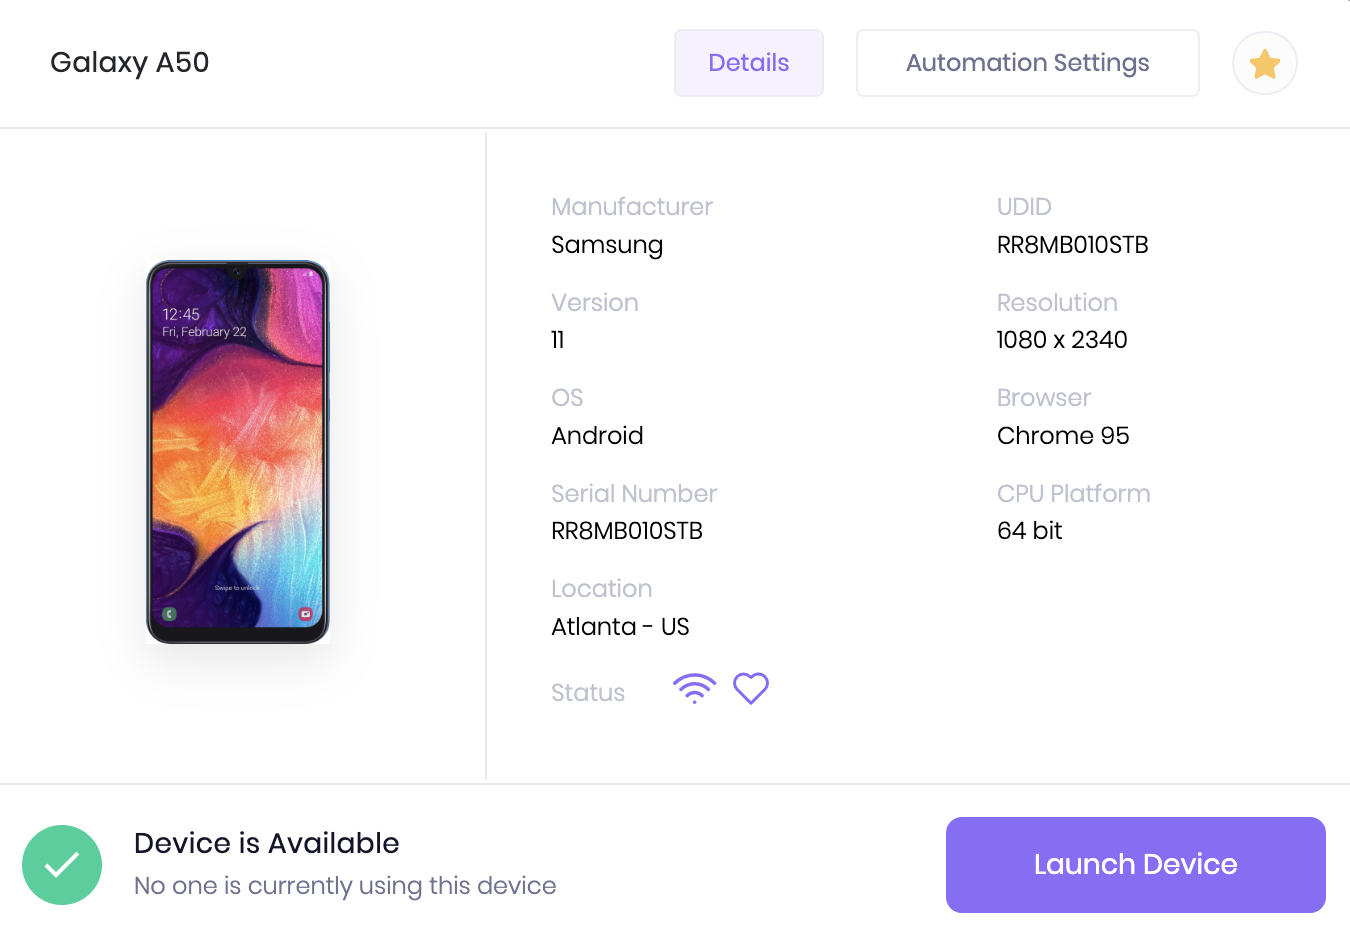
  1. On the Kobiton portal, select a mobile device on which you want to run automation test. Select Automation Settings and copy the desired capabilities. You can also refer to Kobiton's documentation for this step: Getting Started with Appium Testing with Kobiton. Desired capabilities of Kobiton device
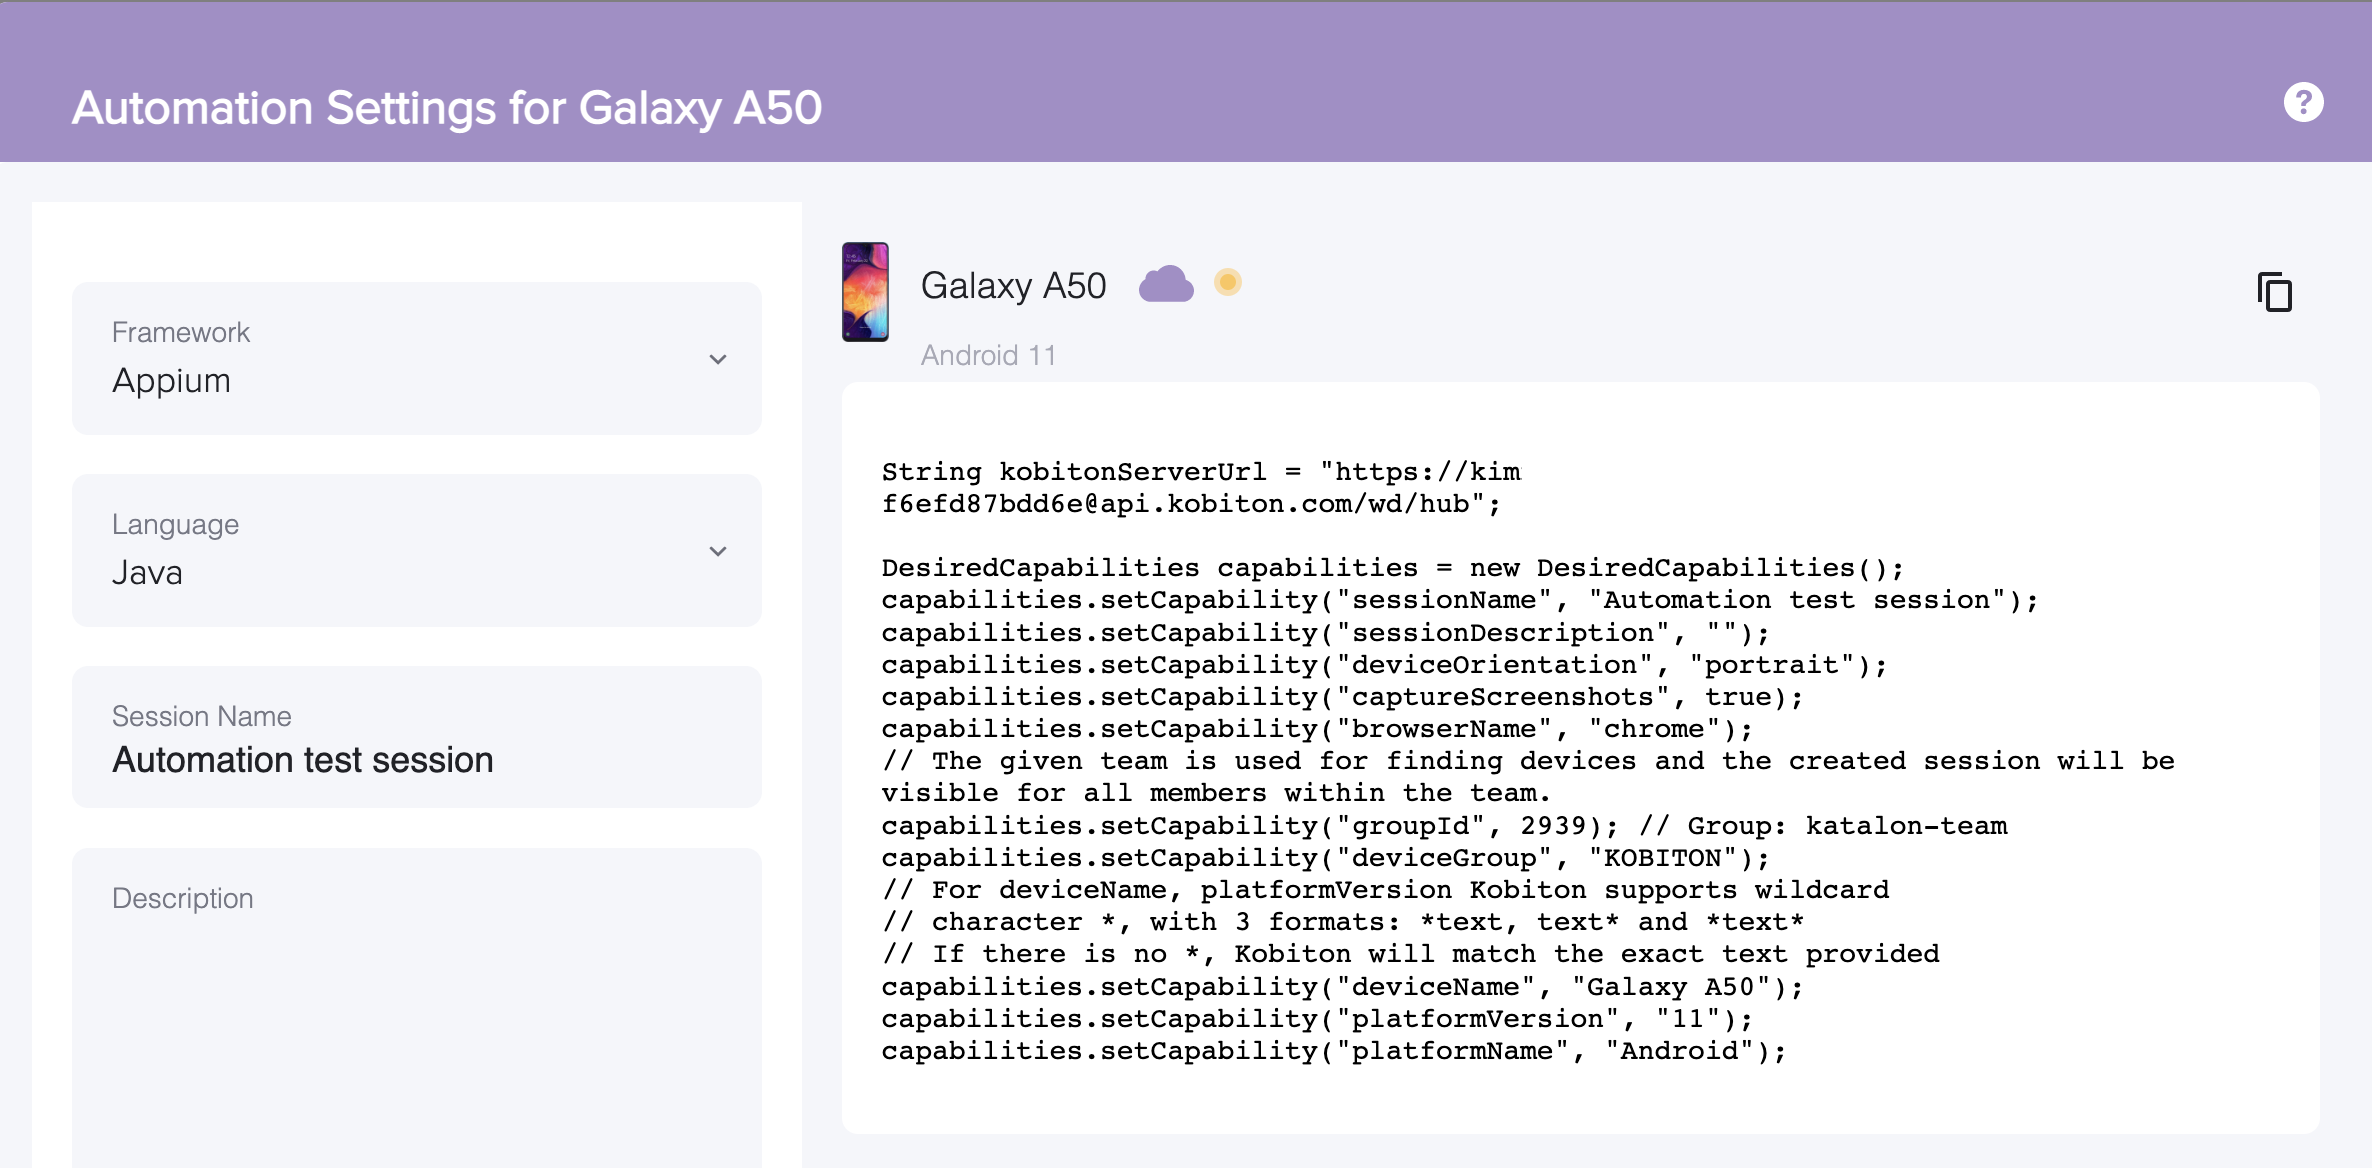
Here is a sample of desired capabilities for mobile device retrieved from Kobiton portal:
    String kobitonServerUrl = "https://katalon-integration:xxxxxxxxxxxxxxxxxxx@api.kobiton.com/wd/hub";
    DesiredCapabilities capabilities = new DesiredCapabilities();
    capabilities.setCapability("sessionName", "Automation test session");
    capabilities.setCapability("sessionDescription", "");
    capabilities.setCapability("deviceOrientation", "portrait");
    capabilities.setCapability("captureScreenshots", true);
    capabilities.setCapability("browserName", "chrome");
    capabilities.setCapability("deviceGroup", "KOBITON");
    capabilities.setCapability("deviceName", "Galaxy S10");
    capabilities.setCapability("platformVersion", "12");
    capabilities.setCapability("platformName", "Android");
  2. In Katalon Studio, open your test case and switch to the Scripts view for the automation script. Then paste the desired capabilities in your script.
    Paste Kobiton device desired capabilities to Katalon Studio test script
  3. On the Kobiton portal, open your app. In the upper right corner of the app tile, select Automation Snippet. Then, copy the value of the app ID to your clipboard (for example, kobiton-store:v488518).
    Get Kobiton app ID
  4. Back to Katalon Studio, insert the app ID from Kobiton app repository as a desired capability to your Katalon script, for example:
    capabilities.setCapability("app", "kobiton-store:v488518");
  5. Replace Mobile.startApplication keyword with these lines.
    These codes establish a connection to selected Kobiton device and create a driver to be used for other built-in keywords. Therefore, you do not have to rewrite the whole test script again.
    import static com.kms.katalon.core.testobject.ObjectRepository.findTestObject
    import org.openqa.selenium.remote.DesiredCapabilities
    import com.kms.katalon.core.appium.driver.AppiumDriverManager
    import com.kms.katalon.core.configuration.RunConfiguration as RunConfiguration
    import com.kms.katalon.core.mobile.driver.MobileDriverType
    import com.kms.katalon.core.mobile.keyword.MobileBuiltInKeywords as Mobile
    import com.kms.katalon.core.util.internal.PathUtil as PathUtil
    import internal.GlobalVariable as GlobalVariable
    import io.appium.java_client.android.AndroidDriver

    //Mobile.startApplication('kobiton-store:10717', false)
    String kobitonServerUrl = "https://katalon-integration:xxxxxxxxxxxxxxx@api.kobiton.com/wd/hub";
    DesiredCapabilities capabilities = new DesiredCapabilities();
    capabilities.setCapability("sessionName", "Automation test session");
    capabilities.setCapability("sessionDescription", "");
    capabilities.setCapability("deviceOrientation", "portrait");
    capabilities.setCapability("captureScreenshots", true);
    capabilities.setCapability("browserName", "chrome");
    capabilities.setCapability("deviceGroup", "KOBITON");
    capabilities.setCapability("deviceName", "Galaxy J3(2016)");
    capabilities.setCapability("platformVersion", "6.0.1");
    capabilities.setCapability("platformName", "Android");
    capabilities.setCapability("app", "kobiton-store:v488518")

    AppiumDriverManager.createMobileDriver(MobileDriverType.ANDROID_DRIVER, capabilities, new URL(kobitonServerUrl))

    If you use an iOS device, you need to changeMobileDriverType.ANDROID_DRIVER to MobileDriverType.IOS_DRIVER.

    Now you have finished adjusting the Mobile.startApplication keyword. Here is the complete sample code:
    import static com.kms.katalon.core.testobject.ObjectRepository.findTestObject
    import org.openqa.selenium.remote.DesiredCapabilities
    import com.kms.katalon.core.appium.driver.AppiumDriverManager
    import com.kms.katalon.core.configuration.RunConfiguration as RunConfiguration
    import com.kms.katalon.core.mobile.driver.MobileDriverType
    import com.kms.katalon.core.mobile.keyword.MobileBuiltInKeywords as Mobile
    import com.kms.katalon.core.util.internal.PathUtil as PathUtil
    import internal.GlobalVariable as GlobalVariable
    import io.appium.java_client.android.AndroidDriver

    'Instead of using Start Application keyword, we use the below code to create a similar driver so that other Mobile built-in keywords can re-use this driver.'
    String kobitonServerUrl = "https://katalon-integration:xxxxxxxxx@api.kobiton.com/wd/hub";
    DesiredCapabilities capabilities = new DesiredCapabilities();
    capabilities.setCapability("sessionName", "Automation test session");
    capabilities.setCapability("sessionDescription", "");
    capabilities.setCapability("deviceOrientation", "portrait");
    capabilities.setCapability("captureScreenshots", true);
    capabilities.setCapability("browserName", "chrome");
    capabilities.setCapability("deviceGroup", "KOBITON");
    capabilities.setCapability("deviceName", "Galaxy J3(2016)");
    capabilities.setCapability("platformVersion", "6.0.1");
    capabilities.setCapability("platformName", "Android");
    capabilities.setCapability("app", "kobiton-store:v488518")
    AppiumDriverManager.createMobileDriver(MobileDriverType.ANDROID_DRIVER, capabilities, new URL(kobitonServerUrl))

    Mobile.tap(findTestObject('Application/android.widget.TextView - App'), 10)

    Mobile.tap(findTestObject('Application/App/android.widget.TextView-Activity'), 10)

    Mobile.tap(findTestObject('Application/App/Activity/android.widget.TextView-Custom Dialog'), 10)

    'Get displayed message on the dialog'
    def message = Mobile.getText(findTestObject('Application/App/Activity/Custom Dialog/android.widget.TextViewCustomDialog'),
    10)

    Mobile.comment('Then the correct dialog message should be displayed')

    Mobile.verifyEqual(message, 'Example of how you can use a custom Theme.Dialog theme to make an activity that looks like a customized dialog, here with an ugly frame.')

    Mobile.closeApplication()

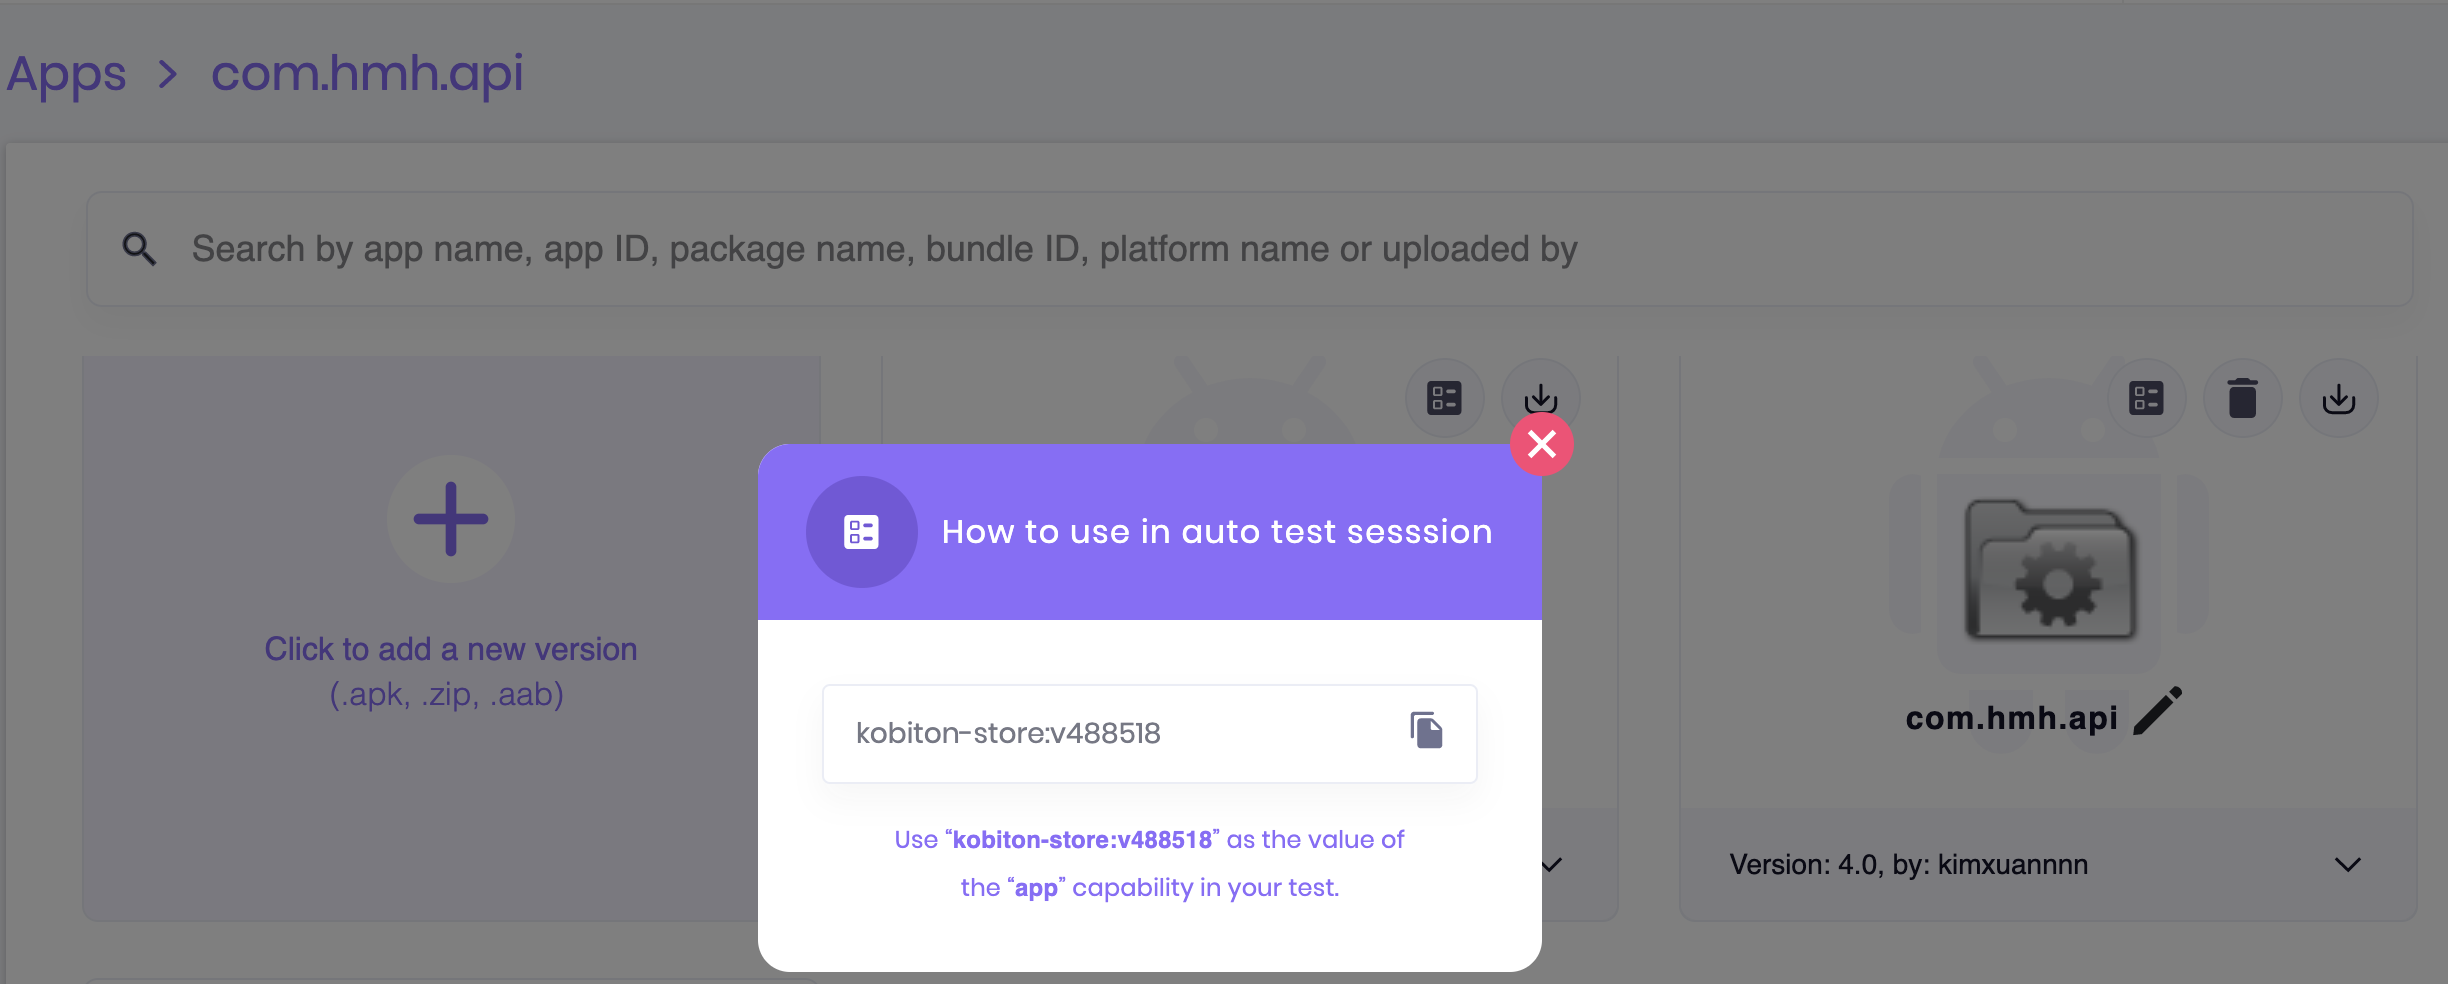
Mobile testing with Kobiton devices

Install and enable the Kobiton Integration plugin. If you haven't configured the integration yet, refer to this section for instructions: Enable Kobiton Integration.

Follow the instructions below to execute your Katalon Studio automation test with Kobiton mobile devices.
  1. Navigate to Kobiton Portal and log in with your Kobiton username (or email) and password.
  2. In the Kobiton portal, upload your app to the Kobiton App Repository. See Kobiton documentation on Managing Applications.
  3. In the upper right corner of the app tile, click on the Automation Snippet. Then, copy the value of the app capability to your clipboard for later use (for example, kobiton-store:v488518 as shown below). Get Kobiton app ID
  4. Click on the Devices menu. Select your device, then select on the star icon in the top right corner to Mark as favorite.
    Mark Kobiton device as favorite

    From version 8.1.0 onwards, you can change the Custom Device Name of Kobiton device to select the correct device on Katalon Studio. If your Kobiton devices don't have any custom name, Katalon Studio uses the devices' original name when running tests. See Kobiton documentation on Device Custom Name.

    Once you have set your Device Custom Names in Kobiton Portal, you can check the Kobiton devices list in Katalon Studio. Go to Katalon Studio, then open Mobile Recorder/Spy > Select Kobiton Device.

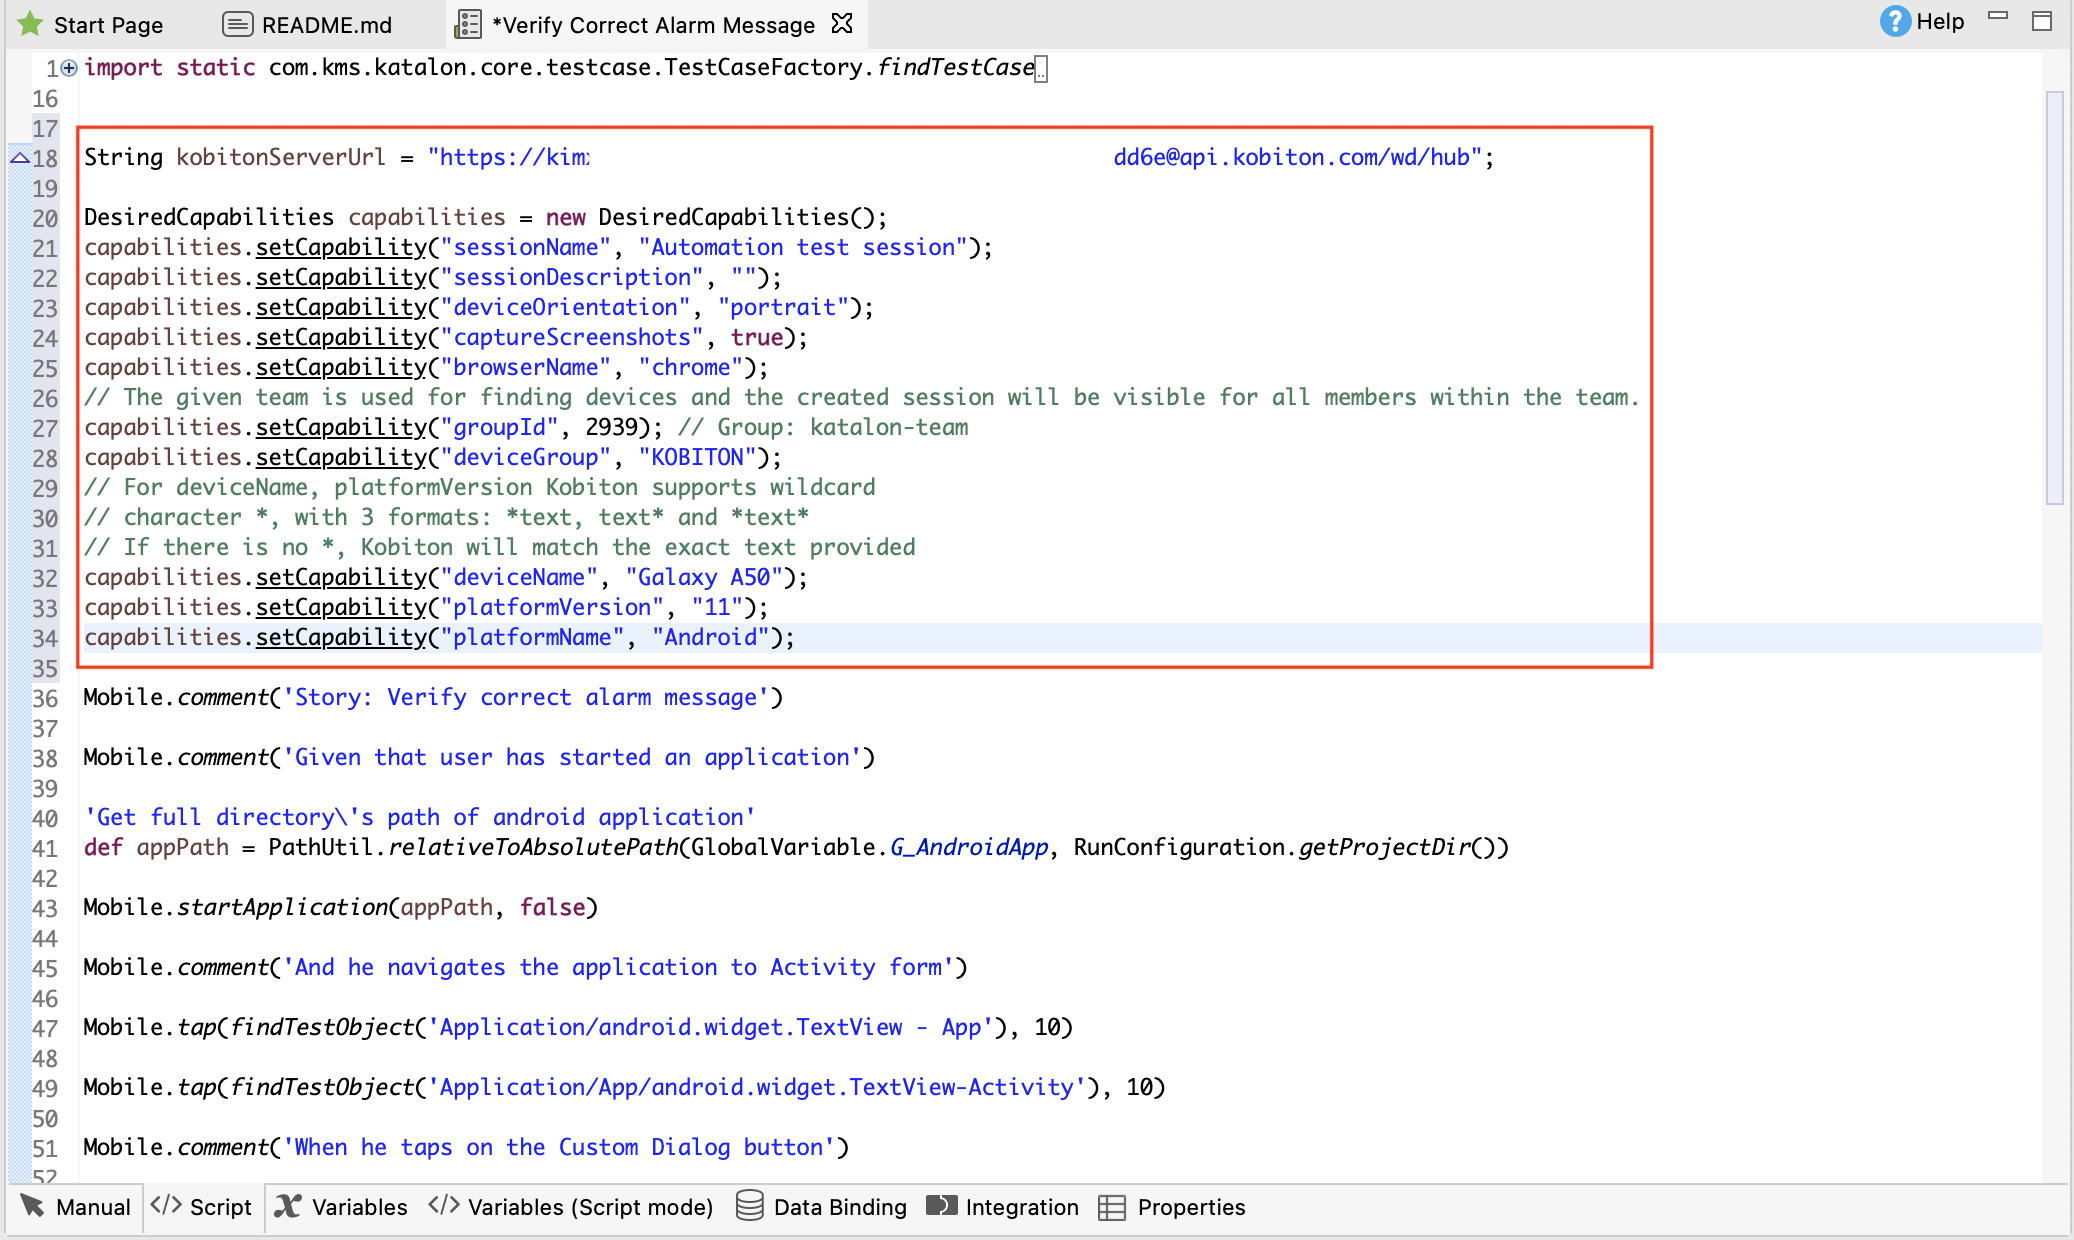
  5. In Katalon Studio, open your test case and switch to the Scripts view to see the automation test script. Locate this line of code:
    Mobile.startApplication('appPath', false)
    Next, replace the appPath with the Kobiton app desired capability saved in Step 3, as shown below:replace appPath with Kobiton's app desired capability
    import static com.kms.katalon.core.testcase.TestCaseFactory.findTestCase
    Mobile.comment('Story: Verify correct alarm message')
    Mobile.comment('Given that user has started an application')'Get full directory\'s path of android application'
    //def appPath = PathUtil.relativeToAbsolutePath(GlobalVariable.G_AndroidApp, RunConfiguration.getProjectDir())
    Mobile.startApplication('kobiton-store:v488518', false)
    Mobile.comment('And he navigates the application to Activity form')
    Mobile.tap(findTestObject('Application/android.widget.TextView - App'), 10)
    Mobile.tap(findTestObject('Application/App/android.widget.TextView-Activity'), 10)
    Mobile.comment('When he taps on the Custom Dialog button')
    Mobile.tap(findTestObject('Application/App/Activity/android.widget.TextView-Custom Dialog'), 10)
    'Get displayed message on the dialog'
    def message = Mobile.getText(findTestObject('Application/App/Activity/Custom Dialog/android.widget.TextViewCustomDialog'),10)
    Mobile.comment('Then the correct dialog message should be displayed')
    Mobile.verifyEqual(message, 'Example of how you can use a custom Theme.Dialog theme to make an activity that looks like a customized dialog, here with an ugly frame.')
    Mobile.closeApplication()
  6. From Katalon Studio main toolbar, click on the drop-down menu of Run, and select the option to run with Kobiton Device.
  7. The Kobiton Favorite Devices dialog appears. In the dropdown list of Device Name, select a Kobiton device to run your test and select OK. You can also modify this list by updating your Favorite Devices from Kobiton Portal.
    Kobiton favorite devices
    Note:
  8. Once Katalon Studio finishes configuring, the automated test execution session will be uploaded to Kobiton.
    You can view the session in the Sessions section Kobiton. To learn more about Kobiton session, see Kobiton documentation: Session List.
You have successfully executed automation tests on Katalon Studio using Kobiton mobile devices.