Configure Jira integration in Katalon Studio
This article shows you how to configure Jira integration in Katalon Studio.
Requirements
- An active Katalon Studio license.
- Install the suitable Jira Integration plugin version for Katalon Studio. You can find the plugin here: Jira Integration plugin.
- In Jira, install the plugin from the Atlassian Marketplace website: Katalon Studio and TestOps integration.
Enable Jira integration in Katalon Studio
To enable Jira integration in a Katalon Studio project, follow these steps:
-
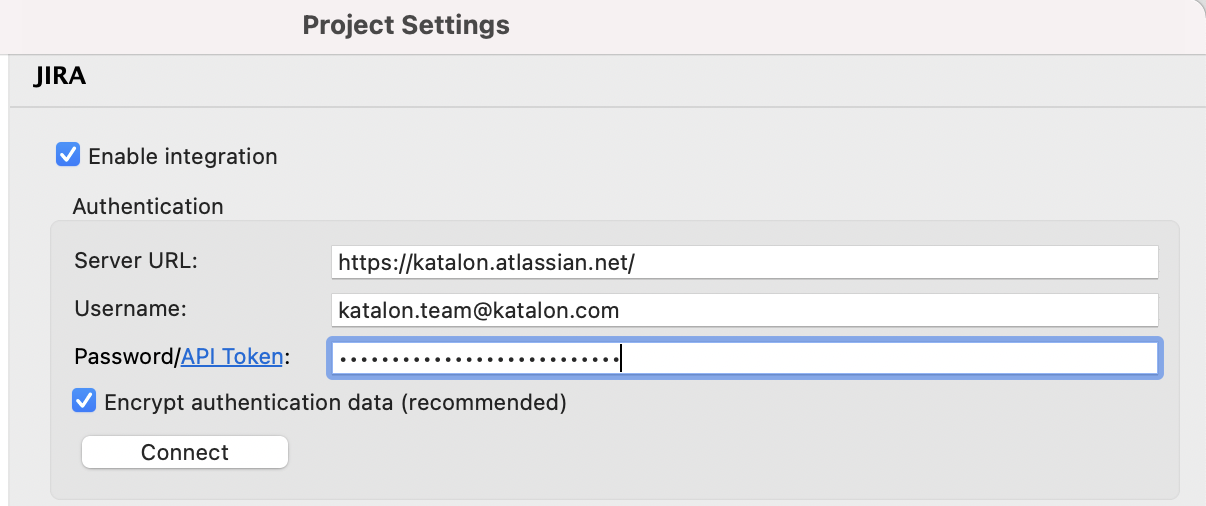
In Katalon Studio, go to Projects > Settings > Plugins > JIRA.
-
Select the Enable integration checkbox.
-
In the Authentication section, fill in the criteria as shown below:
-
Server URL:
- For Jira Cloud:
https://<site_name>.atlassian.net - For Jira Data Center (Jira Server):
https://domainwithout any trailing parts, for example,/secure. Your server URL for Jira Data Center should have a valid SSL certificate.
- For Jira Cloud:
-
Username: your username or the registered email of the Atlassian account.
-
Password/API token: The Atlassian Cloud's API token. To learn more about generating API in Atlassian, you can refer to the Atlassian document: Manage Atlassian token for your Atlassian account.
-
-
Click Connect to start the authentication process. A pop-up dialog indicates that the Atlassian account connects successfully.
-
After successfully authenticating with Jira, all relevant JIRA Projects and Issue Types will be retrieved and displayed under the Submit Options section. You can specify the default project and the default issue type for submission here.
| Field | Description |
|---|---|
| Default Jira Project | The default Jira project to submit tickets. |
| Default Jira Issue Type | The default Jira issue type to create when submitting tickets. |
| Use Test Case name as Summary for Jira ticket | To use the test case name as a summary for submitted tickets. |
| Attach Screenshot to Jira ticket | To include taken screenshots during test execution in submitted tickets. |
| Attach Log to Jira ticket | To include the execution log in submitted tickets. |
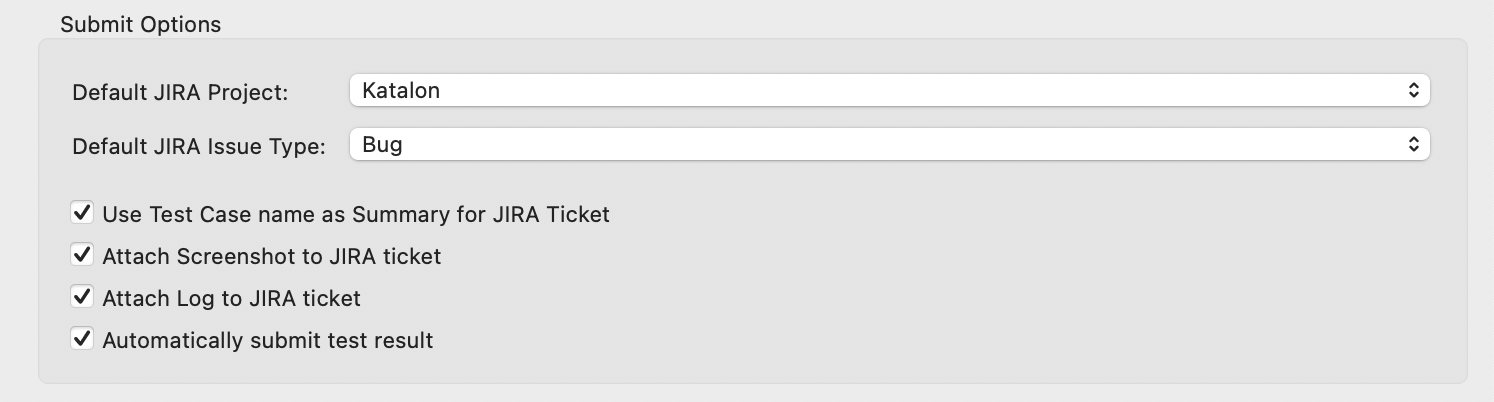
- Click Apply and Close to complete the Jira integration.
You have successfully enabled Jira integration in Katalon Studio.
Jira integration configuration is available in the project scope only. If you want to integrate Jira with another Katalon project, you have to repeat the above steps.
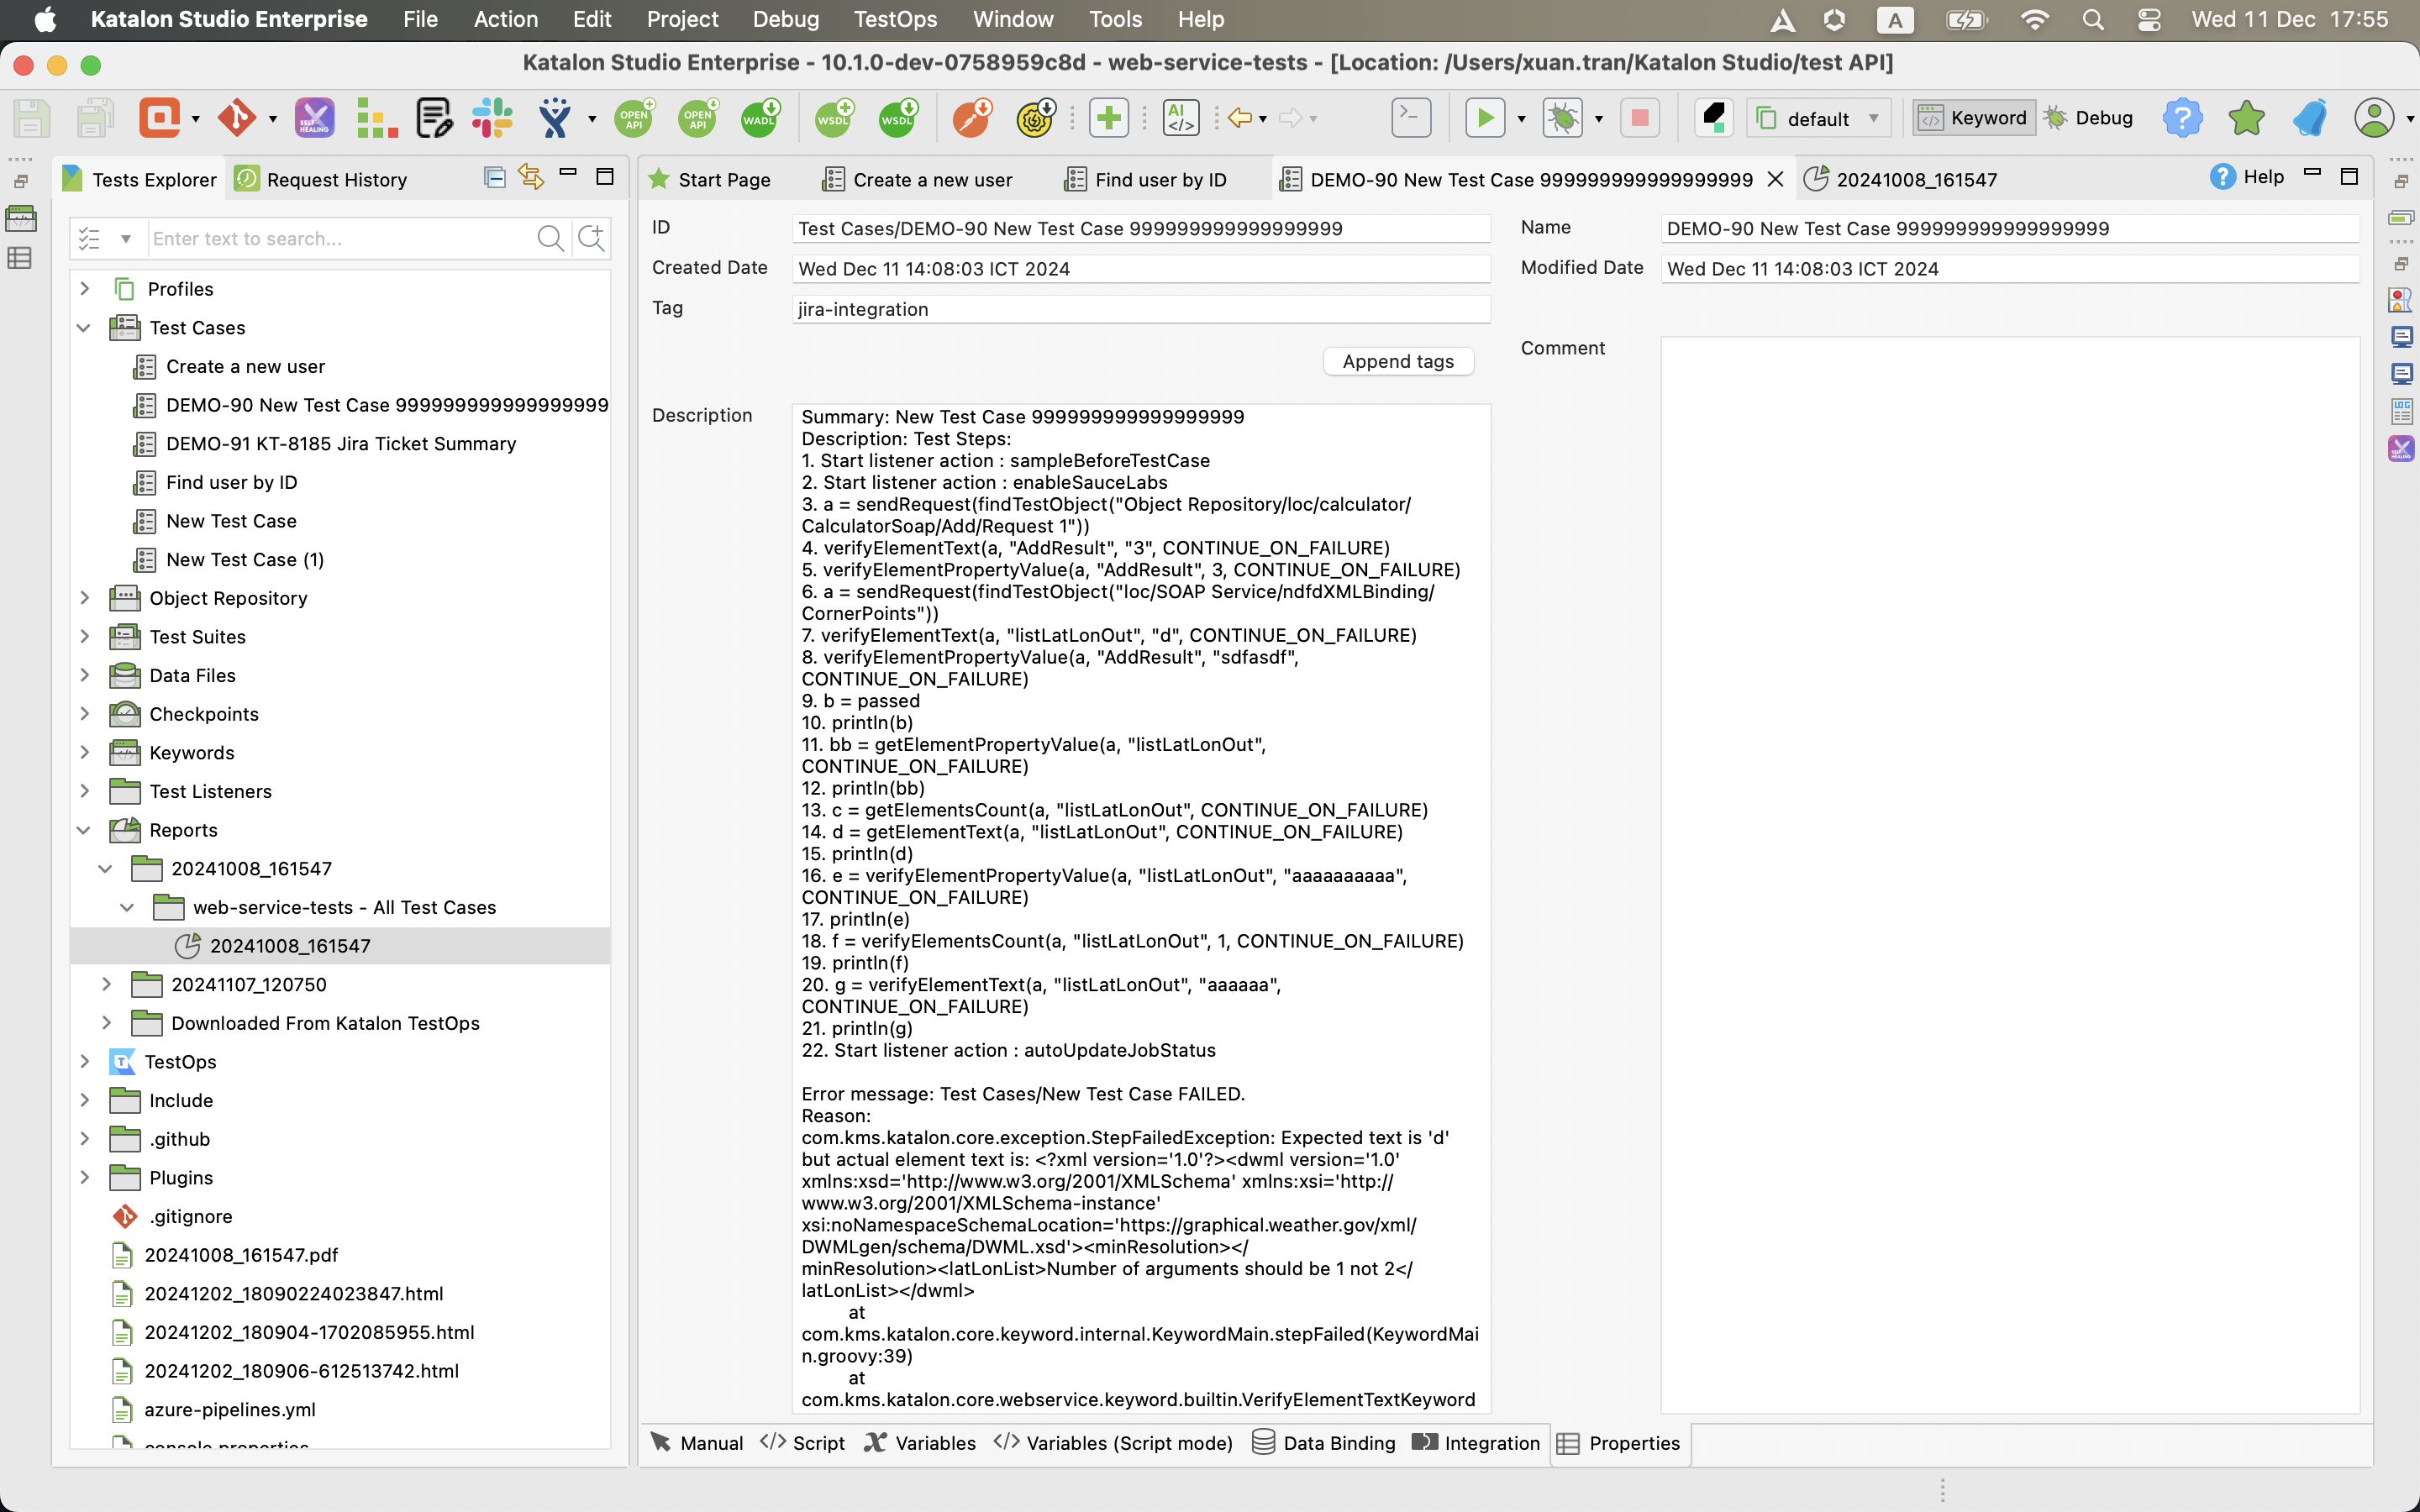
Add and link existing Jira test case
-
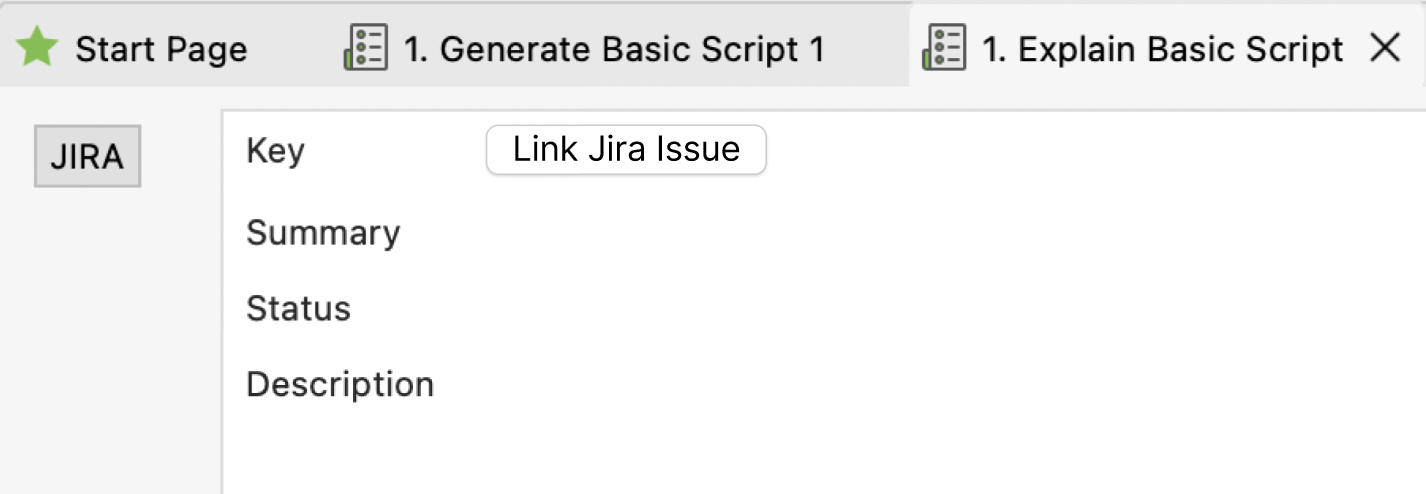
In Katalon Studio, navigate to the Test Explorer and locate to open the required test case.
-
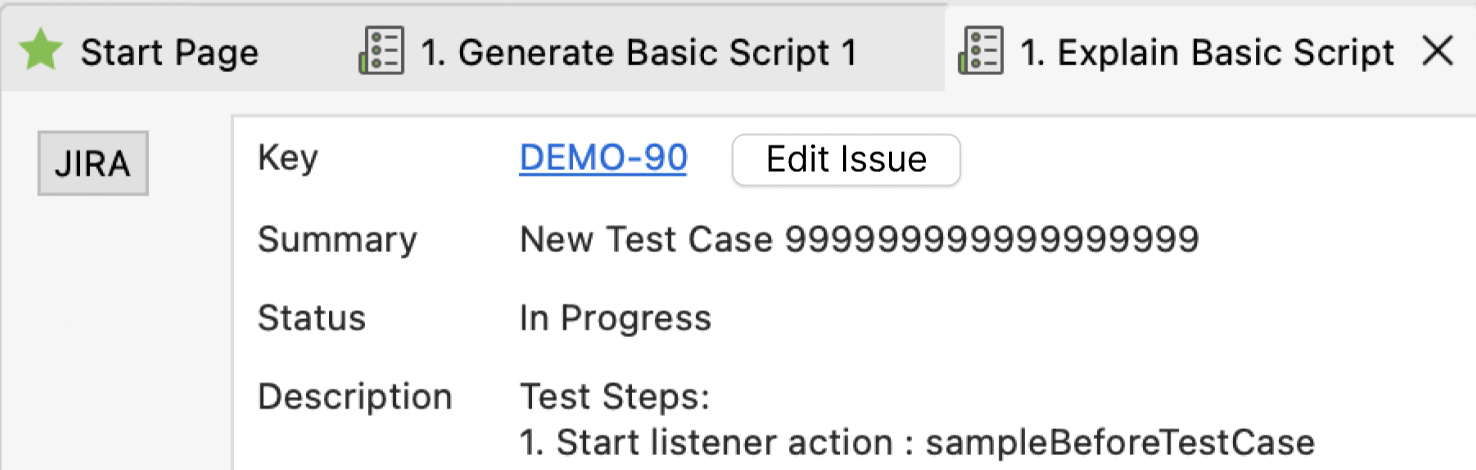
Click on the JIRA integration tab within the test case.
-
To add and link a Jira issue to your test case, click the Link JIRA issue button.
-
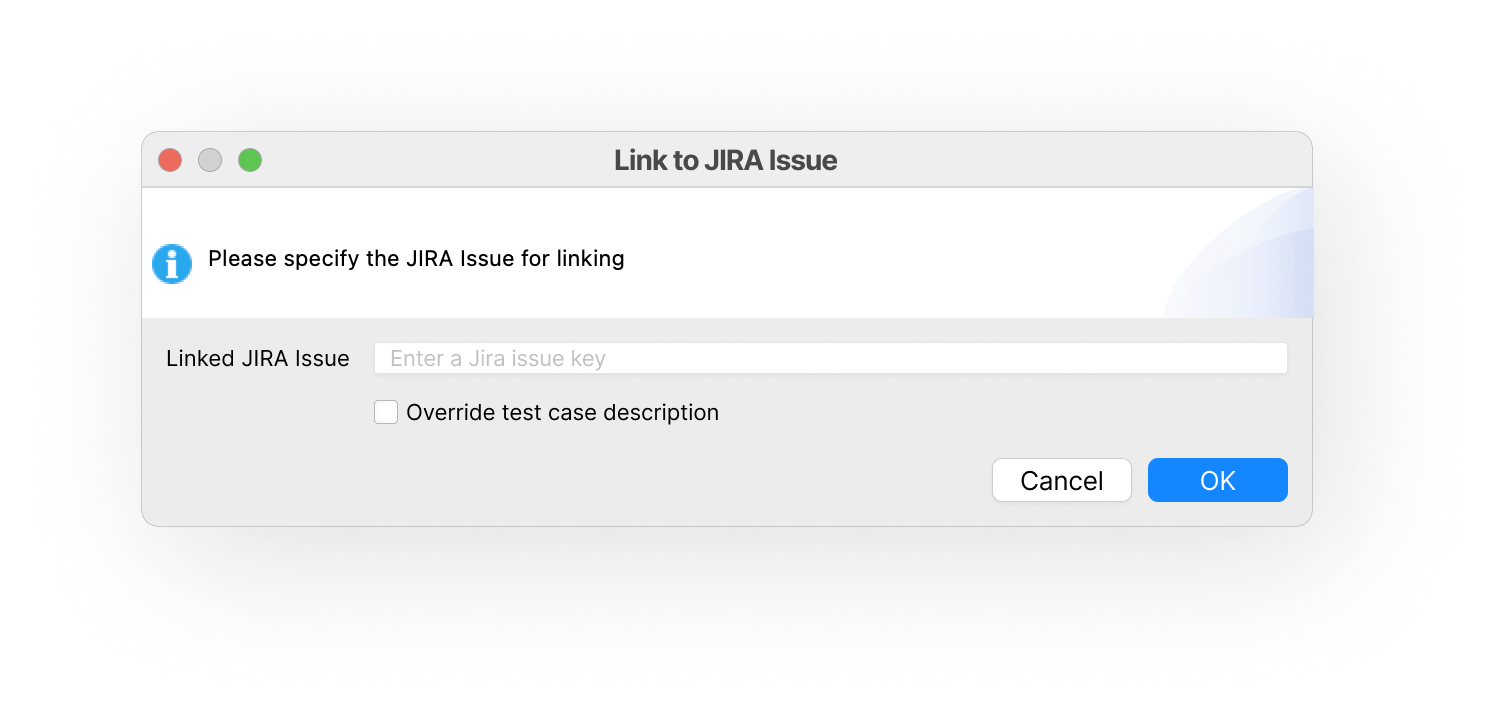
The Link to JIRA Issue dialog opens. Enter your Jira issue key.
-
(Optional) Click Override test case description so you can also edit the test case description.
-
Replace existing test case description in the Property tab with the new description retrieved from the new Jira issue.
-
-
Click OK to apply the changes to the test case.
Troubleshooting
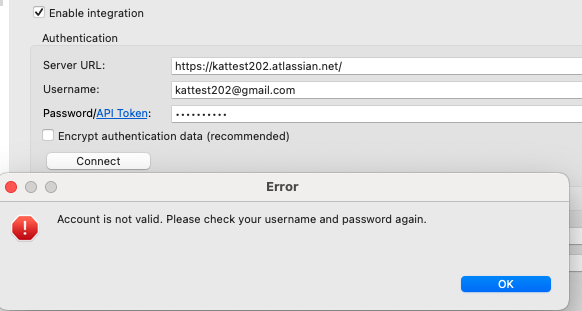
-
[Problem] Account is not valid:
-
[Reason/Workaround] Your Jira credentials are invalid. Please enter the correct username and/or password or contact your administrator for user permission level.
Edit and link existing Jira test case
-
In Katalon Studio, navigate to the Test Explorer and locate to open the required test case.
-
Click on the JIRA integration tab within the test case.
-
To add and link a Jira issue to your test case, click Edit JIRA issue.
-
The Link to JIRA Issue dialog opens. Enter your new JIRA issue key.
-
(Optional) Click Override test case description so you can also edit the test case description.
- Replace existing test case description in the Property tab with the new description retrieved from the new Jira issue.
-
Click OK to apply the changes to the test case.
Troubleshooting
- [Problem] Jira issue cannot be found:
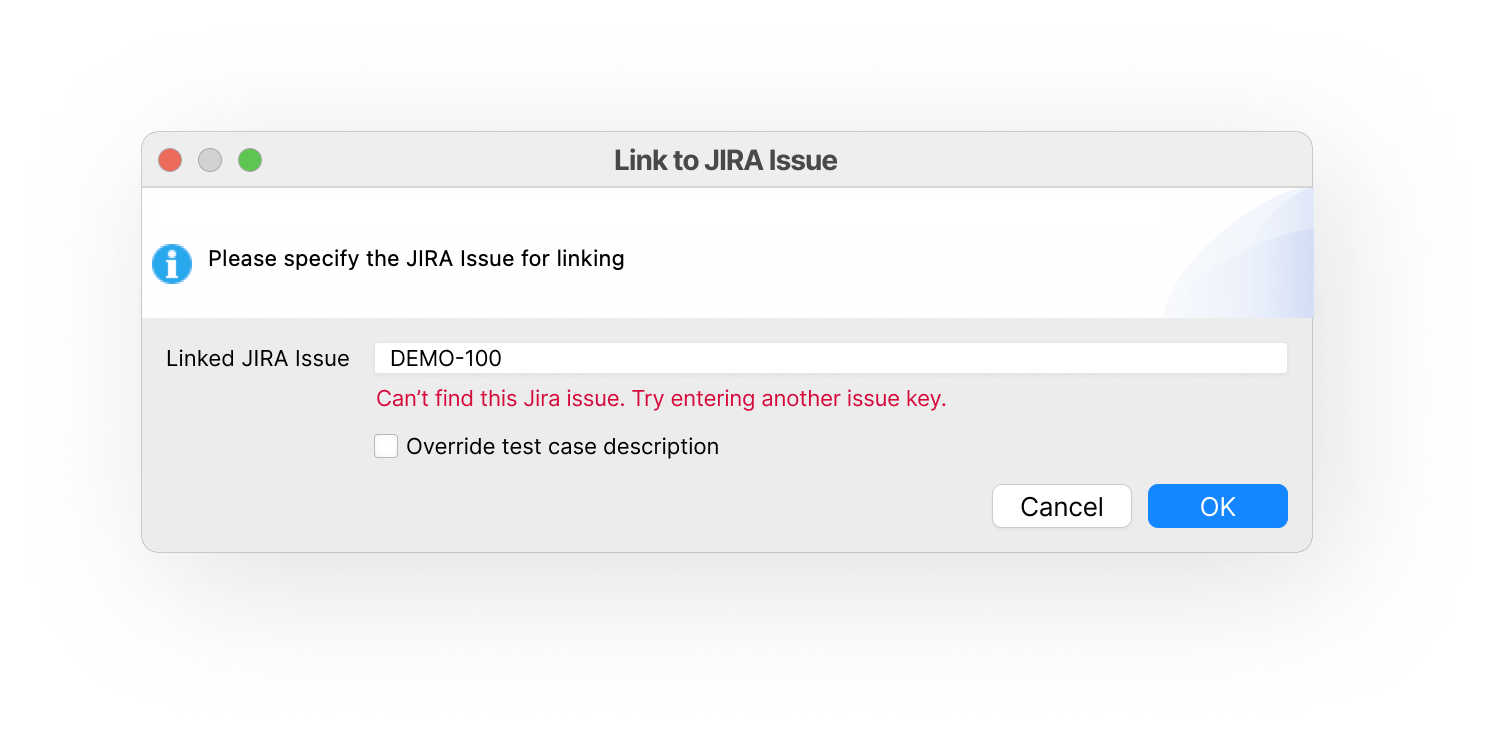
- [Reason/Workaround] You have either entered the wrong issue key or the Jira issue is no longer available from your fetched account. Ensure that you have entered the correct Jira issue key.
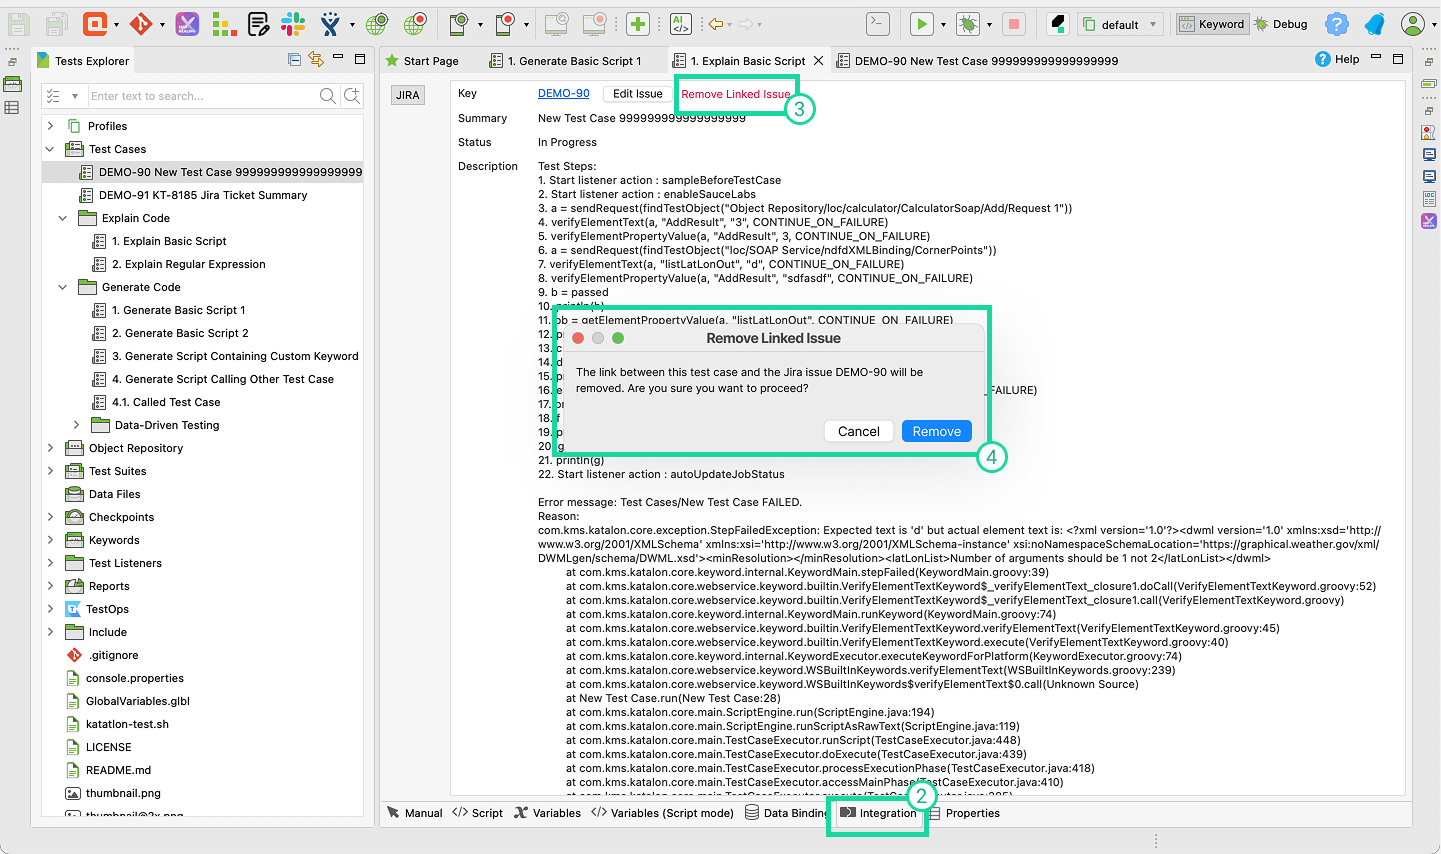
Remove a linked Jira issue
- In Katalon Studio, go to the Test Explorer and find the test case you want to update.
- Click on the Integration tab.
- Select Remove Linked Issue.
- When the confirmation dialog appears, click Remove to confirm.
Import BDD custom fields from Jira to Katalon Studio (Applicable to Jira Cloud integration)
Katalon Studio allows you to pull test cases from Jira and link Jira issues to Katalon. Follow these steps:
-
From the Katalon toolbar, select Jira > Import Test Case from JIRA JQL. An Import Test Case from JIRA JQL dialog opens.

-
In the open dialog, fill the JIRA Query Language (JQL) script of the desired test case in the Jira JQL box. To find out the JQL script of your test case, you can refer to the Atlassian document here: Search for issues using JQL.
For example, we want to import test cases from the TDAP project with Bug type and Complete status. After searching for the Jira ticket using the JQL query, copy and paste the JQL script into the Jira JQL box.
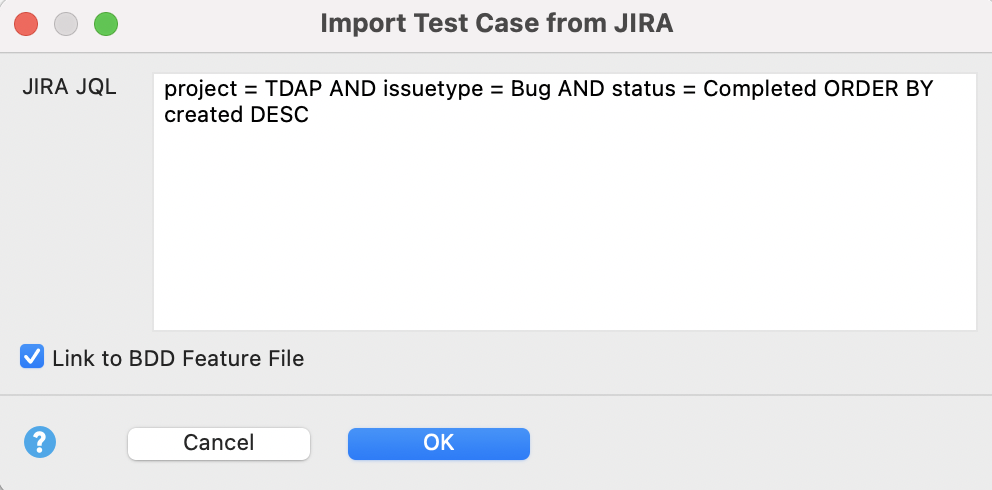
-
[Optional] By default, the Import BDD feature files box is selected. This option allows you to import BDD feature files to run BDD tests. In case you don't want to run BDD tests, uncheck this option.
-
Click OK.
-
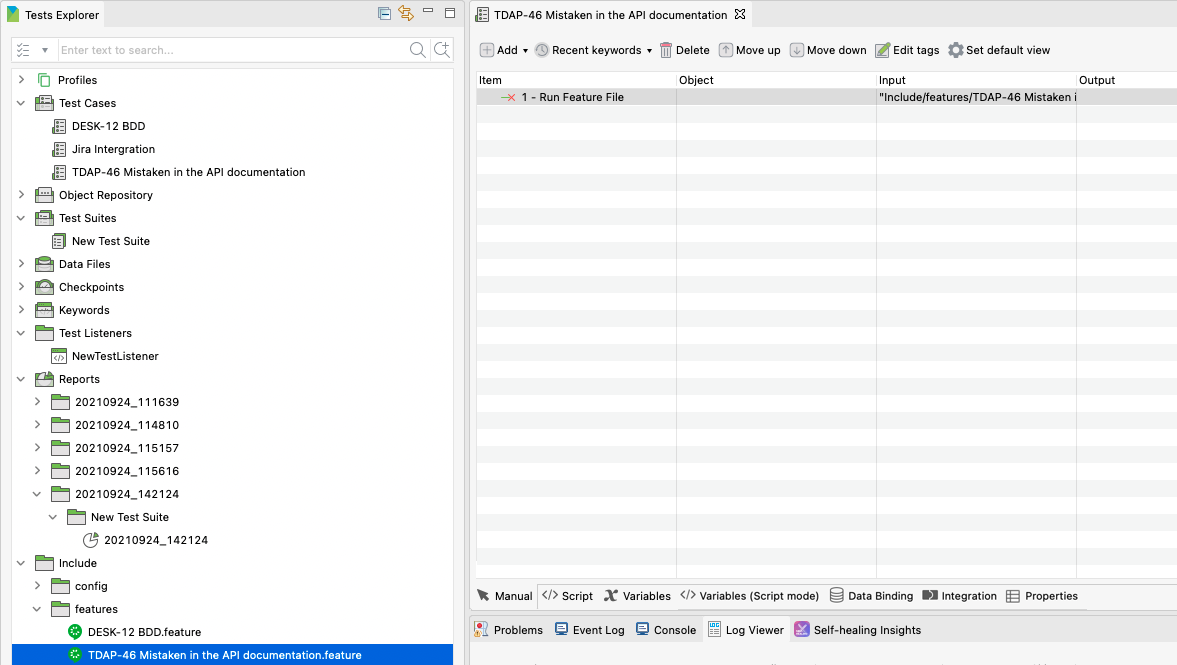
The Test Case Folder Selection dialog opens. Select the destination to store the issues. Click OK.
-
A Jira Issues dialog opens. Click OK to import the test case from Jira.
You can only import test cases from a Jira ticket once. You can not repeat this action.
Once done, you can see a new test case in Katalon Studio with the following information:
- The test case name is the Jira ticket summary/subject.
- The test case description is the Jira ticket content.
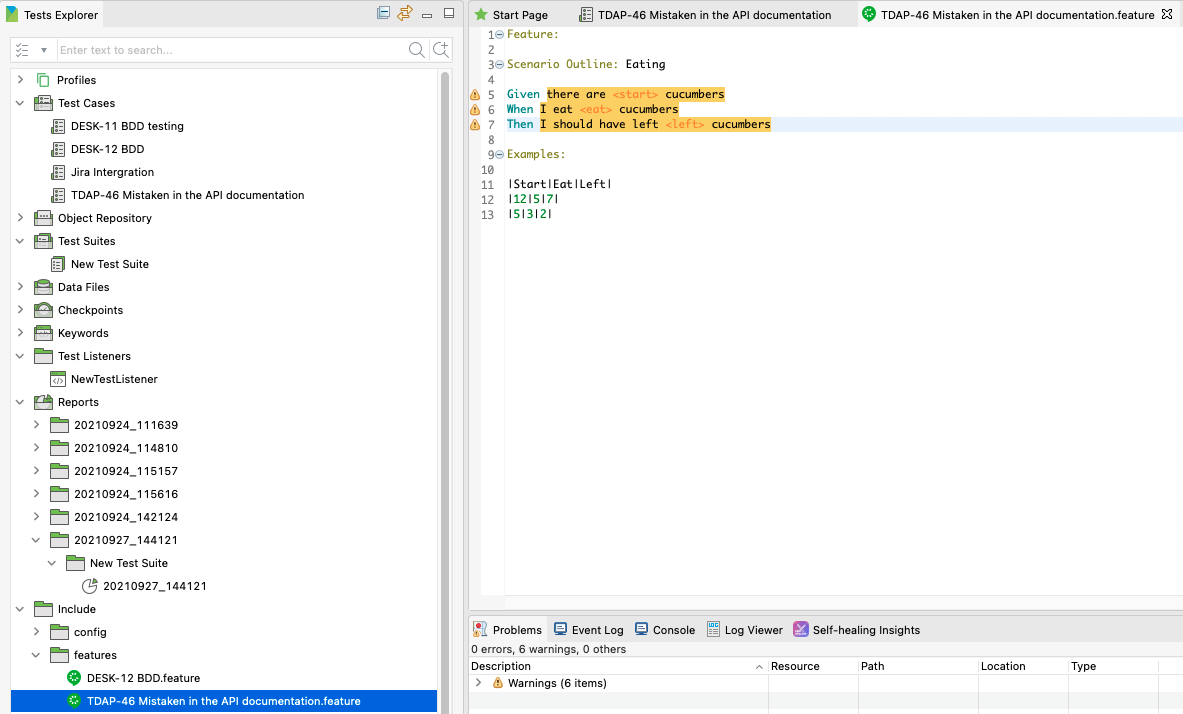
- If you select Import BDD feature file as in step 3, Katalon Studio creates a new corresponding feature file in Include/Feature with the following information:
-
The feature file name is the same as the test case name.
-
The scenario in the feature file is the scenario specified in the fetched BDD custom field of the imported Jira ticket.
-
You can continue to add additional steps in the test case as needed. Then click Run for playback.
After importing test cases from Jira to Katalon Studio, you can view test results and submit tickets to Jira.